Whether you’re decorating sugar cookies for Christmas, or as a heartfelt birthday party favor, you’re going to need the perfect easy sugar cookie icing recipe.
Many icing recipes use hard to find ingredients, are flavorless, or are hard to work with. But not anymore! After years of testing, we’ve finally found the perfect sugar cookie glaze.
Keep reading to find out all the tips for making a tasty icing that uses only a few simple ingredients. We’ll even show how to adjust the consistency for your needs, and a fun cookie decorating tip that will make you look like a pro!
Why I love this Sugar Cookie Icing
- This sugar cookie icing hardens into a beautiful glossy finish that’s sturdy enough to be stacked high on a plate or wrapped up as a tasty gift.
- You can quickly and easily adapt this recipe to fit your needs – from a thick icing perfect for piping to a thin icing for dipping.
- The end result on your cookies is similar to royal icing. But, unlike royal icing, it’s totally forgiving, adaptable, and not finicky at all.
- This icing uses easy-to-find ingredients that you probably already have in your pantry.
- It comes together in only a few minutes, which means impatient kids (or adults) can get decorating almost right away.
What You’ll Need:
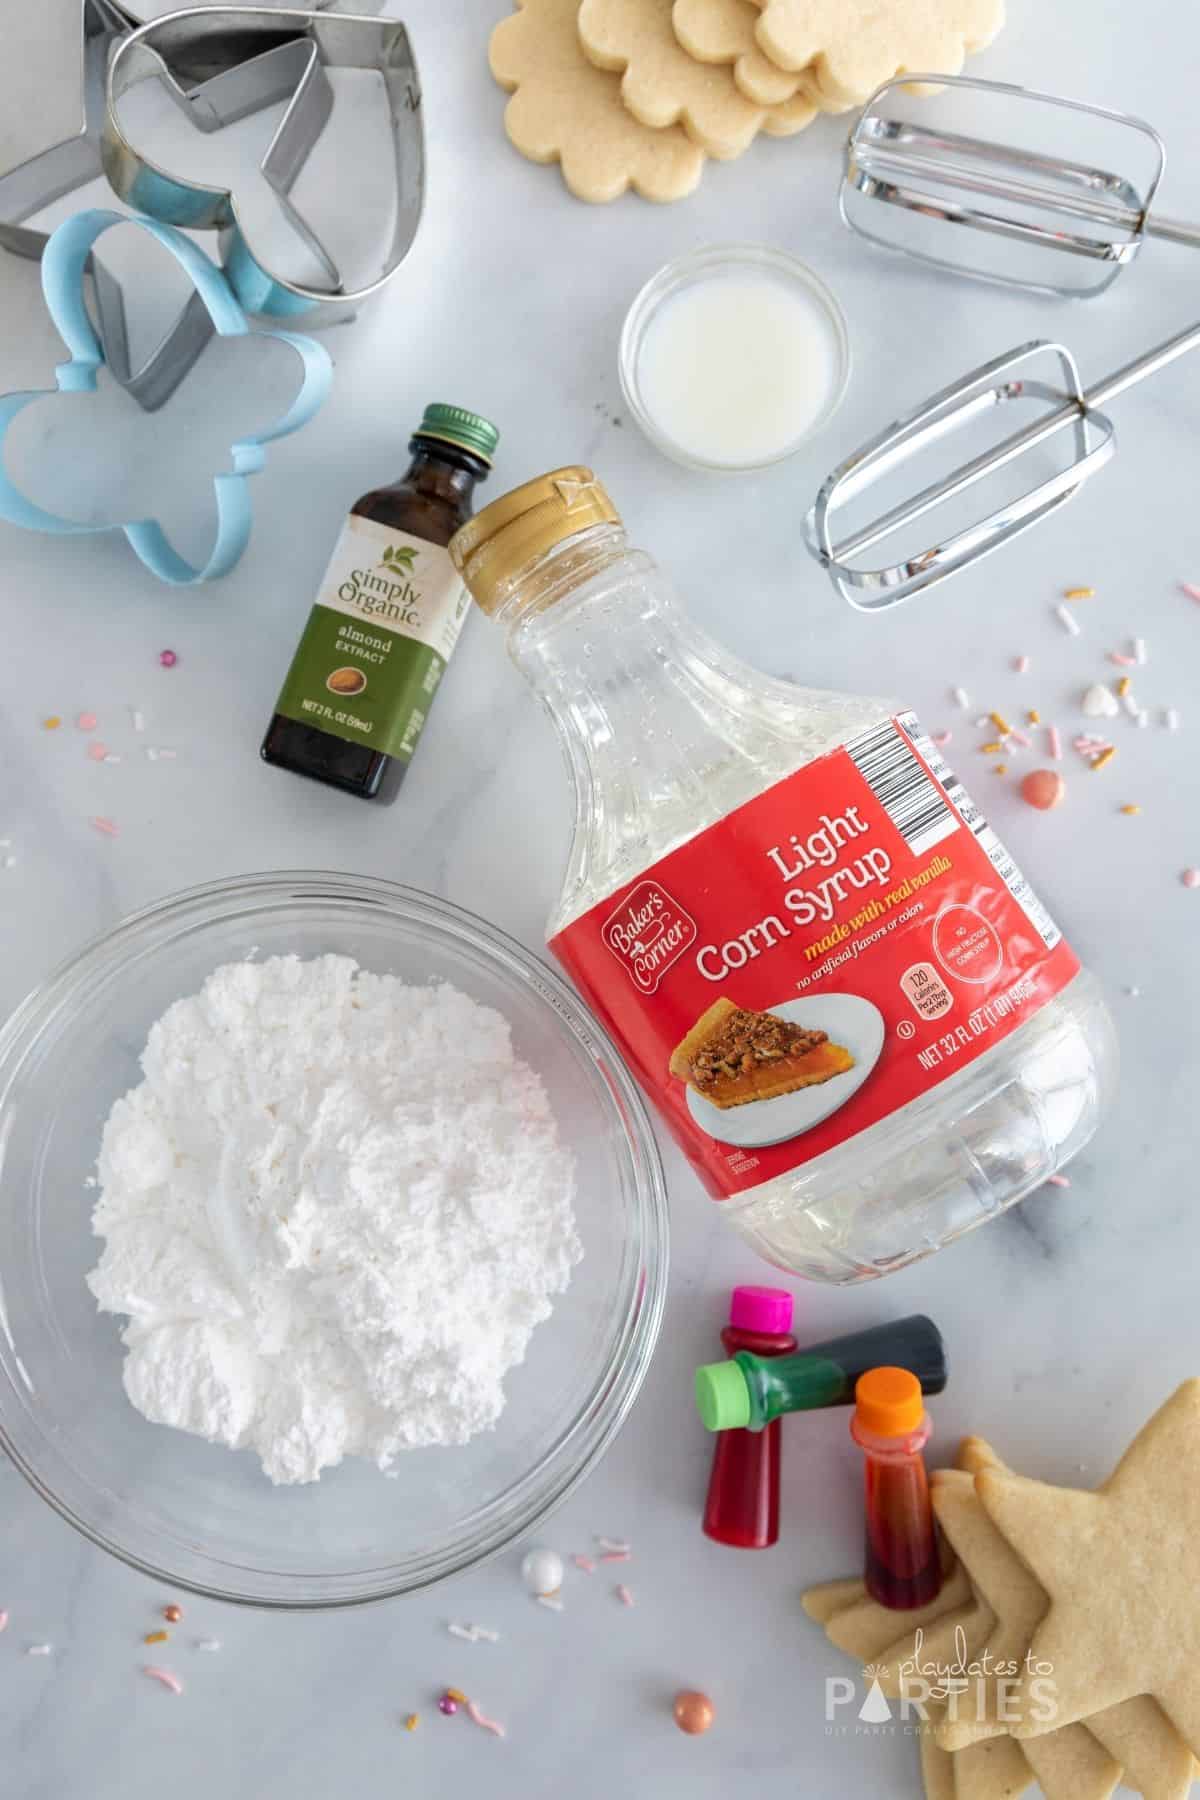
Ingredients:
- Powdered sugar
- Milk
- Light corn syrup
- Almond extract (optional)
- food coloring (optional)
- Sprinkles (optional)
Supplies:
- Large bowl
- Electric Mixer or Kitchen Aid Stand Mixer
- Piping bags and piping tips (optional)
- KitchenAid Pouring Shield/Splash guard (recommended)
A Few Notes about the Ingredients and Supplies:
Almond extract is optional, but adds a yummy flavor to the glaze.
Corn syrup is what makes this cookie glaze harden with a beautiful glossy sheen.
This icing will dry white, but if you want to make colorful decorations you can use food coloring or sprinkles.
Step-by-Step Directions:
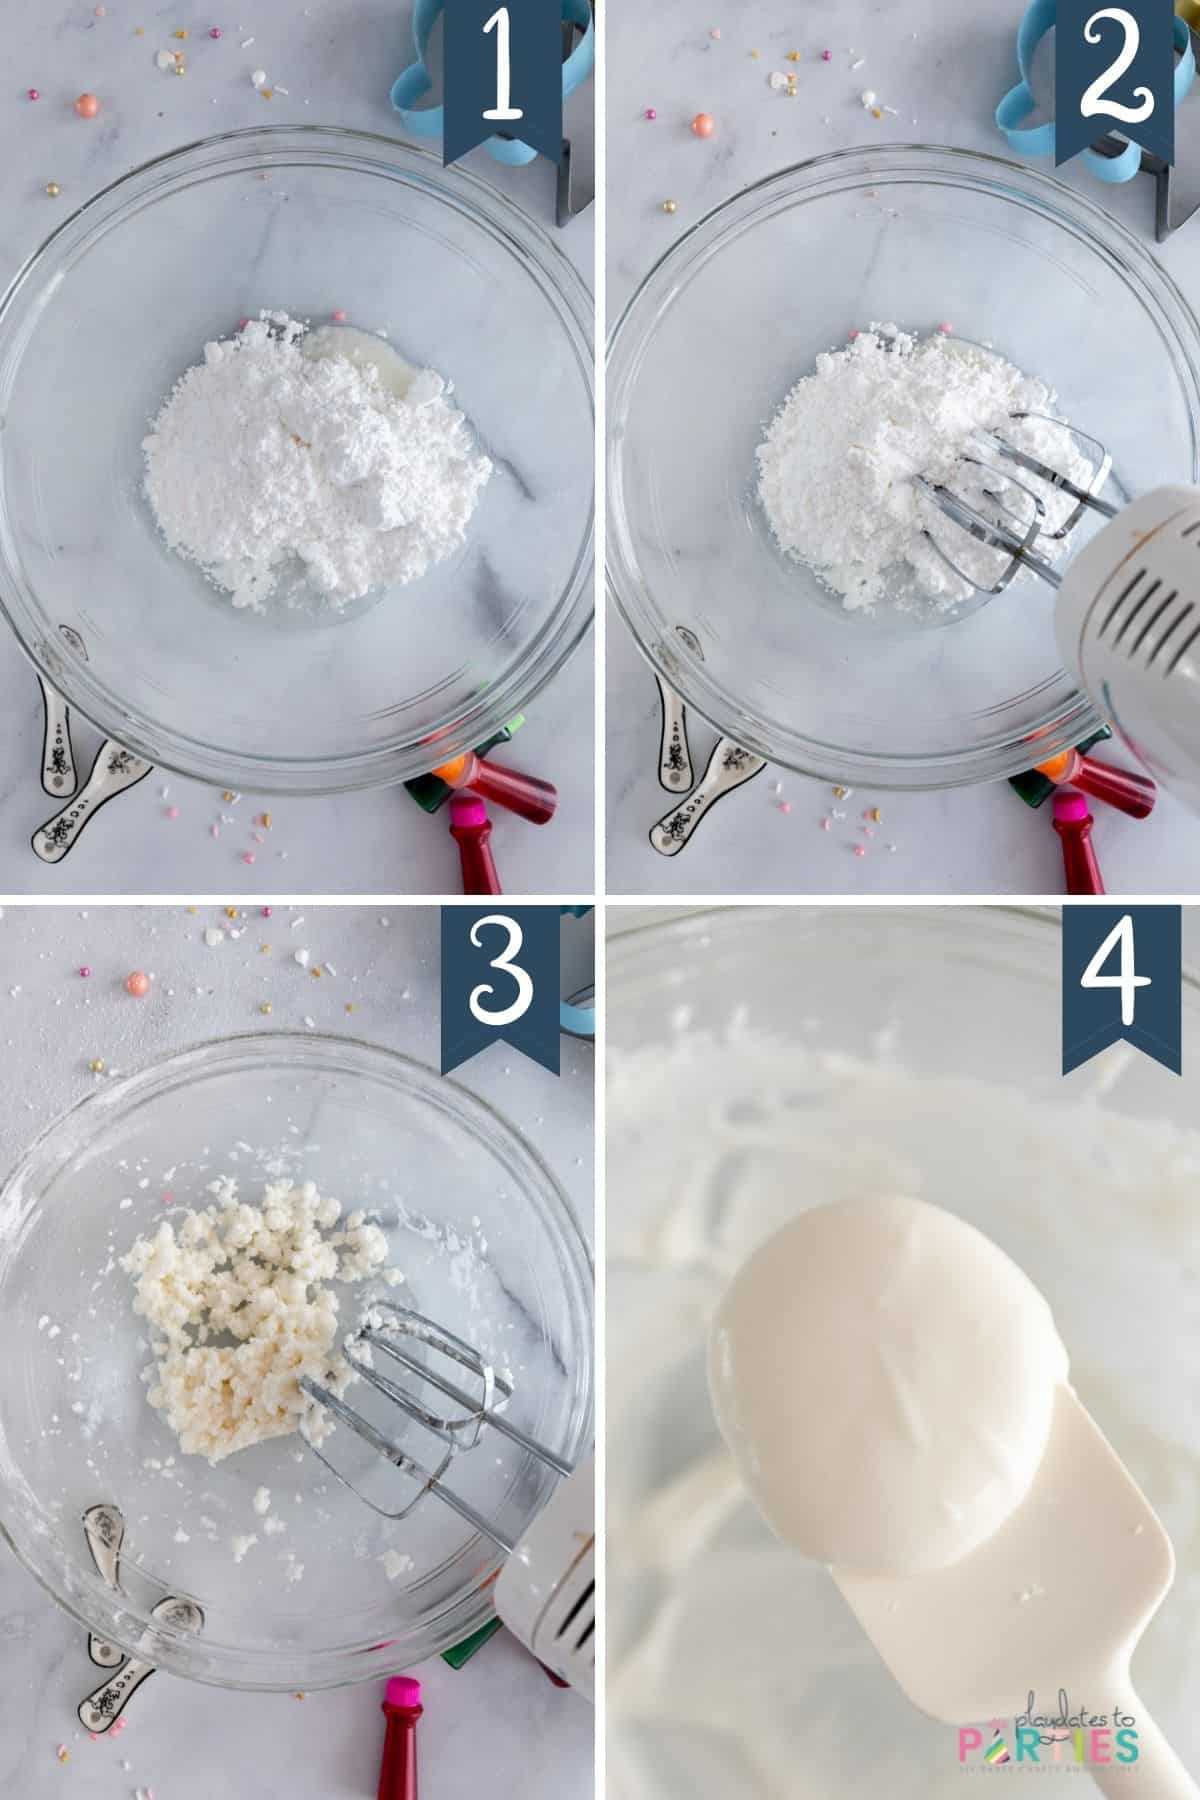
To make things even easier for you, I created a simple step by step guide below. The recipe card below provides the specific measurements, but this is where you’ll get all the detailed information necessary to achieve the consistency you’re looking for.
There are two ways to make this sugar cookie icing:
Method 1: Dry ingredients first (shown above)
Add all your powdered sugar, corn syrup, and extract to a large bowl and then use an elecric mixer to combine the ingredients while adding about 1/4 tsp of milk at a time until you reach your desired consistency.
Method 2: Wet ingredients first
Place all the wet ingredients (corn syrup, extract, milk) in a large bowl with a couple tablespoons of powdered sugar. Then use an electric mixer or fork to combine the ingredients. Slowly add a half tablespoon of powdered sugar to the mixture at a time until you reach your desired consistency.
Which method is better?
Both methods work, but I tend to switch between them depending on the result I’m looking for:
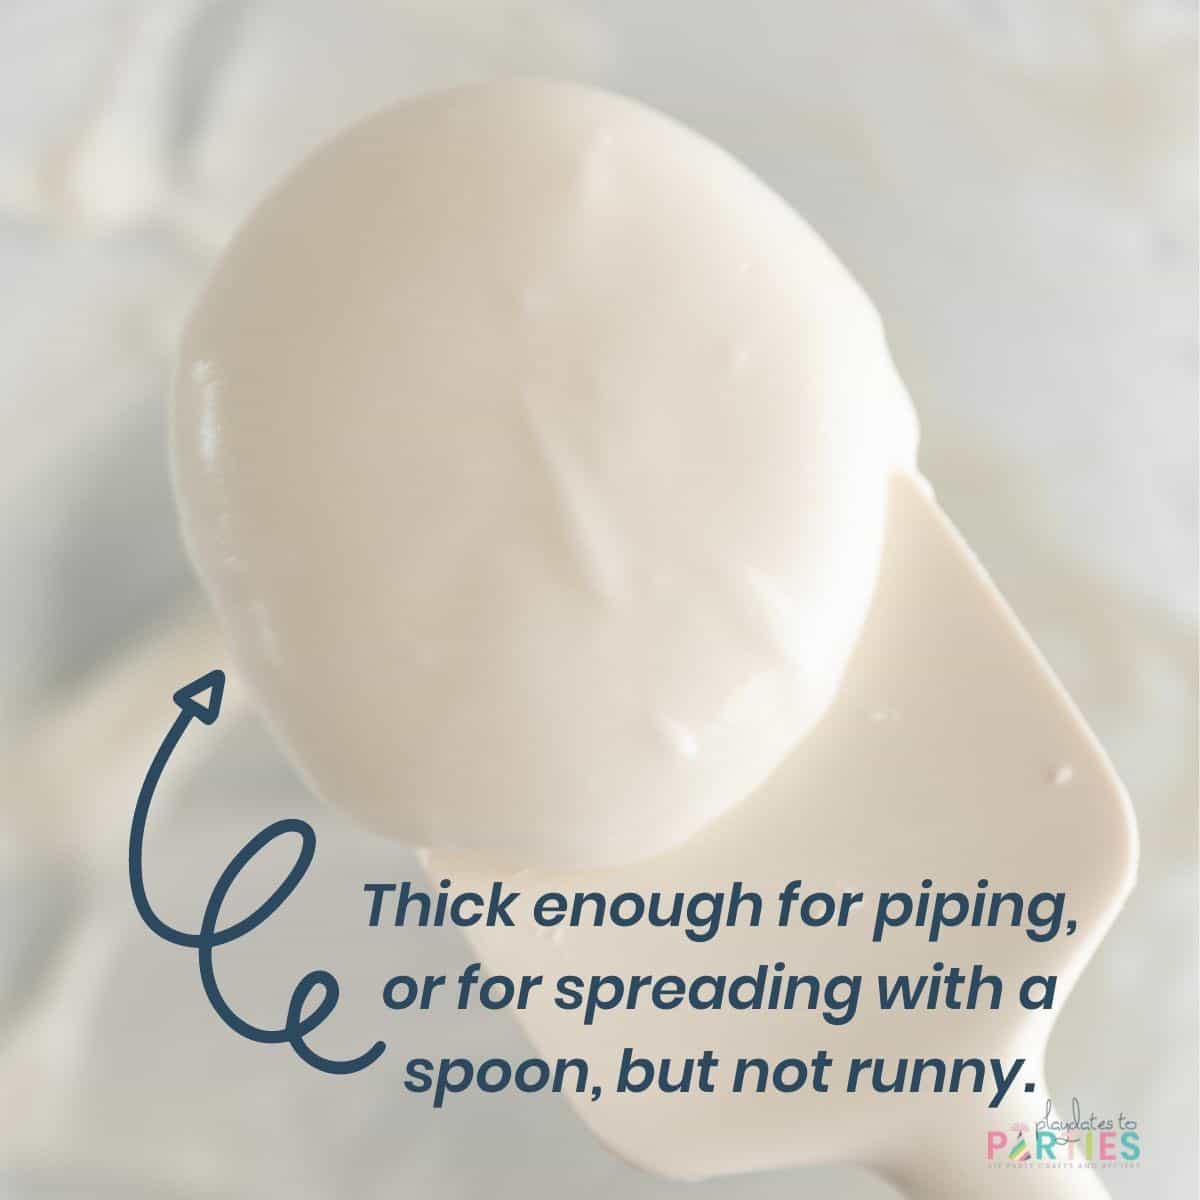
- For thicker icing that’s piped or spread with the back of a spoon, I tend to use the dry ingredient first method.
- For thinner icing to dip cookies or flood a piped outline, I prefer to use the wet ingredients first method.
The important thing to remember is that you don’t want to add all of the ingredients to your bowl at once. You need to build up either from a wet consistency or a dry consistency.
Essential Tips:
Don’t skip these tips – read them before baking to avoid any potential mistakes.
I strongly recommend using an electric mixer
While you can mix this icing with a fork or whisk, it will be difficult. Which is why I recommend using an electric mixer.
You can use either a hand mixer or a stand mixer fitted with a whisk attachment, but you’re more likely to have a powdered sugar cloud with a hand mixer. That’s why I love my Kitchen Aid with the pouring shield and splash guard.
Use the sugar cookie icing quickly
The only unforgiving aspect of the sugar cookie glaze recipe is that it starts to dry out within a couple minutes. You’ll need to use the icing quickly and stir it regularly to prevent a film from developing on top.
If the glaze starts to harden before you’re ready, you can soften it up again by stirring a few drops of milk into it.
FAQs:
Can I make this without corn syrup?
Technically, yes you can. When I was a kid we would always make our glaze with nothing but powdered sugar and milk.
BUT, I found that making cookie icing without corn syrup doesn’t harden as well, and doesn’t have that pretty, glossy finish.
How much milk will I need?
Like many things in life the answer to this question is..it depends.
- For piping nice firm lines: I like to use about 2 teaspoons of milk
- To make a thick spreadable glaze: You’ll need between 2.75 and 3 teaspoons of milk.
- For dipping or flooding: You’ll need at least 4 teaspoons (1 1/3 tablespoons) of milk. You’ll know it’s right when the icing drizzles smoothly off a spoon, but isn’t runny.
Other factors will affect how much milk you need, such as the humidity in the air, and whether you use high fat milk or lower fat like 1% or 2% milk.
How long does it take for the icing to harden?
This also depends on how thick you make it. I recommend you give at least 3 hours for the cookies to dry, but it’s best to let them dry overnight if you’re going to stack them or give them away as gifts.
Bonus Tip: How to Decorate Cookies When You’re Not Artistic
While you can certainly use this sugar cookie glaze with a bunch of colors to pipe beautiful designs on your treats…what I love about it is that you can use the glaze for beautiful decorations even if you’re not a trained pastry chef. (I’m definitely not!)
Here’s an awesome (and super easy!) trick to take your sugar cookie decorations to the next level:
- Mix the icing to be a thicker consistency. You want it thick enough that you could spread it with a spoon, but not thin enough that it drizzles off the back of the spoon.
- Prepare a small, shallow plate with your sprinkles of choice.
- Pipe a thin line of icing around the edge of your cookie. You can also add a few decorative lines here and there, but don’t go overboard.
- Quickly ‘dip’ the icing side of your cookie into the sprinkles.
Voila! You have a cookie that looks fantastic, and it doesn’t take any skill at all.
Giving your sugar cookies away as gifts? Don’t forget to add a cute printable tag to your tin or favor bag so everyone will know that you made these amazing cookies.
Which Cookies Should I Use This Icing on?
You can use this glaze on any cookie that calls for icing or glaze. Here are our favorite recipes to use with it:
- Perfect Cut Out Sugar Cookies – This is the ultimate recipe for sugar cookies that are slightly crispy on the edges and soft on the inside
- Ornament Sugar Cookies (coming soon!) – Turn your favorite sugar cookie recipe into adorable ornaments for a mini Christmas tree.
- Lemon Cake Mix Cookies – With the addition of lemon extract and a bit of lemon juice, this glaze takes lemon cake mix cookies to a whole new level.
- Melting Snowman Cookies – This sugar cookie glaze is the perfect easy icing to make what looks like a melted snowman puddle on the top of your cookie.
Adaptations and Substitutions
Thankfully there are only a few ingredients to make this easy sugar cookie icing, but there are some adaptations and substitutions you can make based on your need or preference.
- Dairy products, like milk or cream will produce the best flavor with this glaze, but I know some people will use water in a pinch.
- If you don’t like almond extract, or have allergy concerns, then you can also use clear vanilla extract if you want a white finish. If you’re using food coloring with your cookies, then regular vanilla extract will be fine.
Storage Tips
This icing must be used on the same day it’s made, but here are some tips for storing your cookies and baked goods that you decorate with it:
- Make sure the icing is completely hardened before packaging or stacking your cookies. It will appear dry long before it is fully hardened, so be sure to allow plenty of time.
- Store iced cookies and treats at room temperature. The humidity in the refrigerator will make the icing soften again and will dull the finish.
If you liked my easy sugar cookie icing, you’re going to love my homemade caramel sauce. With the help of the instant pot, you can enjoy buttery, delicious caramel sauce in less than an hour.
Or you can check out my other desserts right here.
Easy Sugar Cookie Icing

In only five minutes, you can make this delicious easy sugar cookie icing. It hardens to a glossy finish and is perfect for gifts or holiday treats!
Ingredients
- 1 cup powdered sugar
- 2-4 teaspoon milk
- 2 teaspoon light corn syrup
- 1/4 teaspoon almond extract
- Food coloring (optional)
- Sprinkles (optional)
Instructions
- Add powdered sugar, corn syrup, extract, and 1/4 teaspoon milk to a large bowl.
- Use an electric mixer to combine the ingredients until well mixed. (Mixture may be lumpy or grainy.)
- Continue adding 1/4 teaspoon milk at a time until until you reach your desired consistency.
Notes
Remember, the step-by-step photos and FAQ in the recipe post are there to help you if you feel stuck at any point.
Ingredients:
- It is not uncommon for the mixture to appear quite dry and crumbly at first. Eventually, and as you add a small amount of milk to the mixture it will smooth out and come together.
- For piping firm lines: I like to use about 2 teaspoons of milk
- To make a thick spreadable icing, you'll need between 2.75 and 3 teaspoons of milk.
- For dipping or flooding, you'll need at least 4 teaspoons (1 1/3 tablespoons) of milk. You'll know it's right when the icing drizzles smoothly off a spoon, but isn't runny.
Wet Ingredients First Method:
(Best when you want a thinner icing for dipping cookies)
Place the corn syrup, extract, and milk in a large bowl with a couple tablespoons of powdered sugar. Then use an electric mixer or fork to combine the ingredients. Slowly add a half tablespoon of powdered sugar to the mixture at a time until you reach your desired consistency.
Recommended Products
As an Amazon Associate and member of other affiliate programs, I earn from qualifying purchases.
Nutrition Information:
Yield:
16Serving Size:
1 tablespoonAmount Per Serving: Calories: 31Total Fat: 0gSaturated Fat: 0gTrans Fat: 0gUnsaturated Fat: 0gCholesterol: 0mgSodium: 1mgCarbohydrates: 8gFiber: 0gSugar: 8gProtein: 0g
__________________________________ The nutrition information provided above is estimated using an automated calculation system. Actual nutrition will vary depending on brand and measurements used in your recipe. To obtain the most accurate representation of the nutrition information for any given recipe, you should calculate the nutritional information using the actual ingredients you used in your recipe.










Leave a Reply