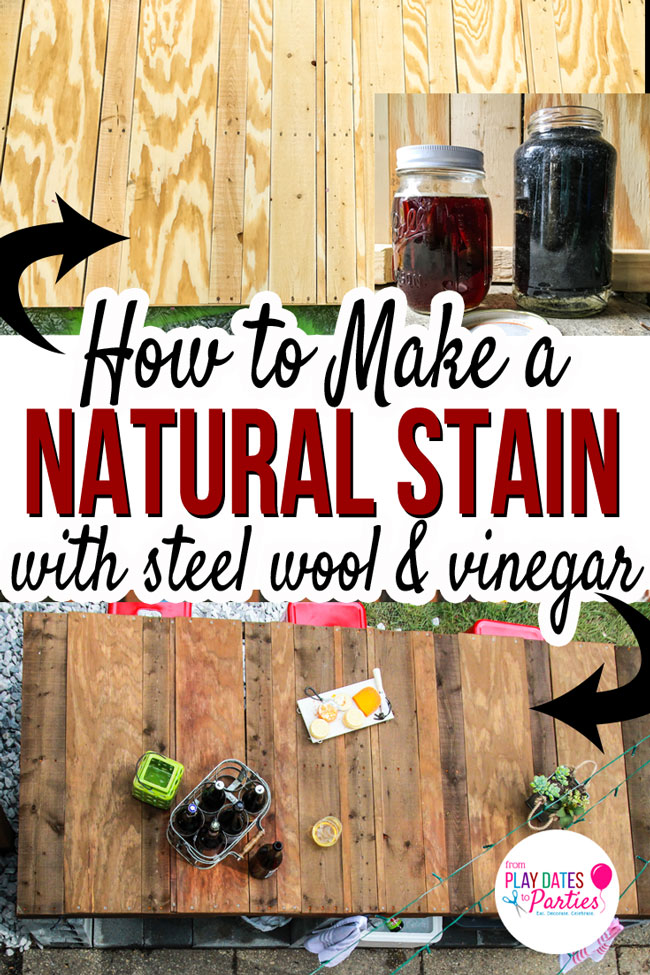
Get all the details on staining wood with steel wool and vinegar. It’s a gorgeous way to naturally get that reclaimed wood look!
Have you ever read a blog post or article that stuck with you years later?
It might not even be about anything truly deep or earth-shattering, but you never seem to quite forget about it.
For me, it was a random DIY post on staining a wood tabletop with steel wool and vinegar.
And when I decided to turn our 7-foot by 3-foot pallet into a tabletop for our outdoor bar, I couldn’t get that natural stain out of my head.
Now, I could have played it safe and used one of the countless cans of leftover paint and stain that is in our garage. But, honestly, I didn’t like the colors.
Our house is trimmed in white and black, and those are the corresponding stain colors we have. But I wanted warm, reclaimed wood tones to contrast with the corrugated steel facade of the bar.
So, inspired, I went in search of that original post…and found it! And in the meantime, I ended up going down the rabbit hole of researching steel wool and vinegar stains.
But the more research I did, the more anxious I got.
You see, there’s a ton of variability with this technique. The final color of your project is going to be affected by any number of factors, including:
- Which type of wood you use,
- The type of vinegar you use
- How much steel wool is in your vinegar solution,
- Whether or not you pre-treat with tea or coffee, and which type of tea or coffee you use, and
- How long the solution sits before you put it on the wood.
If you have the time and the materials, it’s best to test things out with some scrap wood. Or, you can just dive in and hope for great results!
RELATED>>>> How to Make Custom Live Edge Wood Shelves
How does Steel Wool and Vinegar Stain Work?
The reason that there is so much variability with this technique, is because it’s all based on a scientific reaction.
When steel wool and vinegar are combined for an appreciable amount of time, the components start to create an iron oxide. When the iron oxide is brushed onto the wood, it reacts with the tannins in the wood to naturally oxidize the wood, creating a stained effect.
The final color will be a result of how much iron oxide your solution has combined with how much tannin is in your wood.
This is also why many use a pre-treatment with brewed tea or coffee. When added to low-tannin wood (like pine), the tea and coffee increase the tannins to create a deeper result.
My experience staining wood with steel wool and vinegar:
With this project, I had three major challenges:
- Time. The One Room Challenge deadline was approaching, and I didn’t have time to wait for the solution to come together properly.
- Weather. This pallet was HUGE, and we’ve practically been living in monsoon season here. So, I was working in a narrow area of our garage to get this done.
- Unknowns. I had no idea what type of wood was used to make the pallet I was staining, so there was no way to predict the final result without some testing. That combined with the time limit made this a real nail-biter!
Challenges aside, I was committed to the project. And it was excited, even if it was nerve wracking.
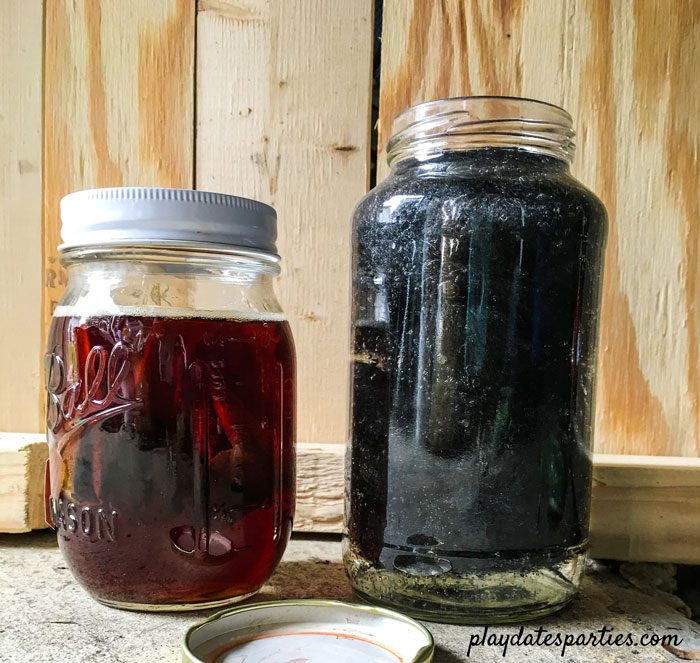
So, one night, I broke apart 1.5 steel wool pads (most recipes only use one pad), and placed them in a leftover pasta sauce jar. That got covered with white vinegar and then left to do it’s thing.
Just over 24 hours later, my impatience got the better of me. I brewed a VERY strong batch of 5 black chai tea bags in a mason jar and started prepping the pallet.
Thank goodness the pallet was large enough to do plenty of testing on the underside.
Panic, and Second-Guessing
I painted some tea on one area of the pallet and then tested the vinegar solution with and without the tea base.
That’s when the panic set in.
The places with the tea solution were black, the pine plywood had a strange black and yellow zebra effect, and the tea-free areas were hardly changed at all!

After a few minutes of pouting, I calmed down and decided to give the steel wool and vinegar solution another day to soak.
But this time, I left the lid off, in hopes that it would help create more iron oxide. (After all air=oxygen, and oxide is a combination of oxygen with other components, in this case iron)
The good news is, that it only took about 30 minutes to paint the tea solution on the entire pallet, which was left to dry overnight.
The next day I went out and tested a small area again.
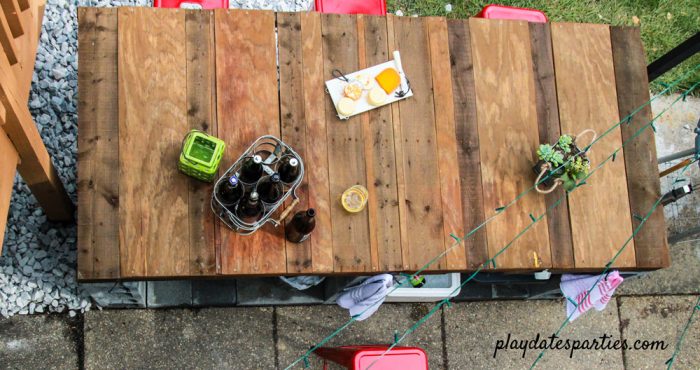
This time, a silver-brown color started to develop immediately. Talk about relief! And as I worked, the colors changed further to a richer shade of brown.
The alternating boards of whatever the pallet is made of and the plywood I used to fill in the gaps means there are slight differences between each board, which makes the pallet truly look like a reclaimed wood creation instead of something perfectly manufactured.
I totally love it. What do you think?
How to Stain Wood with Steel Wool and Vinegar
If you’re ready to give this technique a try, here are your step-by-step instructions!
Materials:
- #0000 Steel Wool
- Vinegar (White, Balsamic, or Apple Cider)
- Mason Jars or Leftover Glass Jars
- Brewed Tea or Coffee
- Inexpensive chip brushes
Directions:
- At least 48 hours before you want to stain your wood, break apart a pad of steel wool and put it into a jar. If you want to stain your wood sooner, leave the jar open. Otherwise, you can leave the jar closed for up to 5 days.
- While your solution sits, prepare your wood by sanding it down well. Every once in a while, give the solution a little stir or shake to help break up the steel wool.
- If you have a low tannin wood, like pine, paint the wood first with brewed tea or coffee and let dry completely.
- Strain the steel wool out of the solution to remove the particles, and then paint the remaining solution onto the wood using an inexpensive brush
- Allow the wood 24 hours to fully oxidize and dry. (It’s a lot of fun to see how the color changes over that time!)
- Seal the wood with a polyurethane or other sealer of your choice.
A close-up of the results:

You can see here that some glue in the plywood didn’t absorb the stain (of course), and some boards even took on a reddish tone while others are a rich brown color.
Have Fun with It!
I’m so glad I remembered that old post.
There’s something so exciting about seeing transformations like this take place before your eyes, and to keep experimenting with more an more pieces.
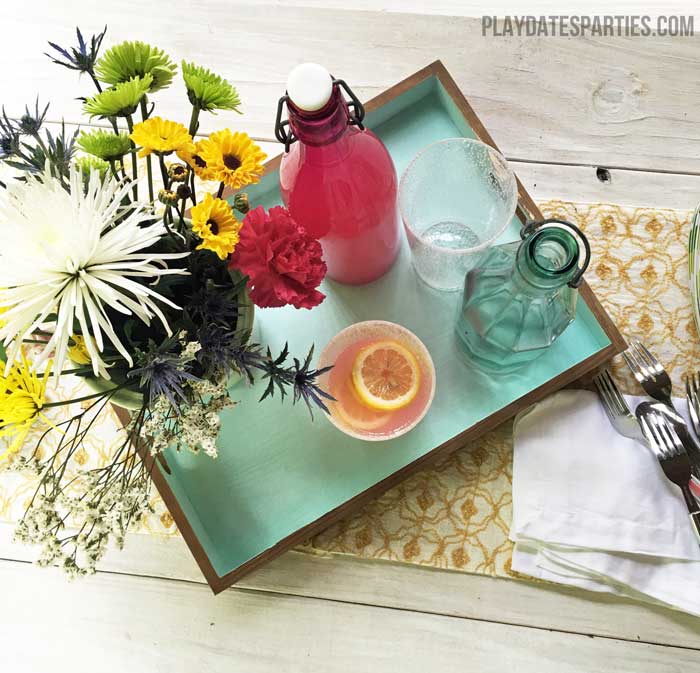
I used some leftover stain on the outside of this unfinished wood tray from Target. Isn’t it just perfect for summer?
RELATED >>>> How to Make Your Own Chalk Style Paint
Want to Read More? Here are The Best Resources
There’s so much information available on staining wood with steel wool and vinegar. (I know because I spent hours looking at every single post I could find!)
Here are the very BEST articles I read to help you supplement Avoid all that time spent and take a look at these great resources:
- 7 Ways to Make Beautiful Wood Stain by A Piece of Rainbow
- A Deeper Look at Aging Wood with Steel Wool and Vinegar by Snovej
- Aging Wood Instantly by Country Design Style
- Homemade Stain with Steel Wool by The Saw Guy
Have you ever used a natural stain before?
What would you stain with steel wool and vinegar?

Don’t forget to subscribe via
Bloglovin, Facebook, and Twitter,
to get more updates!

[pt_view id=”02aefc87c3″]


Tamara says
This is Cassidy’s next weekend project! You are so timely. He was sand blasting or doing something like that last week. Next week is staining.
Janine Huldie says
So showing this to Kevin, who ironically was just talking about doing something like this, too. So thank you 😉
Jen says
I had no idea this was possible. Wow! I love using natural products to do this. I am hoping to stain some wood for a backyard art project soon. Will be trying this!
Tammy says
Say What?!?!?!!?! I had no idea and am totally trying this! Thank you for the “how to”!
SArah Fuller says
Now this looks very doable. Thanks for the tutorial. Much appreciated.
Helen Fern says
Wow!! This looks like something I need to try! Would love it if you shared on the Pleasures of the NWs DIY linky! https://www.pleasuresofthenw.com/do-it-yourself-linky-party-17/
Charlotte says
I love this. My husband and I are getting into making things out of pallets.
Theresa says
Love this post & the how to.
Thanks for sharing at the #InspirationSpotlight Party. Pinned & shared.
Lisa Silfwerbrand says
Oh Leslie this is soo cool! I have never stained wood this way and would love to try it. I work with wood all of the time so can’t wait to experiment with this. Thanks so much for linking it up to our Bewitchin’ Projects Block Party this past week. You are one of my features tomorrow over at http://www.recreateddesigns.com.
Sherry Nappa says
I never would have thought to use vinegar to age wood. I can’t wait to try it. Thanks so much for sharing your tutorial with us at Merry Monday.
JEnnifer Worrell says
What a cool idea! I am totally sharing this with my husband, the furniture stainer…visiting from the Best of the Blogosphere LInk Party!
Jess says
Such a great tip!!
Would love for you to share this with my Facebook Group for recipes, crafts, and tips: https://www.facebook.com/groups/pluckyrecipescraftstips/
Thanks for joining Cooking and Crafting with J & J!
David Jones says
These would cook up nicely with an insta Pot https://www.instapotguide.com/
Celeste | The Whole Serving says
I have some wood I need to stain, I think I’ll give this method a try.
Thanks
Carol says
I’m allergic to most chemicals but I could do this! Yeah! Thanks for the post.
Renee says
This is an absolutely wonderful idea! I love using things that we already have around the house to do an awesome project. I will definitely remember this trick! #ThursdayFavoriteThings
Mummy and the Mexicans says
I’ve never done anything like this but I’d love to try one day. I have no idea about wood staining, but what an unexpected combination of ingredients, and such great results! I will keep this post in mind and maybe I’ll be inspired to do something! #TwinklyTuesday
lydia says
I tried this on fencing wood without the tea and the effects were more of a cedar color which I used on my bathroom walls.cut the curved edges off and layed them across the wall.the end results were beautiful for my rustic bathroom redo.
Rhonda says
I love this idea. I have a large spool that I was going to chalk paint, but I like this idea better. Please share on my Sunday’s Best linkup.
Julie says
I guess if you are willing to go with the flow and are not super fussy about finishing with an exact shade this is a really fun way to stain your wood. I like the idea of not quite being sure what you are going to get. Pinning ! Thanks for doing such extensive research for us!
candy says
I will have to play around with this and see how I like it. Found you on Simple Homestead Blog Hop.
Teresa says
This sounds like a really good alternative for staining wood. Thank you for sharing the tutorial at The Really Crafty Link Party. Pinned.
Kimberly H. Smith says
Another great post, Leslie! I have been wanting to stain a microwave cart that I have . This would be a perfect way to do it. This post is one of our features for Traffic Jam Weekend going live on Thursday, June 7th. Thanks for sharing!