The right backdrop frame is an essential part of a well-designed party. This DIY backdrop frame is so easy to build and store, why would you make any other?
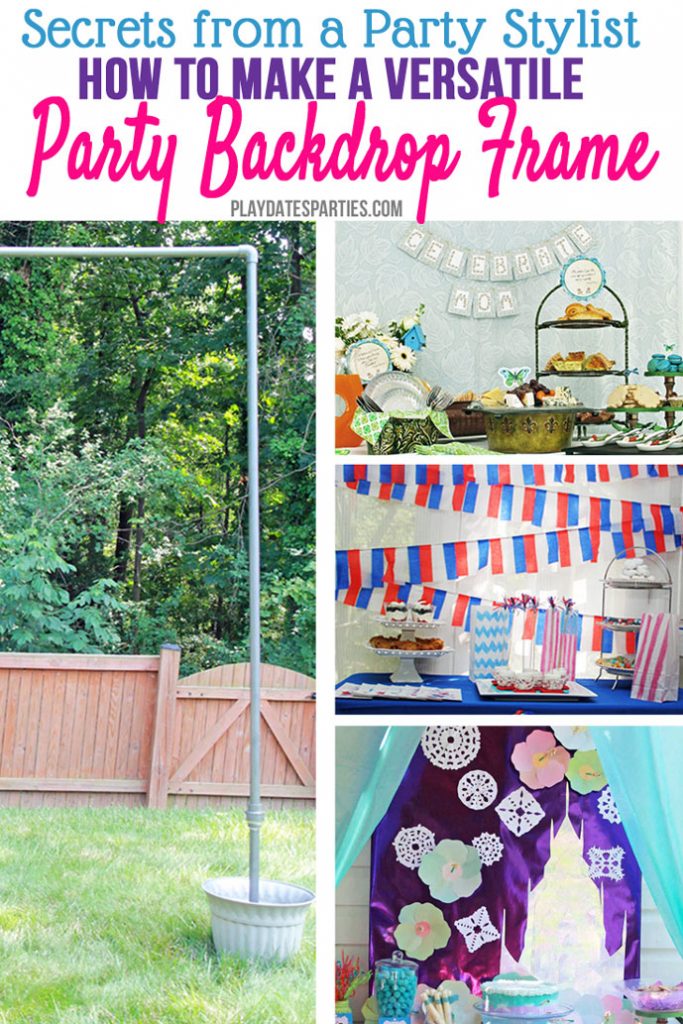
From across the room, I see the other moms pawing at it.
They inspect the layers of tape, ribbon, and/or twine. They peel the pieces of fabric apart. They look behind and below.
Eventually, someone asks “How did you make that?” and “Where do you keep it?”
Our PVC pipe backdrop frame is probably one of the most useful party crafts I’ve ever made. In the six years that we’ve had it, we’ve used it no less than 10 times, and it hardly takes up any storage space at all.
If you want to create gorgeous buffet tables like the ones you see all over Pinterest, then you need to start with the right backdrop frame.
Advantages of Using a Portable Backdrop Frame:
- No wall damage: The thought of pinning or taping backdrops to the wall makes me cringe. Not only can that cause permanent damage to your wall, but it can look very messy if not done properly.
- It’s sturdy. The concrete feet do a fantastic job of holding the frame in place, even in moderate wind.
- It’s versatile. Because the PVC pipes are not glued into place, you can adjust the frame to nearly any width and style. (Wait until you see how I modified it for my oldest’s 7th birthday!)
- It provides a clean shape. With the ability to attach the raw edges of my backdrop fabric to a frame, our parties look more refined and put together.
- It Saves Time. Once you’ve used this frame a couple times, you get a feel for how long it takes to set up and can pull together a professional-looking backdrop rather quickly.
What Makes This Frame Unique?
The fact that this frame can break down into smaller pieces for storage is the most valuable part of the project.
BUT, unlike many of the other PVC pipe backdrop frames, this version doesn’t use PVC pipe as a foot. Instead, it uses concrete-filled planters as feet. These planters look nicer than the long lengths of PVC pipe for feet, provide more stability, and are less of a trip hazard.
This design was originally inspired by the instructions from Celebrations at Home. But I adapted the design based on our family’s storage needs.
Without those adaptations, I don’t think this would have been so successful throughout the years.
See How We’ve Used Our DIY Backdrop Frame Over the Years:
Obviously, I big pink puffy heart love our backdrop frame. It’s made a huge difference in decorating for our kids’ parties over the years. Here are a few of my favorites:
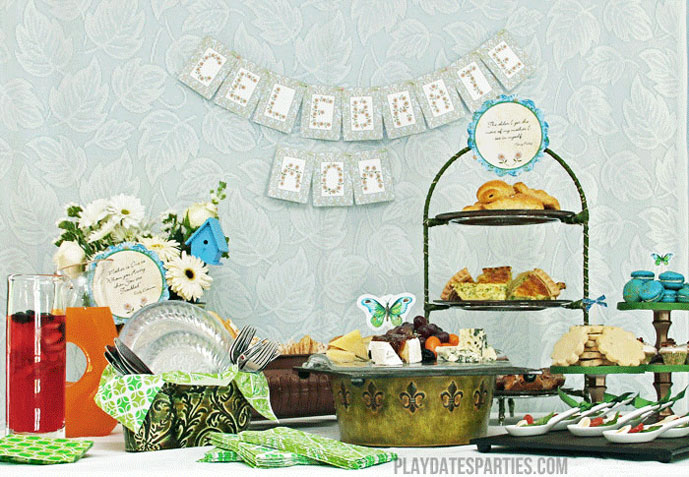
One of the first times we used the frame was for this garden-inspired Mother’s Day brunch. The frame itself sat right behind our kitchen island, which acted as the buffet. Fabric, lace, and a homemade banner were then layered around the frame to create the perfect background.
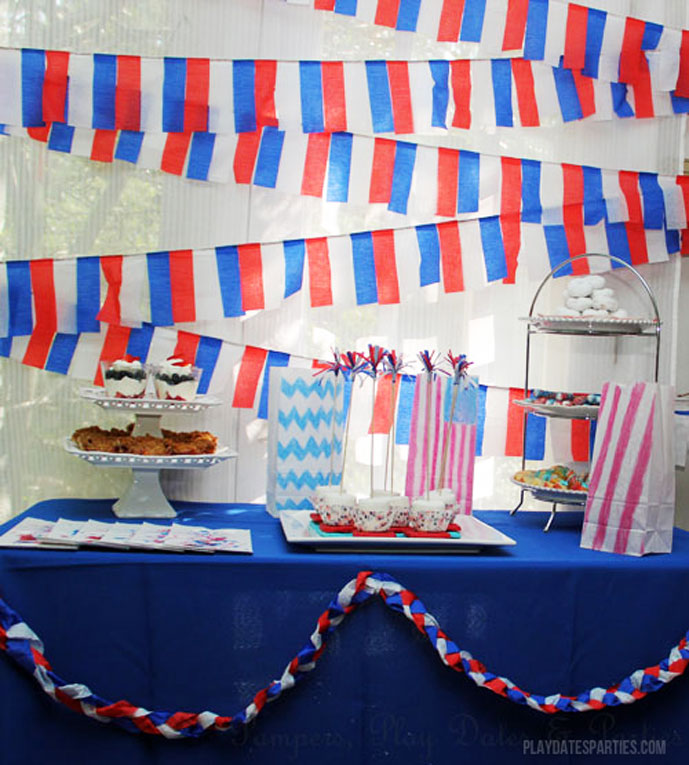
This was one of the most fun uses for our backdrop frame! Here, I threaded the top PVC pipe through the pocket of a sheer curtain. Then, several yards of homemade bunting were wrapped around the sides of the frame in a zig-zag pattern.
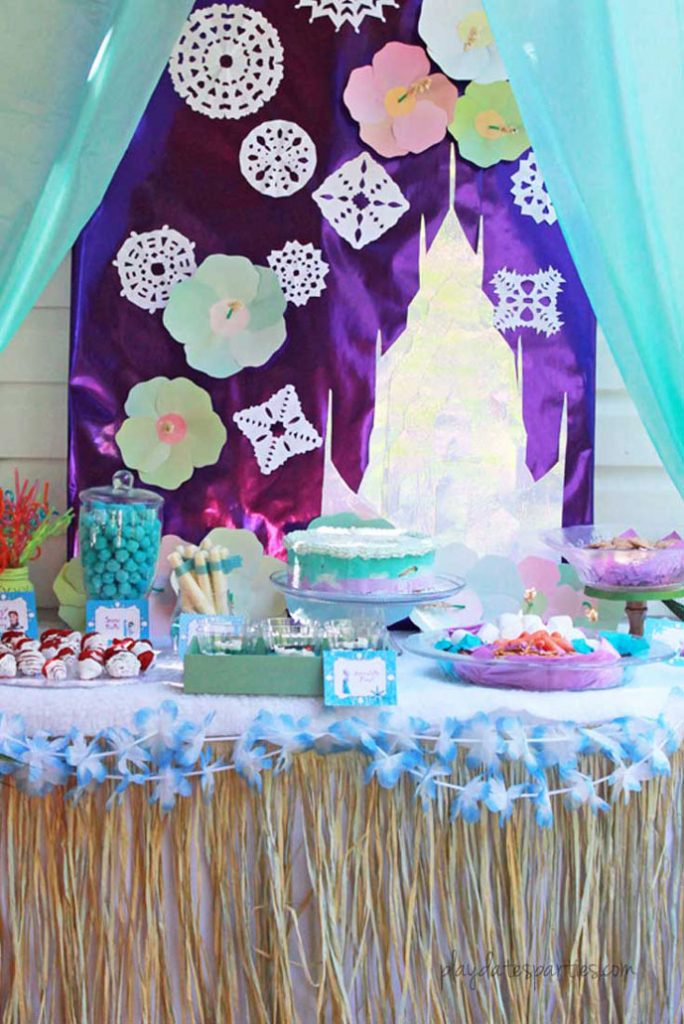
Sometimes I want to change things up a bit. Here, I made a backdrop several days in advance on a large piece of cardboard. Then, I used plastic tablecloths on the backdrop frame to act as curtains to help give the board a more polished look.
How to Make a Reusable PVC Backdrop Frame
Materials
- 2 Plastic Planters without drainage holes, at least 12 inches in diameter
- 18 feet of 3/4” PVC Pipe
- Hacksaw
- 2 3/4” Slip Tee Fittings
- 2 slip elbow attachments
- 2 3/4” Thread & Slip Adapters
- Quick drying concrete
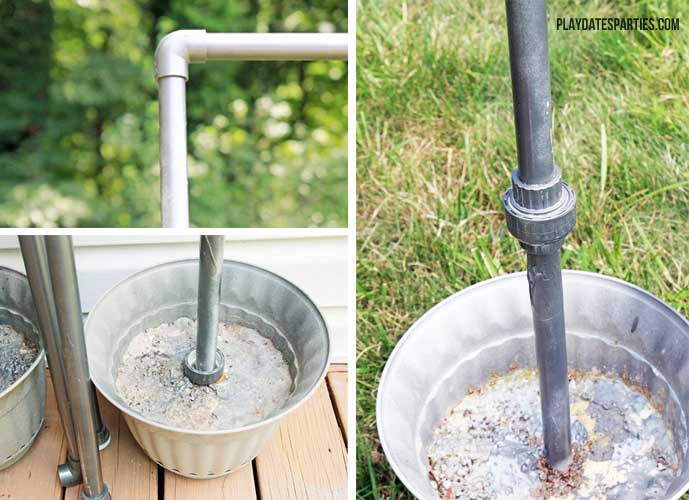
Directions
- Cut your PVC pipe into the following lengths: (3) 5’ pieces, (2) 18” pieces.
- Attach a T bracket to one end of each of the 18” pipes.
- Insert the “T” end into the planter, and fill the planter with a quick-drying concrete mix. Leave plenty of room so that you can add fillers to cover the dried concrete if you like and so that you can attach the remaining vertical pipes.
- Water down the concrete with a hose until the water puddles but doesn’t overflow.
- Check the concrete mixture after 10 to 15 minutes. If all the water is absorbed, add more until you see puddling start to happen again.
- Repeat steps 4 and 5 every 10-15 minutes until the water is no longer completely absorbed after 10 minutes.
- Allow the concrete to finish setting up for 12 to 24 hours.
- After the concrete is set, attach the thread and slip adapters to the PVC pipe in the concrete footers, and on one end of two of the 5’ PVC lengths. You can then use the adapters to attach and un-attach the tall vertical pieces of the frame.
When It’s Time to Set Up the Frame:
- Use the thread and slip adapters to attach the vertical 5ft lengths to the concrete feet.
- Attach the elbow attachments to the vertical supports and add the final 5ft length between the elbow attachments.
- Assemble the backdrop of your choice!
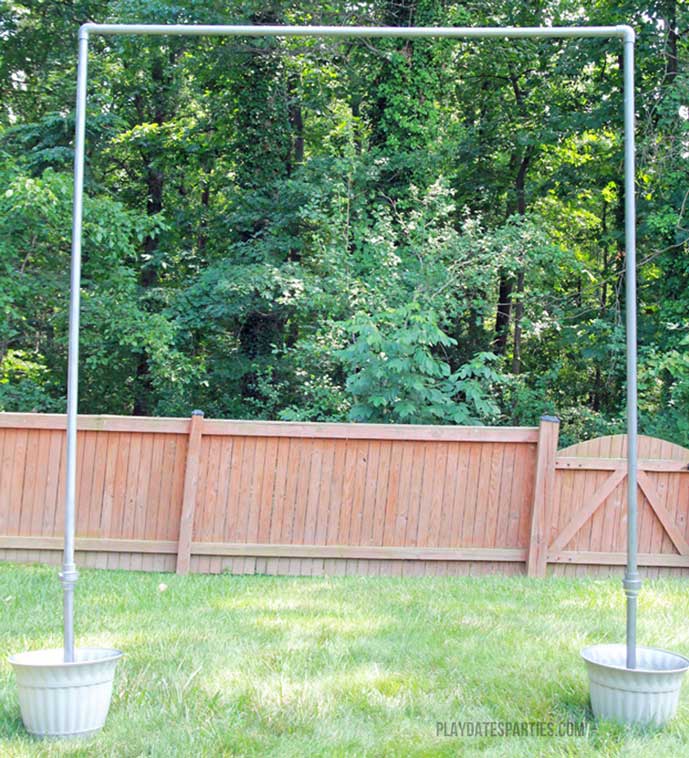
How Long will it last?
As mentioned above, we’ve had ours for about 6 years. It even spent the last year outside, with little to no damage. The concrete is chipping a bit, but that is easily covered with tissue paper, fabric, Easter straw, or any other possible decorations.
How Do You Attach Your Backdrops to the Frame?
I like to use bedsheets and curtains because they can be easily threaded with the top PVC pipe. But if I’m just using a few yards of fabric, I’ll tape it up with duck tape – cheap and easy.
How and Where Do You Store the Frame?
With 5 people living in 1,800 square feet, we don’t have much storage space at all. So I won’t recommend something that is too bulky or difficult to store.
The fact that this frame breaks apart into easy-to-store pieces is one of the very best things about it. I stored both concrete feet under our mudroom sink for years. And the PVC pipes are so thin, they easily tuck into a closet or corner.
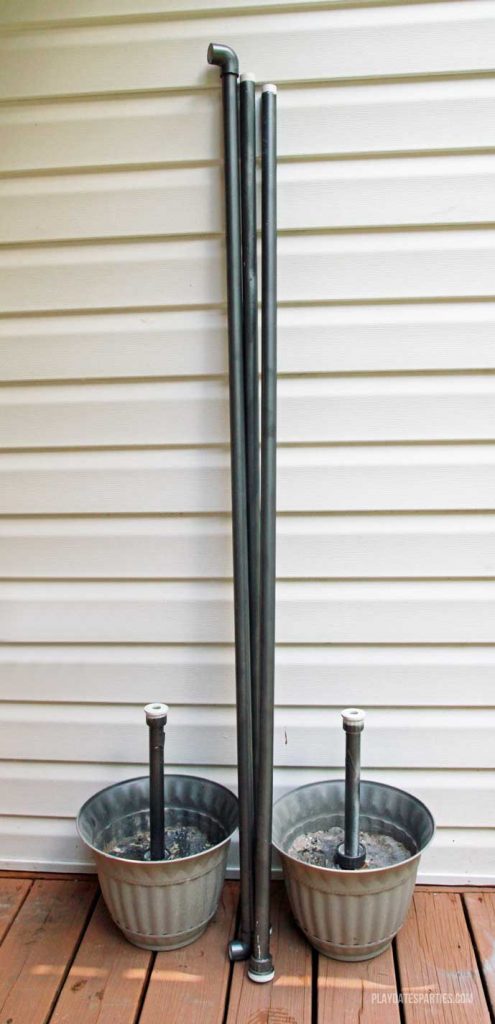
That said, ever since we redesigned our backyard, the backdrop has stayed outside on our lower deck. And after a year in the elements, it’s still holding strong!
Now, It’s Your Turn
Now you know you can create gorgeous party backdrops without hurting your walls, searching for a giant box to break down, and with minimal storage space.
And at your next party, you can be the one watching the mothers trying to figure out how you made such a gorgeous, Pinterest-worthy party backdrop.
Have you ever wished you had a backdrop frame?
What would you put on your DIY backdrop frame for decoration?



Don’t forget to subscribe via
Bloglovin, Facebook, and Twitter,
to get more updates!





cheryl@sewcando.com says
This is genius. We’d made one just from PVC, but it took up a lot of room to store and was too lightweight. Would love to feature this next week. Could you add the Craftastic Monday party to your party page? Thanks for linking up this week:)
Leslie says
OMG! I totally thought your party was on my list! Adding you right away. And so glad you like the project. It’s been a total game changer over the years.
Victoria @DazzleWhileFrazzled says
Wow, great idea! Nice way to let guests be fully in the party’s theme. Visiting from A Round Tuit party.
Leslie says
We love it. Thanks so much for stopping by, Victoria!
Jodie says
GREAT idea!
Hope you come share at Reader Tip Tuesday: https://www.jodiefitz.com/2017/09/12/reader-tip-tuesday-weeks-craft-recipe-party-3/
open & growing all week 🙂
Leslie says
Thanks so much for stopping by!
Kathleen Rupp says
Oh my gosh!! This is amazing! I would never have thought about this for parties. Whenever I have a party, people always ask me so what are you going to do for decorations? Oh geez….my mind just becomes a cluttered mess and completely shuts down. haha. Talk about an overwhelmed mom. I am pinning this. What a fantastic idea. Found your post through the creative inspiration party:)
Leslie says
If that’s your reaction, then you’re going to LOVE the series I’ll be starting in the next few weeks. Stay tuned, it’s going to be awesome.
Lindsay @ The DIy Mommy says
What a great idea! Thanks for sharing 🙂
Leslie says
Thanks so much for stopping by!
candy says
This is a really great idea. Not hard to make and love the easy storage.
Heather says
This is a great idea for booth backdrops at a craft fair or antique mall as well!!! Definitely pinning for my next vintage show! 🙂 Thanks for sharing Leslie!
Leslie says
Great point Heather! I hope it works well for you!
angie says
thanks so much for inspiring us and offering the tips. You are so right a ready made back drop is perfect for many different parties
come see us at https://shopannies.blogspot.com
Leslie says
Thanks so much for stopping by Angie!
Julie says
That’s brilliant, such a clever and practical idea. Pinning.
Leslie says
Thanks Julie!
Angie ~ Ambient Wares says
This backdrop looks like so much fun! Great idea! Thanks for sharing with us at Funtastic Friday. Pinned!
Leslie says
Thanks for stopping by Angie!
Jelica says
Wow! What a great DIY. The winning feature is definitely being able to break the backdrop down and store it away easily. Brilliant! Just brilliant!
Leslie says
Yes! I don’t think we would have kept it so long if we couldn’t store the backdrop frame so easily. Thanks so much for stopping by!
Michelle Leslie says
What a super idea Leslie. I love the fact that it’s so easy to store and that it’s so stable with the concrete buckets at the bottom. Nobody wants their backdrop collapsing in heap on top of the party goers 😉 Really great idea
Kim says
I love the idea for the “feet”. We made one 4 years ago to use as a photo backdrop at our wedding with the large pvc feet. It worked fine, but your idea is way better. Our guest had a blast and received copies of their photos. Also used it for my daughter’s sweet sixteen and now loan it out for women’s events and birthday parties. might be redoing the feet on mine. Thanks 🙂
Debra says
What a great tip! Thanks for sharing.