Forget finding new platters for every party and holiday celebration. Find out how to make a cute interchangeable serving tray decoration in just five minutes!

Not long after realizing we were going to be going through a kitchen renovation last fall I also realized that I had to start getting rid of all my extra serving dishes too.
It was surprising how many platters and bowls we had that we just don’t use.
Some of them just aren’t my style anymore. Some of them were chipped or cracked. And some of them were just plain ugly.
Yet they sat there in our cabinets year after year.
Thankfully, necessity meant I finally HAD to get rid of them. So anything that I even remotely questioned got donated or recycled.
It was wonderful….freeing even.
But then I realized just why I had acquired so many serving dishes through the years: I like variety.
I like knowing that I can host the same holiday with a different design each time.
But that gets so expensive. And obviously, it wastes storage space, too. So I had to find another solution.
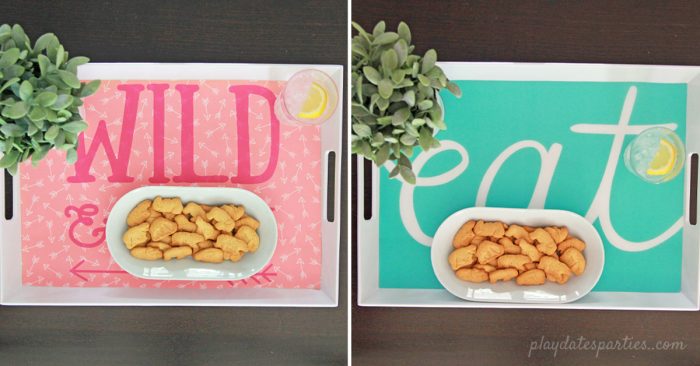
Enter…the interchangeable serving tray decoration.
It’s perfect.
With just one neutral serving tray, I can change up colors and patterns based on the season or the occasion. It takes hardly any storage space, and is SO much less expensive than buying new platters every time.
It’s a true win-win-win (yes, that’s 3 wins!)
How You Can Use it:
Use this interchangeable serving tray decoration in so many ways!
- Add it to a coffee table or island to hold a vase filled with flowers and a decorative bowl,
- Serve up some fun treats to overnight guests for a holiday breakfast.
- I often use trays like this to take snacks to the kids when the babysitter is over.
- Corral kitchen counter items such as soap containers, paper towels, and ring holders.
[clickToTweet tweet=”Store one tray…get endless options. ? #crafts #homedecor via @PlayDatesParty” quote=”Store one tray…get endless options. ? #crafts #homedecor”]
How to Make an Interchangeable Serving Tray Decoration:
Materials & Supplies:
- White acrylic serving tray
- Plastic placemats that are at least as large as the base of the tray
- Pencil with a sharp tip
- Scissors
- Magic Eraser
Directions:
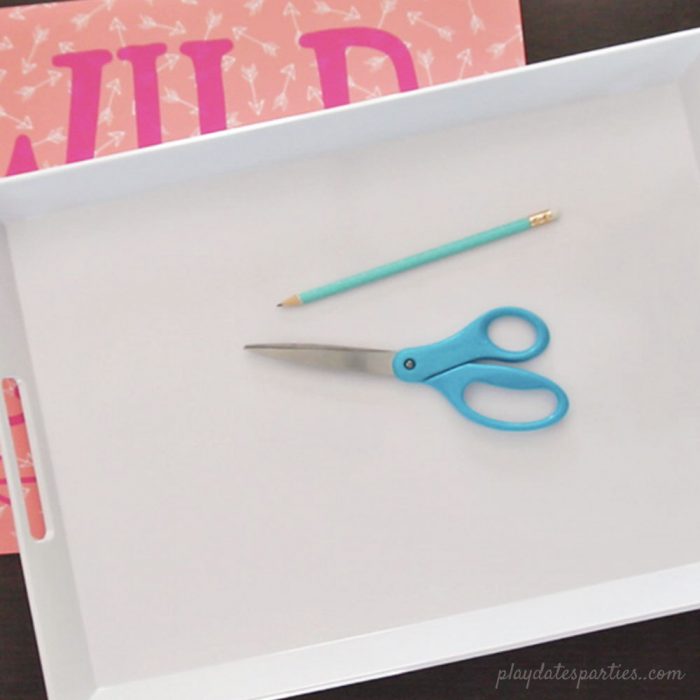
- Put the placemat into the bottom of the serving tray to get an idea of where you want to cut it.
- Remove the placemat and place it on a firm, flat surface, right side up.
- Place the serving tray on top of the placemat. Carefully adjust the serving tray so that the bottom of the tray aligns with your desired location.
- Using a sharp pencil, carefully trace the bottom of the serving tray onto the placemat.
- Remove the tray and double check your marks. If they aren’t exactly where you want them, repeat steps 3 and 4 until you are satisfied.
- Using scissors, trim the placemat along your pencil marks.
- Double check the size of the placemat by placing it inside the serving tray.
- If it’s still too big, repeat step 7.
- Remove any extra pencil markings with a Magic Eraser, and place inside the tray!
How Long Did it Take to Make?
My first two attempts only took about 5 minutes to make. As you see in the video, the third liner I made ended up needing a bit of adjustment and took about 8 minutes. Not too shabby!
How Much Did it cost?
With the cost of the tray and three liners, I spent less than $20!
Notes:
- Plastic placemats work best for this project, as they clean off easily and are still food-safe.
- If you end up making a mistake when tracing the base of the tray, you can easily remove the marks with a Mr. Clean Magic Eraser.
- Trim right along or just outside of your marked lines. That way you can easily trim more if the placemat is still too big. But you can’t put the clippings back on iff you trim too far inside your lines!
Would I Do It Again?
Definitely. Learning how to decorate a serving tray by making tray liners is a total game-changer. It’s so easy to change up the look in just a few minutes, and the liners are easy to store too!
Now It’s Your Turn
Do you have too many serving pieces for your home? Clear out the clutter and make your own interchangeable DIY serving tray decoration. Then you can decorate for each season and occasion without wasting extra time, money, or storage space.


Don’t forget to subscribe via
Bloglovin, Facebook, and Twitter,
to get more updates!


Julie says
Love your tray idea! The different placemats from Target look great inside. It’ll be fun to change up the look of your serving tray for couple bucks.
Kelsie Corbett says
How cute is this?! My serving tray is plain white right now with some accessories, but I love this idea!
Katherine says
Yes! I totally feel you on not wanting a different tray for every season simply because of storage space. This is such a neat idea and I’m pretty sure I could pull it off! Lol I’m not too crafty, but you make it seem simple! 🙂
Marisa says
I absolutely love your pages!! So inspiring.. I love how cute these came out, I bet it would even make a nice gift!
Indya | The Small Adventurer says
This is a fantastic idea! I’ve been really into serving trays lately, and have made one of my own so far, with more ideas in mind for the future, but this is such a great cost-effective and quick way to make your trays suit every occasion! Brilliant idea.
Victoria @DazzleWhileFrazzled says
Great idea! There are so many fun placemats out these days that you could have endless ways to decorate a tray. Visiting from Happiness Is Homemade.
Becky - BeckyandJames says
This is great. We have literally no room to keep more that one tray and I often think I’d like another for a different feel.
Karen Del Tatto says
This is such a great idea! So easy too!
Thanks for sharing.
Karen two tiny hands says
This is so clever. I have no serving trays and rarely hold parties. This would be a great way to start out though!! Thank you for linking up to the #familyfunlinky
angie says
love this idea the interchangeable part is the most interesting as I love to change themes and special days thanks for sharing
come see us at https://shopannies.blogspot.com
Jann Olson says
Great way to dress up a plain tray! Thanks for sharing with SYC.
hugs,
Jann
Tracy Albiero says
really cute idea! #piecedpasttimes
Donna @ Modern on Monticello says
Great idea. This would be good for holidays and birthday parties too. Thanks for sharing at #HomeMattersParty