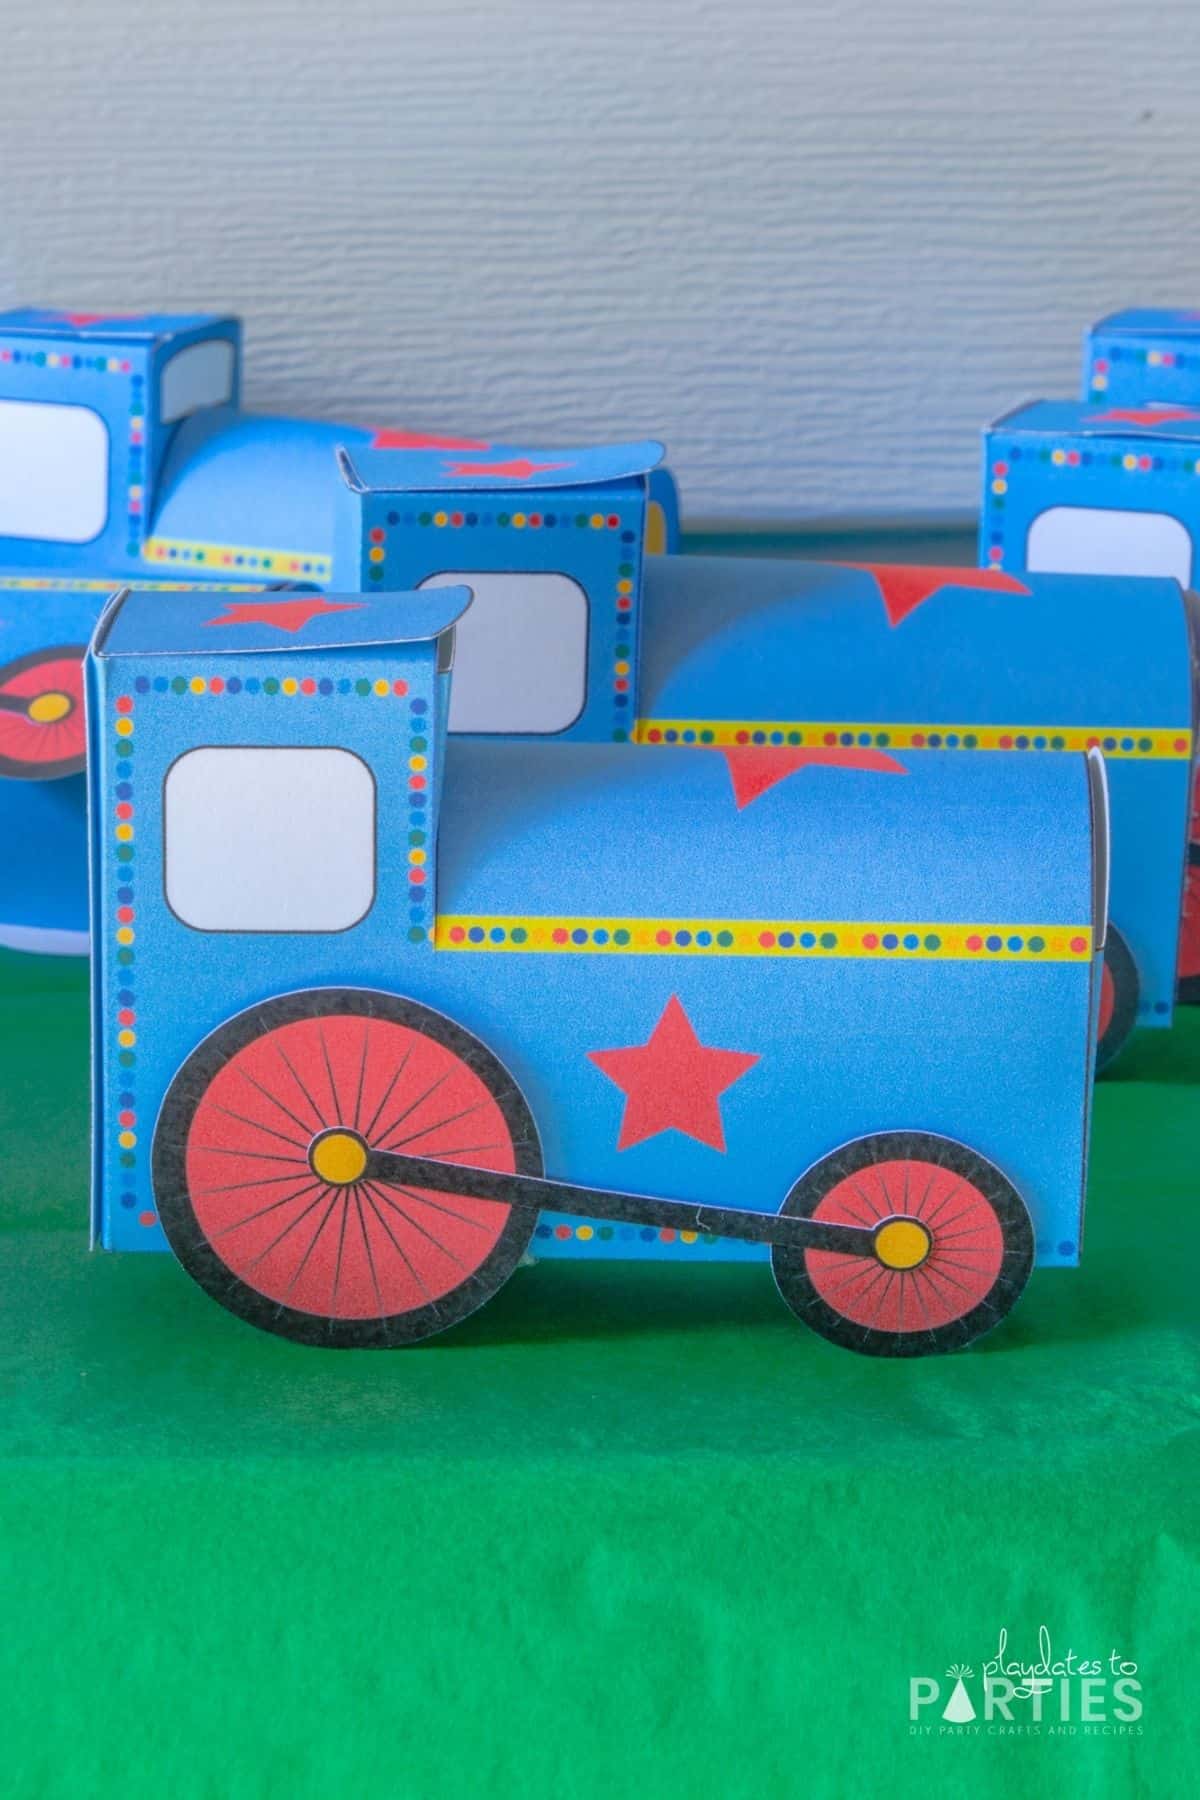
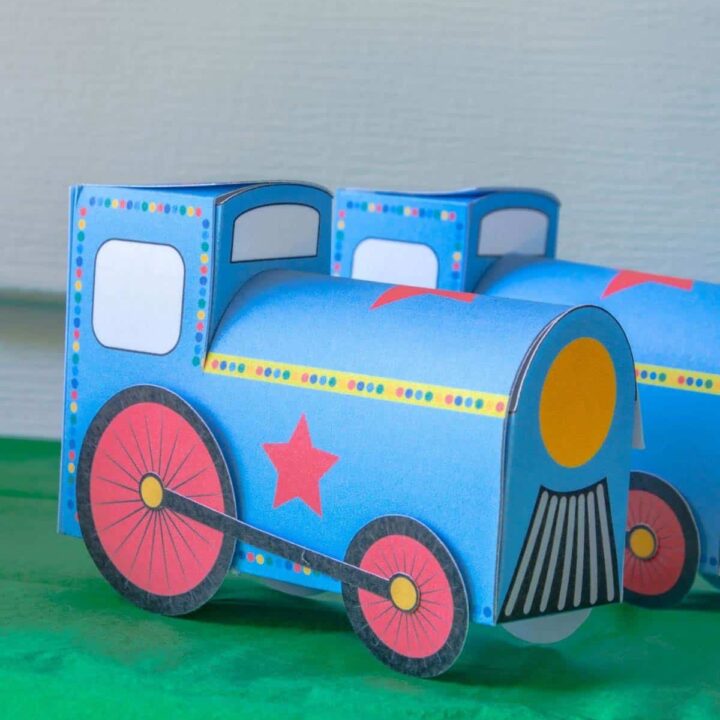
If you’re looking for a cute and inexpensive party favor idea, then this is the project for you! This 3 dimensional train party favor box is perfect for small treats (like Hershey’s kisses) and even double as adorable party decor.
Kids and adults alike are in awe of the little boxes that look just like tiny train engines. In fact, my son’s friends couldn’t keep their hands off them at his train themed birthday party, and I know your kids are going to love them too.
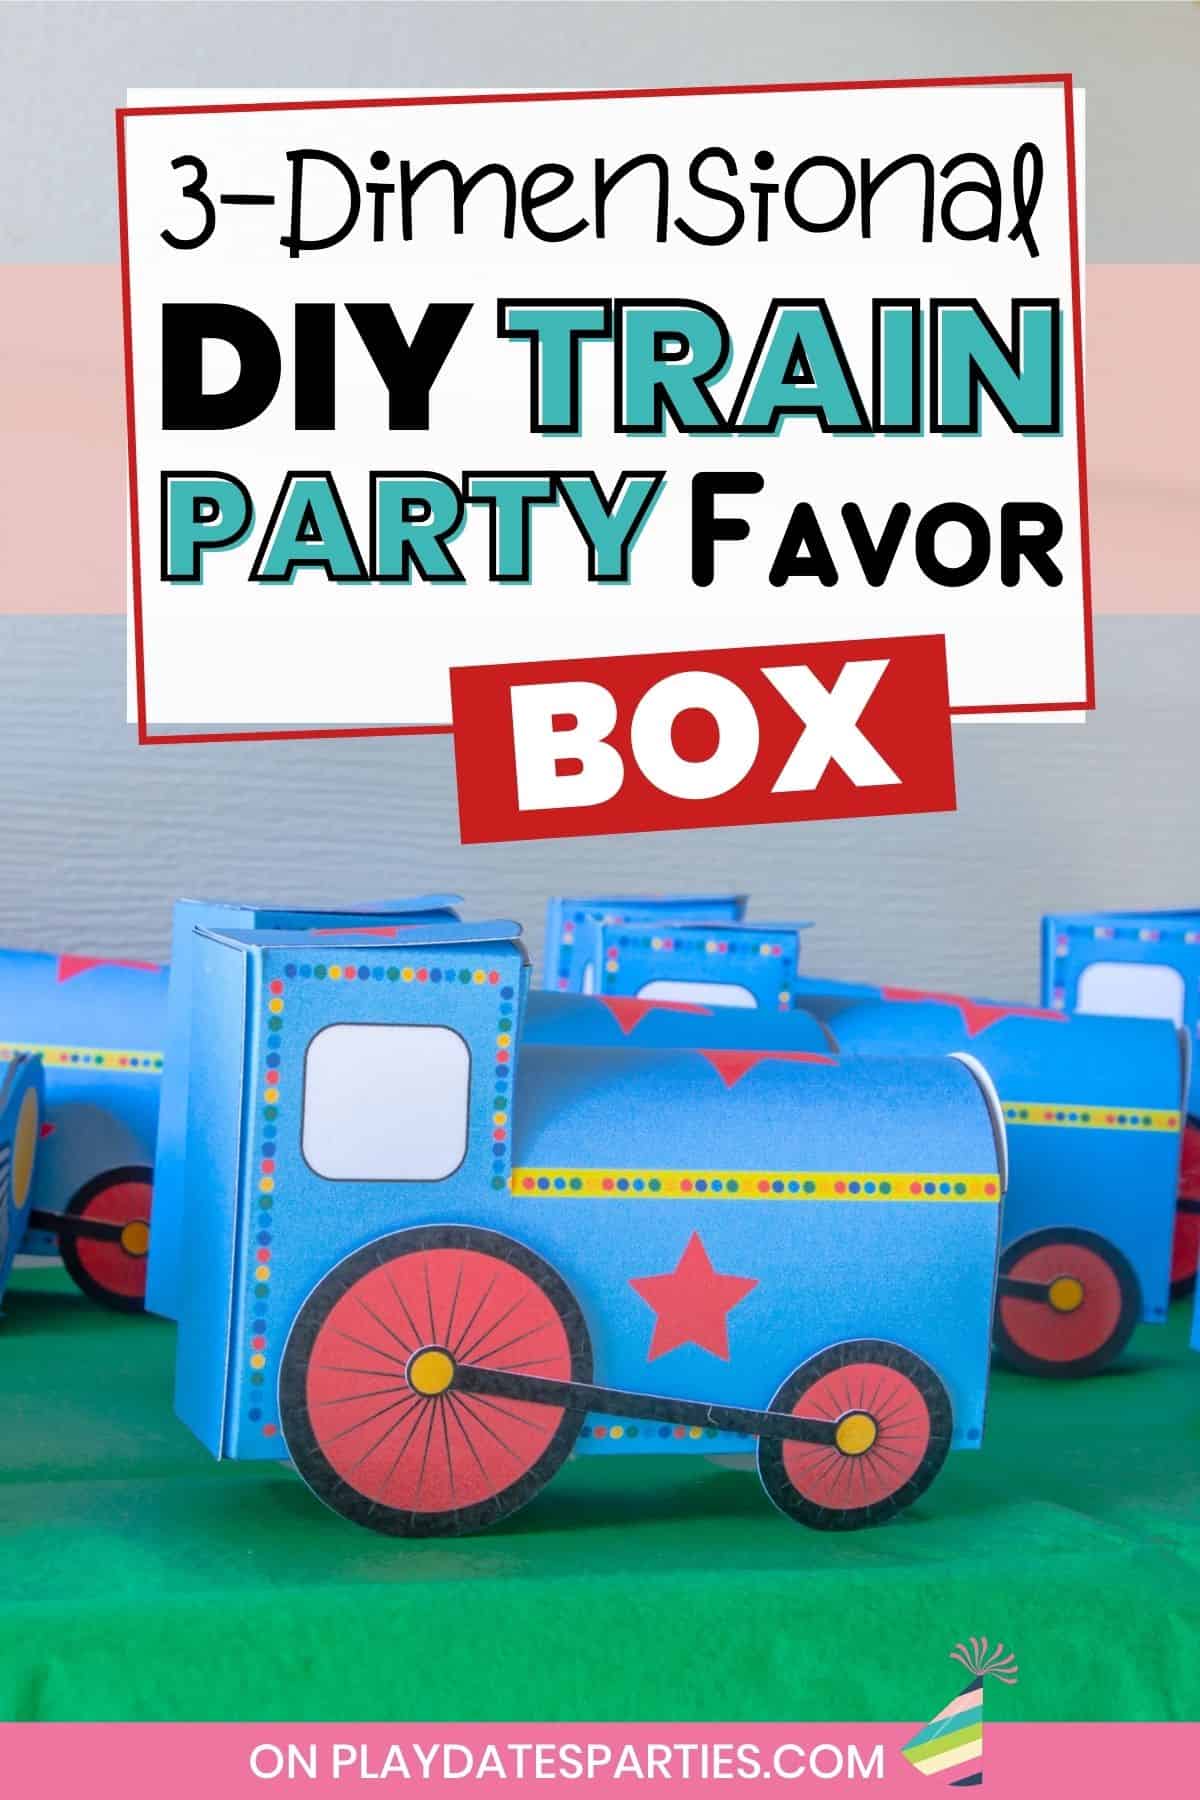
When you don’t have much time to prepare for a party, every little detail counts. Which is why I created these three dimensional train engines that double as both party decor and train party favors.
By simply arranging them on some green tissue paper, I had a cute little display that perfectly matched the party theme.
I’m going to go through with you below every step to make these boxes…from uploading them to Cricut Design Space all the way through assembly. Don’t forget to read the tips and FAQs below to make sure your train party favor box comes out perfectly every time.
What You’ll Need:
Materials:
- This file
- Letter sized white cardstock
- Hot glue gun and glue sticks
- Glue stick or glue pen
Supplies:
- Cricut cutting machine*
- Light grip cutting mat
- Fine point blade
- Scoring stylus or single scoring wheel
- Color printer
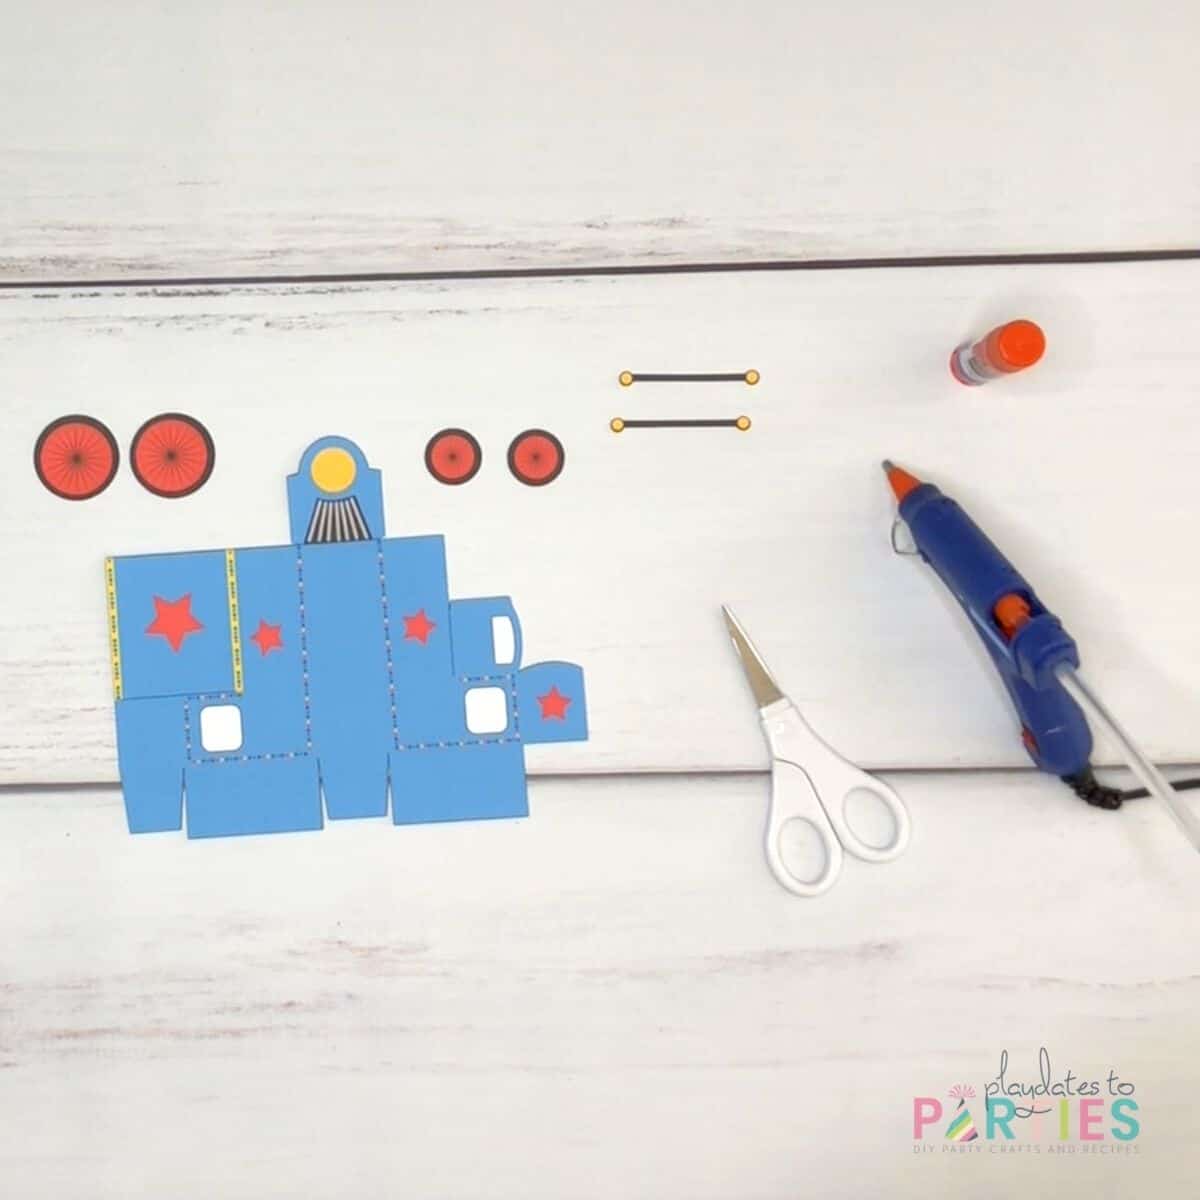
- Scissors (I used small fine-point scissors)
*If you don’t have a cutting machine, see the FAQ section below for how to cut the design by hand.
A few notes about the materials and supplies:
Hot Glue vs Craft Glue vs. Glue Stick: A lot of paper crafters hate on hot glue, because it can cause strange lumps and bumps. But when you’re pressed for time right before a party, you need fast.
That’s why I prefer to use hot glue for the majority of this project. There are a couple spots where I recommend craft glue or glue stick, which are made clear in the instructions and in the video tutorial.
White Card Stock: Subscribers know that I usually prefer matte photo paper for my printed party decor. But it’s honestly too stiff for this project. A nice lightweight bright white cardstock is the perfect choice for these favor boxes.
Not a subscriber? It’s easy to become one. Subscribe to the newsletter, by picking your favorite freebie from this list. And I’ll send you regular party planning tips, tricks, and behind-the-scenes insight…including a side-by-side comparison of how different papers look for party printables.
Scoring Stylus vs. Scoring Wheel: If you prefer deeper grooves for your scoring, you’ll want to use the scoring wheel. However, when I’m crunched for time right before a party, every minute counts.
That’s why I tend to use the scoring stylus alongside the fine point blade with my Cricut Maker. It allows me to get more decorations prepared in the same amount of time instead of stopping to change the scoring wheel and blade.
Step-by-Step Directions:
To make things easy for you, I’ve got a step-by-step tutorial with photos at the bottom of this post. Don’t forget to leave a rating and print out your copy of the instructions, too.
You can also watch the full video tutorial in the video player on this page, or over here on YouTube.
Essential Tips:
Don’t skip these tips – read them before starting to avoid any potential mistakes.
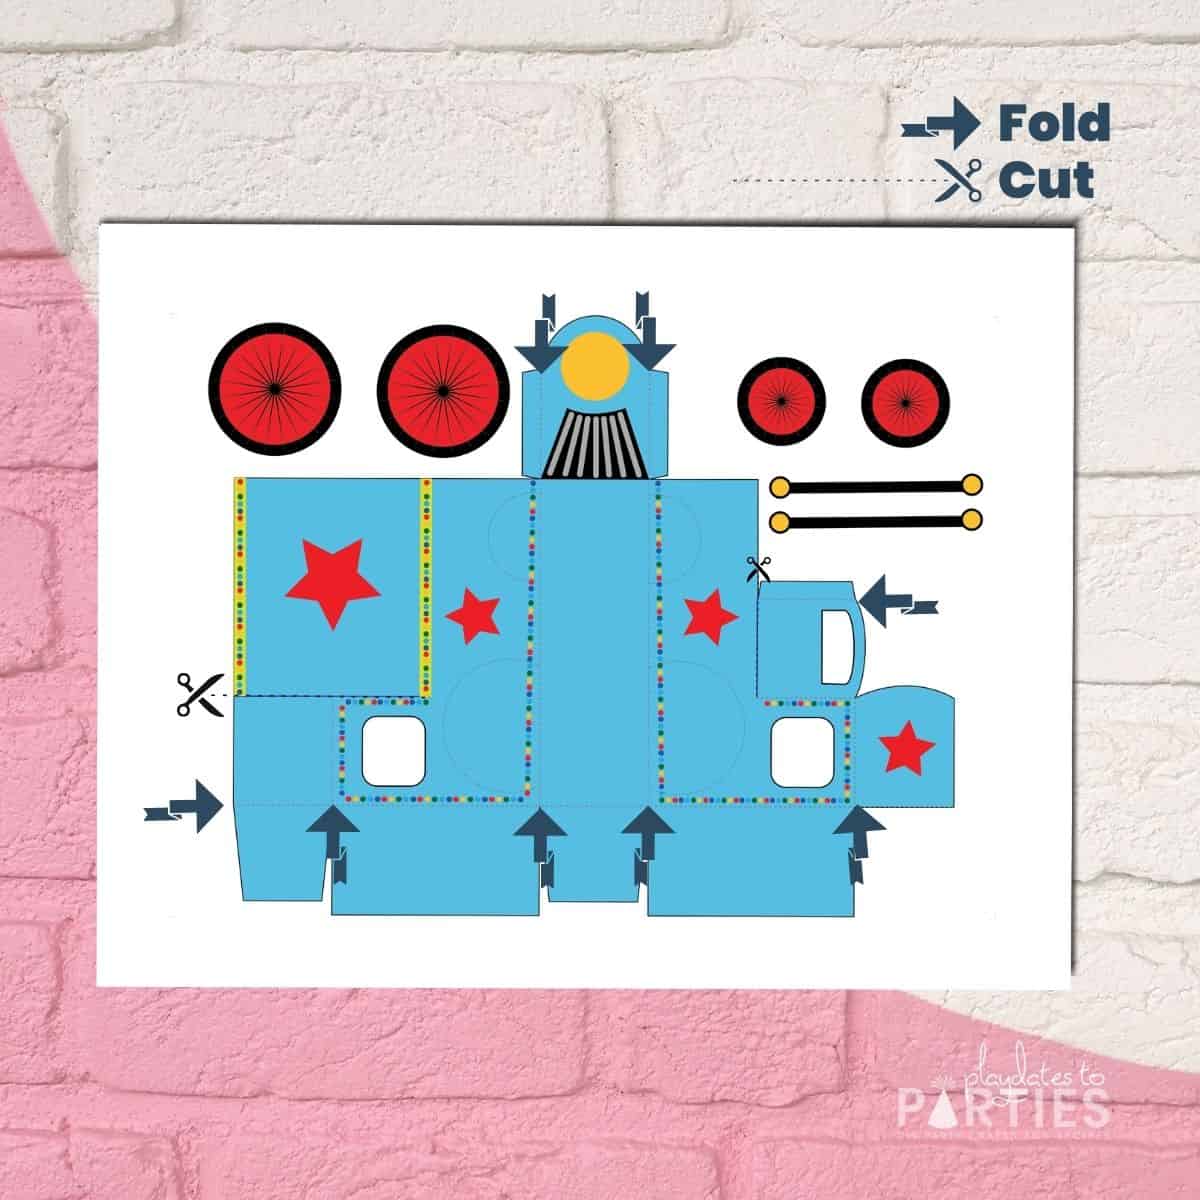
Keep the corner marks
They’re barely visible, but there are marks in all four corners of the print then cut file. These marks are there to make it easy for you to resize the file within Cricut’s Print then Cut sizing.
If you remove the corner marks, I cannot guarantee that the design will match the sizes and shapes provided.
Make sure your alignment matches Cricut Design Space Preview
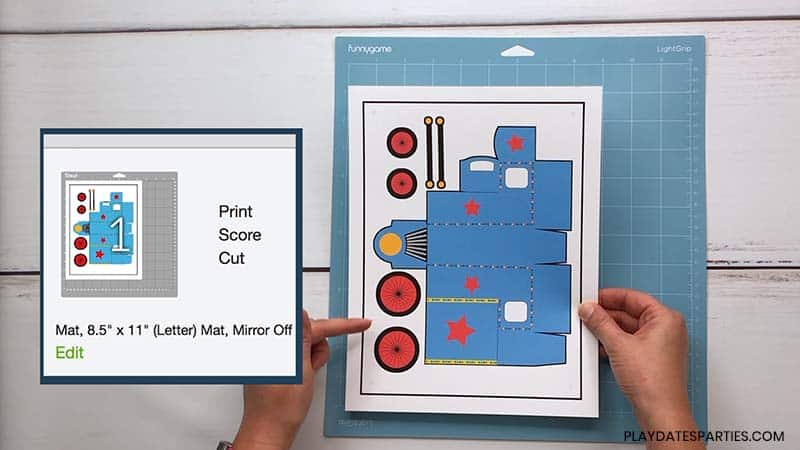
Print and cut files depend on everything lining up properly. Please make sure you line up the printed file on your mat in the same direction as it is shown in the Cricut Design Space preview.
In this case, you can see that the wheels on the left side of the paper are on the left side of the mat, so we need to make sure that the paper is placed on the cutting mat in the same direction.
FAQs:
What can you fit inside the train party favor boxes?
These print and cut boxes can fit small treats like:
- Hershey’s kisses
- Hard candies
- Tootsie rolls
- Small trinkets (e.g. toy rings, mini keychains, etc.)
How big are the train boxes when assembled?
- Main compartment (where favors go): 3.75” long x 1.75” tall x 1.2” wide
- Total size (Including wheels): 3.75” long x 2.75” tall x 1.2” wide
I don’t have a cutting machine. Can I cut this by hand?
Absolutely! If you don’t have a cutting machine, you’ll use scissors to cut along the outside edge of the box. And along the solid border lines indicated above.
Then, you’ll follow the straight dashed lines on the box to create the folds. You may want to use a scoring tool and a ruler to help make sure you have straight creases.
If you liked this train party favor box, then you’re going to love this train party backdrop. The entire backdrop comes together for less than $30, and many of the pieces are reusable. You can also check out all my other train party ideas right here.
DIY Train Party Favor Box
Learn how to make the cutest 3D train party favor box. It’s the perfect way to give the gift of small treats at your little one’s train themed party.
Materials
- This file
- Letter sized white cardstock
- Hot glue gun and glue sticks
- Glue stick or glue pen
Tools
- Cricut cutting machine*
- Light grip cutting mat
- Fine point blade
- Scoring stylus or single scoring wheel
- Color printer
- Scissors (I used small fine-point scissors)
Instructions
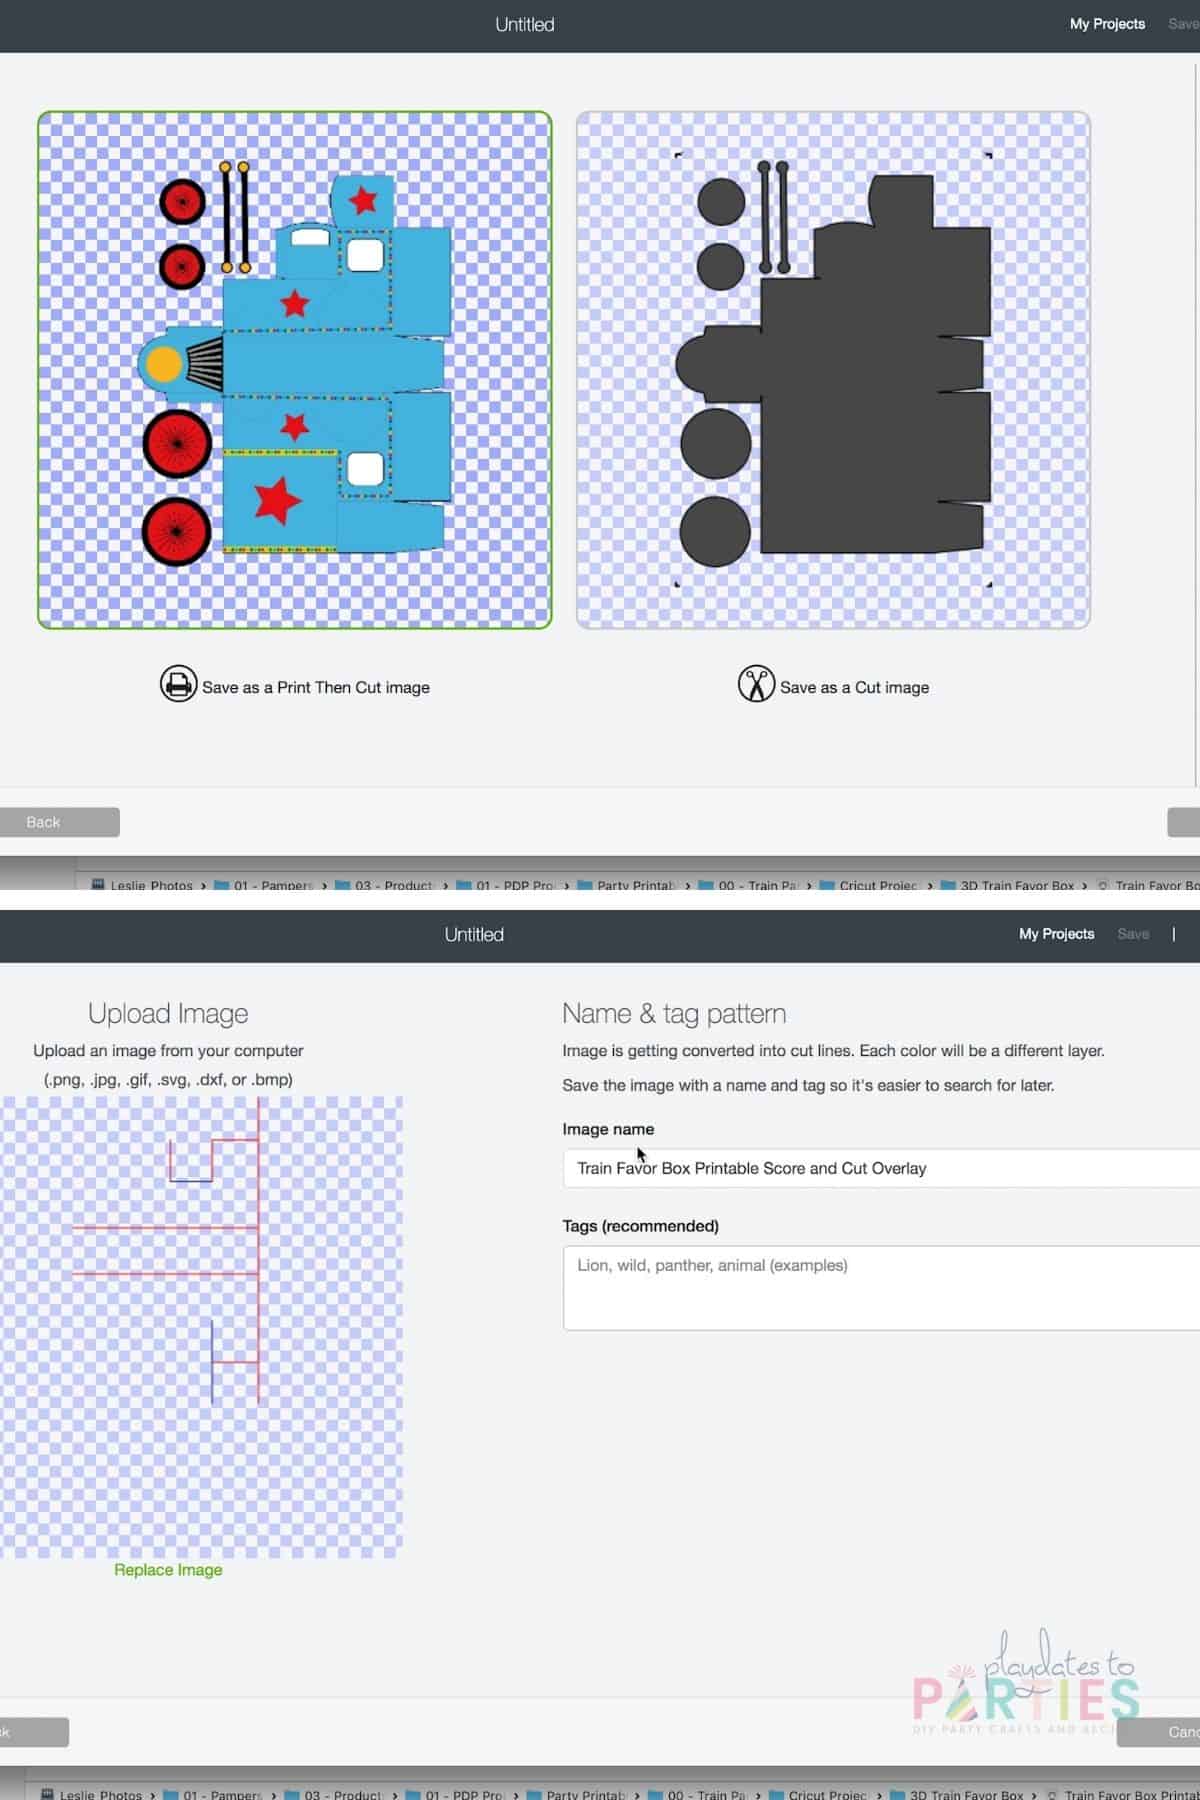
- In a new canvas, click upload, then upload image, then browse. After you click browse, you're going to need to get to the folder where you've got the document stored.
- Choose the PNG print and cut file, then click open. Choose complex. IMPORTANT: Do not erase anything in the file. (see notes) Click continue and save it as a Print then Cut image.
- Now it’s time to upload the scoring overlay. Click upload again, click upload image, click browse.
- Choose the Train Favor Box Cut and Score Overlay SVG file. Change the name, add any tags you might want to and click save.
- Select both the favor box print and cut and the score and cut files, then click Insert.
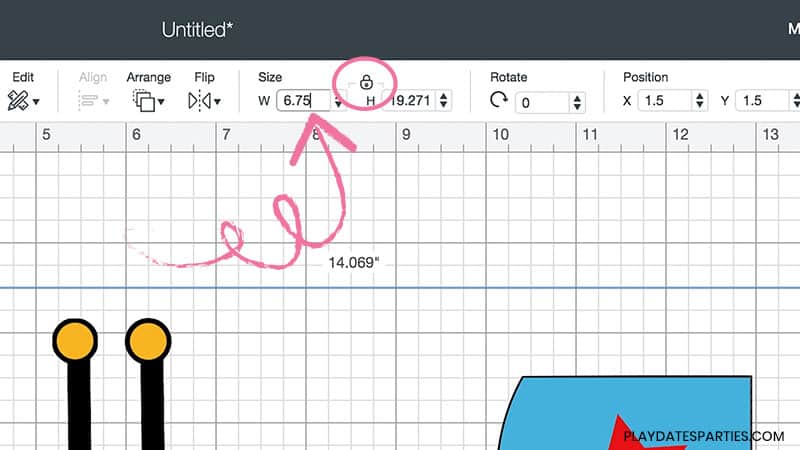
- Select the Print and Cut file. Go up to where it says size, make sure that the lock between the width and the height is closed, then change the width to 6.75 inches. The height should automatically changed to within Cricut Print and Cut parameters.

- In the layers panel on the right, you will see two different color cut lines for the scoring overlay. The blue lines are cuts, and do not need to be changed. The red lines will be score lines. Select the red line, go up to operation and choose Score in the dropdown menu.
- Now it’s time to line everything up. Drag the cut and score overlay on top of your print and cut file, and line up the overlay score lines with the printed score lines on the box.
- Select both the print and cut file and the scoring overlay and then click attach.Click make it, and follow the prompts in Cricut Design Space to print your design and cut it out (see notes regarding scoring wheel vs. scoring stylus)
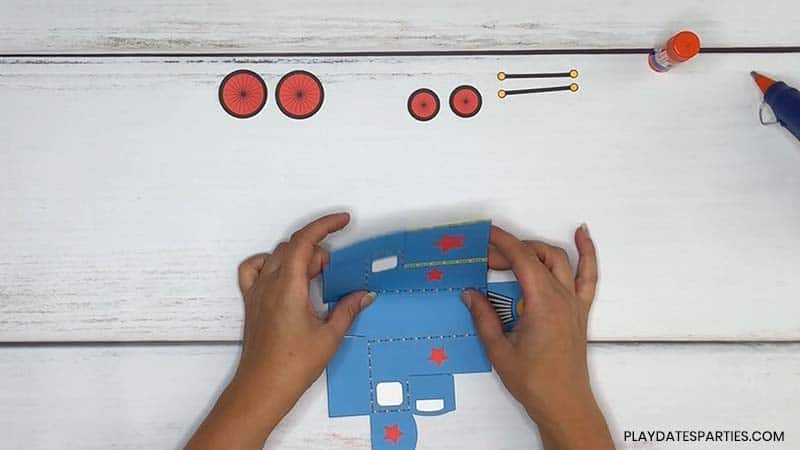
- Once everything is cut out, carefully remove the pieces from your mat.
- Double check that everything is cut properly, and use small scissors to snip any areas that didn’t completely cut.

Upload Your Files to Cricut Design Space
Prepare and Cut the File in Cricut Design Space

Assemble the Boxes
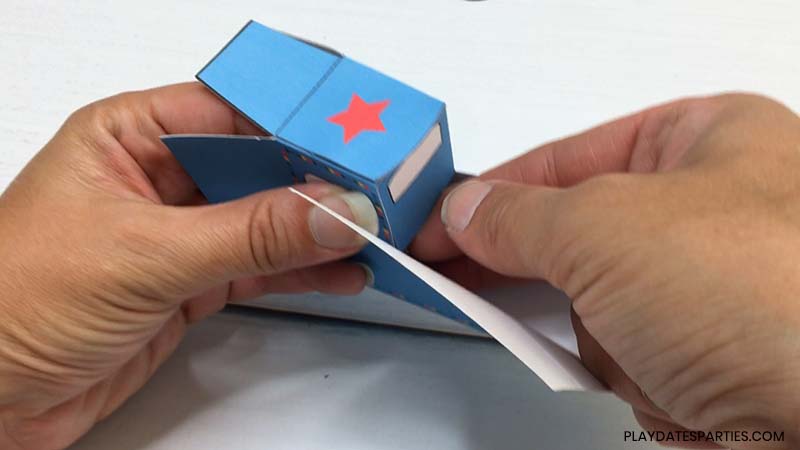
- Crease the fold lines in the train engine by folding each of the scored lines toward the outside of the design first.
- Flip the paper over and then fold everything back the other way.
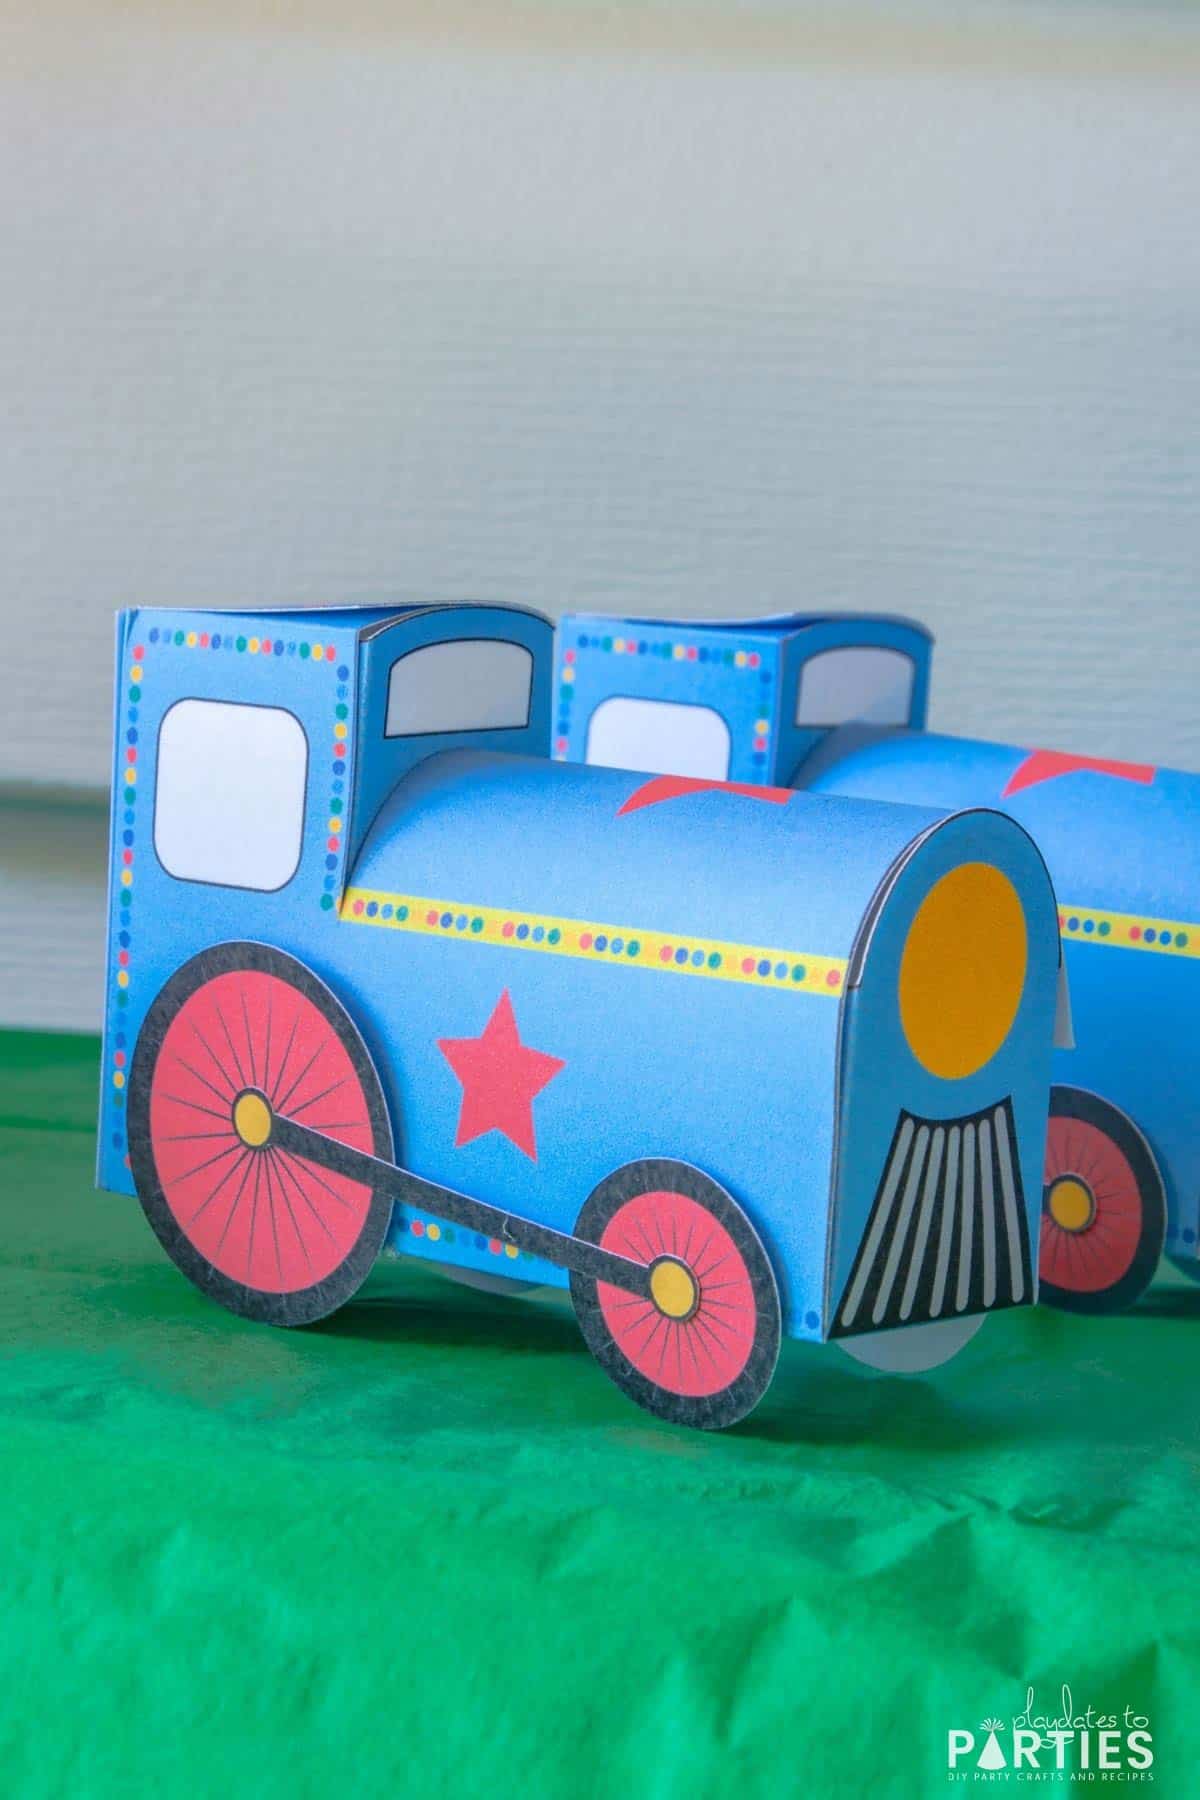
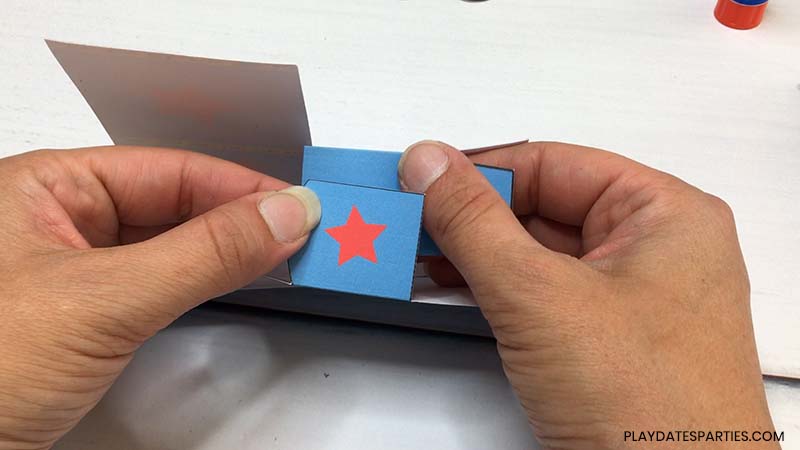
- Fold the main body of the train up, and then line up the top of the engine, where you see the star with the flap on the corresponding side. Use hot glue to glue the flaps together, making sure that the red star is on top. Make sure to keep everything lined up while gluing.
- Use a glue stick or a glue pen to add glue to the tab next to the cab window. Reach one hand in from the back of the box to push up the top of the train that you just glued. Then place the tab on the inside of the train where it lines up, and pinch it together. Continue to pinch the window in place until it’s mostly dry.
- Once the train window is dry enough to stay in place, move on to the front of the engine and hot glue the flaps from the front of the train underneath the train body.
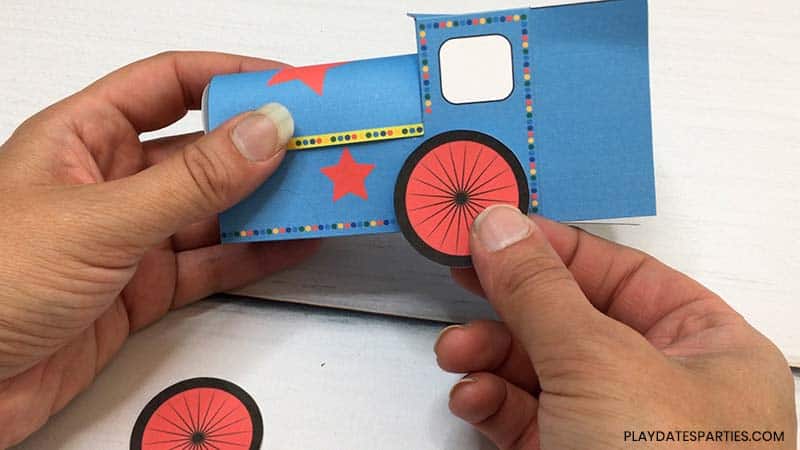
- Next, curve the top of the train over and hot glue the polka dot edge just above the red star. Be careful not to glue it down too far or you'll cover the star.
- Hot glue the wheels to the train, using the dashed circles on the sides as guides for placing the correct size wheel at the right location. Repeat with all the remaining wheels.
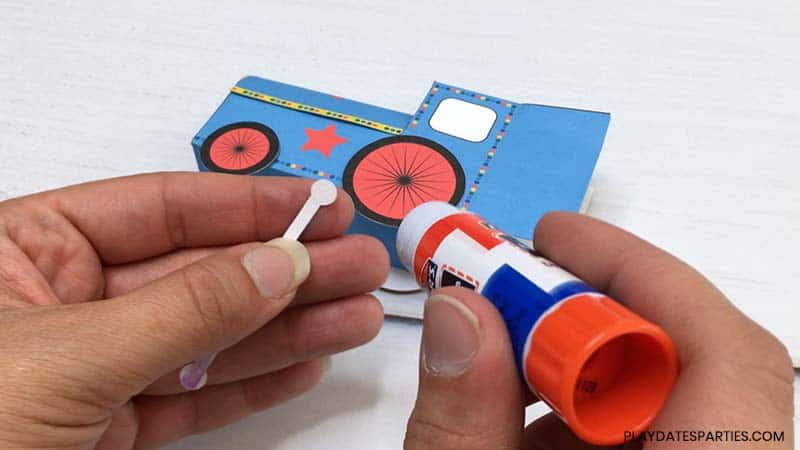
- Finally, add a bit of school glue to the underside of the axles and glue the axles to the wheels.
- Your boxes are now ready to fill. Once they're filled with candy, close up the flaps at the back of the engine and use a dab of hot glue to hold them down.
Notes
Opening the Files:
You will need to unzip the file after it is downloaded. How to do this varies depending on your device:
- Click here for instructions to unzip on a Mac or PC
- Click here for instructions to unzip on an Android device
- Click here for instructions to unzip on an iOS mobile device.
(I strongly recommend opening zip files on a desktop or laptop, as mobile devices are still not consistently able to recognize zip files)
Scoring Stylus vs. Scoring Wheel:
If you prefer deeper grooves for your scoring, you’ll want to use the scoring wheel. However, I find that when you’re in the time crunch right before a party, every minute counts.
With the scoring stylus, you don’t have to change the tools in the middle of a cut. Which gives you a bit more time to get other things done.
Recommended Products
As an Amazon Associate and member of other affiliate programs, I earn from qualifying purchases.


Beth says
SUPER CUTE and so unique!
I’d love for you to join us over at the Creative Crafts Linky Party every Wednesday through Sunday
https://creativelybeth.com/creative-crafts-linky-party/
Followed and Pinned!
Creatively, Beth
Adi says
Wanted to use this SO bad for my son’s 2nd birthday party so it’s not just your average gift bag but a fun surprise for the kids, even though going in it would be a lot of prep work due to no Cricut machine (time to get on that, huh?). That being said, it’s so small inside once folded that I started looking into options of going to staples etc to see if they can print on big poster board so it’s double in size and even then might be a bit narrow for some of the favors.
I ended up finding another foldable train on Etsy that I can use with a top that closes and ends up much bigger BUT yours is so much cuter and so much nicer but with theirs I end up spending less money overall because I can print at home without blowing up the image x2 or 3. To preface, I purchased yours and theirs. The only difference is that with theirs they had the train on 2 different pages with a bottom part and then a flap on the other page to glue together. So same concept as yours but two cutout parts.
Was wondering if there is any way you can tweak the design and offer another one in the same manner — just bigger overall box for crazy people like me who want to put crayons and coloring pages and not just small candies. Not sure if possible but figured I’d write the comment / give food for throught. Would LOVE to hear back from you. If you had any way of doing that I’d purchase again <3
Otherwise, just beautiful work and I was in awe when I found this!! Thanks for posting this!!!