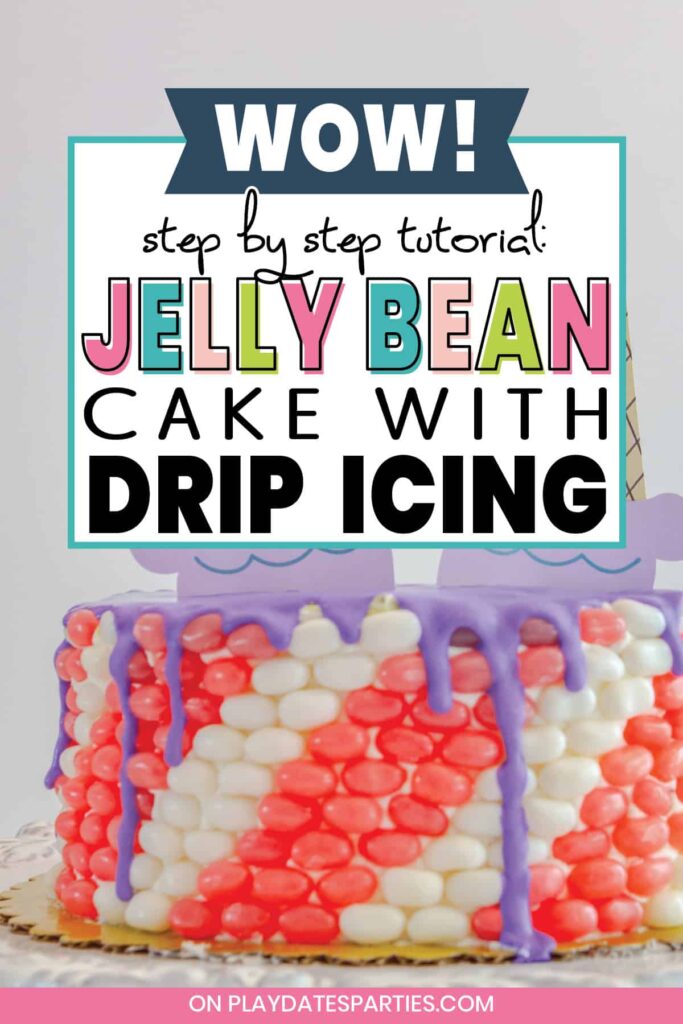
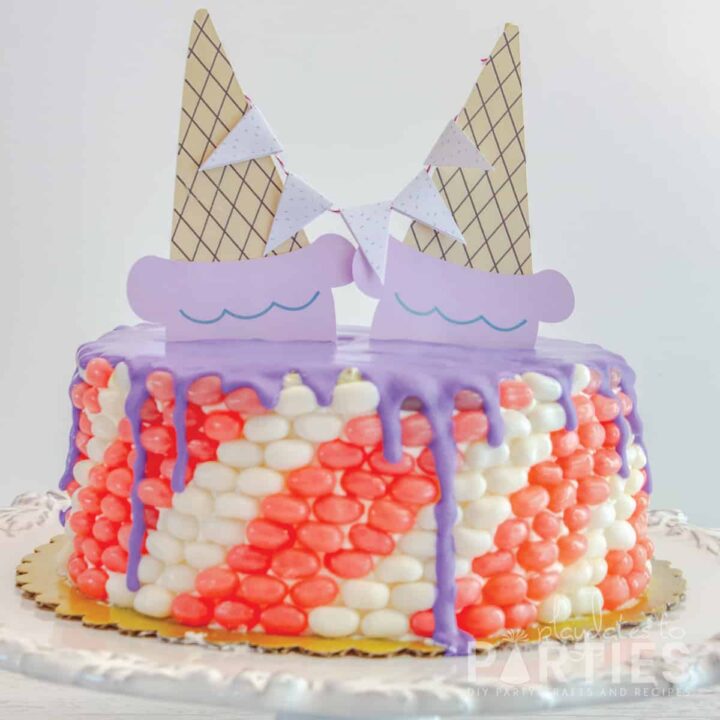
You’ll look like a master baker when you make this stunning jelly bean cake with drip frosting. But your guests don’t need to know that it’s so much easier than it really looks.
“Oh no. Oh no! I can’t use this at all.”
As my daughter tried to hold back tears over her ruined birthday cake, my mind immediately started thinking about ways to recover from our baking disaster.
But with only 3 days until the party, our options were limited.
You see, we were trying to make a birthday cake that looked like an upside down ice cream cone. But the cake I made using this cake mold was a complete disaster.
And there wasn’t really any time to bake another cake.
So after a few minutes of hyperventilating and wheels turning, we switched over to this:
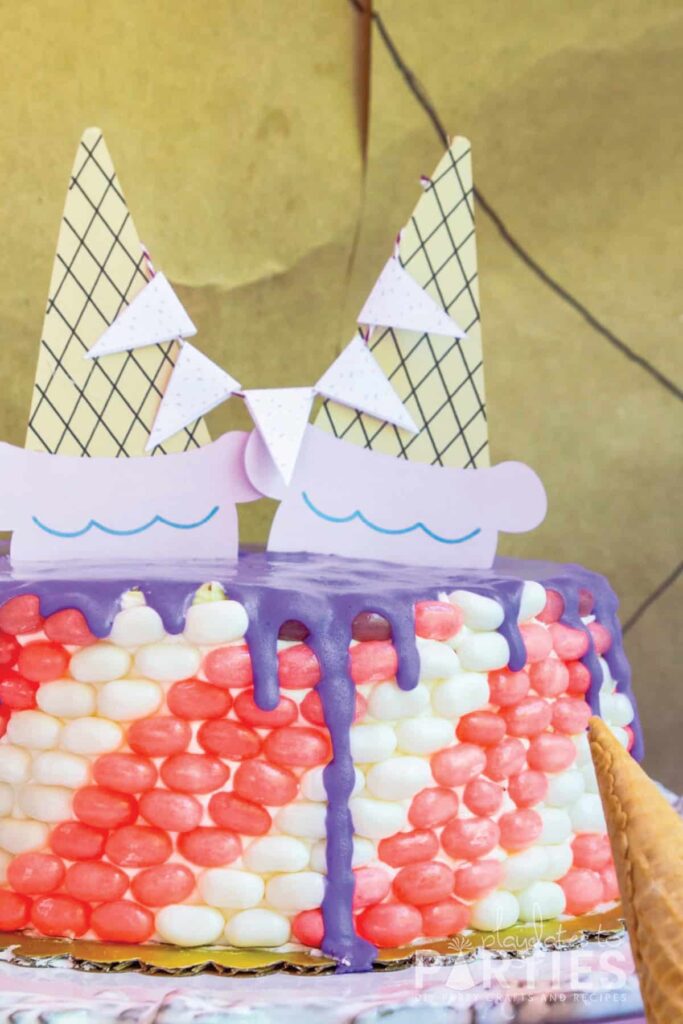
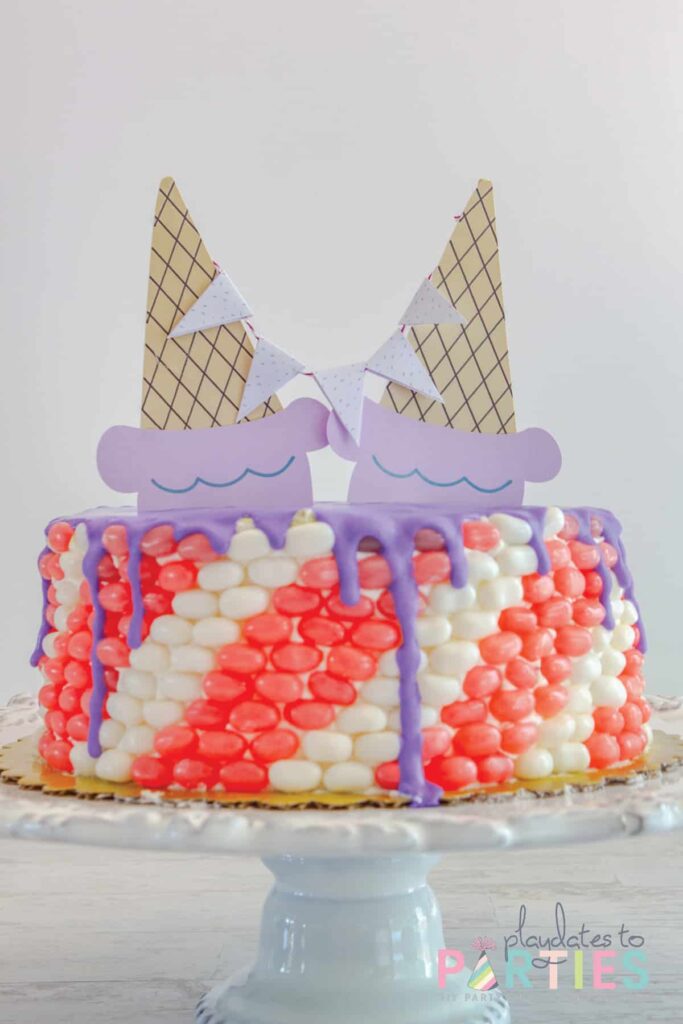
…a store-bought cake that was redecorated with a candy exterior and a card stock ice cream cone topper.
Honestly, I think it might be even better than the original plan. 😊
What You’ll Need:
- 8 inch round birthday cake with a base coat of white frosting (either store bought or homemade)
- About 1/2 to ¾ a pound each of pink and white jelly beans (buy specific colors here)
- Offset Spatulas: 6-inch and 10-inch
- Microwave safe bowl
- 1 cup store-bought or homemade white frosting
- Purple gel food coloring
- Optional: Melted Ice Cream Cone Topper
Tips for Making Your Own Jelly Bean Birthday Cake:
- Make sure your jelly bean colors are separated before you start. It helps to use small bowls with jelly beans close by.
- You may need to make one stripe only one jelly-bean wide if you don’t have enough space. That’s fine, just make sure it’s facing the back when you add your topper.
- White frosting is recommended underneath the jelly beans so their color stands out best. Dark or colored frosting may affect the final look.
- Make sure you add your jelly beans from bottom to top, so the lower jelly beans support the weight of the jelly beans above.
- If the jelly beans tend to slide down your frosting, put the cake in the refrigerator for 15-20 minutes to firm it up.
- Keep a few paper towels and a cup of warm water at hand to wipe off your offset spatulas every now and then.
- Obviously making a cake from scratch will save you a lot of money. If you choose to do that, I recommend having your cake baked and frosted the day before you start decorating.
How Much Does It Cost?
Arguably the biggest drawback is that this is definitely more expensive than making your own cake from scratch. You can save nearly half the price of the whole thing if you make the cake yourself (we were just desperate).
Note: To help you plan your budget, the costs here are what we paid for each ingredient, not the cost of just what’s used. (You’ll probably have leftover frosting and jelly beans, but it’s not like you can only buy half a can of frosting and half a bag of jelly beans.)
- Cake: $15
- Extra Frosting: $1.50
- Jelly Beans: $12
- Total Cost: $28.50
How Long Does It Take?
From start to finish, it took about just over an hour (62 minutes to be precise) to decorate the jelly bean cake. But that includes stops and starts for creating the video, so it might not take you an hour, but you should allot that much time just to be safe.
It’s still less time than trying to bake, cool, and frost a whole new cake when there’s hardly any time left.
Get Creative! Ways to Make this Idea Your Own
- Use other candies, such as M&Ms or skittles around the cake
- Instead of pink and white, create a rainbow effect
- Change the design of the stripes so they are straight up and down, zig-zag, or any other pattern
- Only put the candies halfway or ⅔ up the sides of the cake and make your drip larger
More Jelly Bean and Ice Cream Party Ideas:
- Melted Ice Cream Cone Topper (Tutorial coming soon!)
- Ice Cream birthday party ideas
- How to Make a 3D Jelly Bean Ribbon Trim
How to Make a Jelly Bean Cake
Watch the Video Right Here:
Jelly Bean Cake
You'll look like a master baker when you make this stunning jelly bean cake with drip icing. But no one needs to know how easy it was to make.
Ingredients
- 8 inch round birthday cake with a base coat of white frosting (either store bought or homemade)
- About 1/2 to ¾ pounds pink jelly beans
- About 1/2 pound white jelly beans
- 1 cup store bought white frosting
- Optional: Melted Ice Cream Cake Topper
Instructions
Prepare Your Cake:
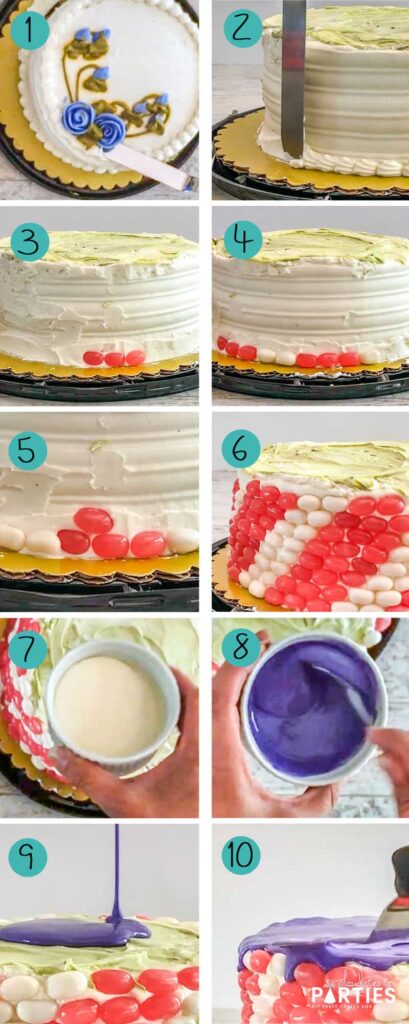
- If you have a store bought cake, use a 6-inch offset spatula to remove any of the decorations from the top of the cake, and smooth out the remaining frosting.
- Next, hold a 10-inch offset spatula, perpendicular to the table (that’s straight up and down) and use it to scrape up the piping around the edge of the cake and smooth out the sides a little bit.
Add the Jelly Beans:
- Choose the side you want to be in the back and add a pink jelly bean to the bottom of the cake. Add two more jelly beans next to the first jelly bean, and then follow those with 2 white jelly beans.
- Continue adding jelly beans in a pattern of 3 pink, 2 white until the bottom row is completely finished.
- Start the next row up with the first pink jelly bean offset from the lower pink jelly beans, so it sits halfway between the first two jelly beans on the bottom.
- Continue adding jelly beans in a pattern of 3 pink and two white, offsetting each next row so the stripes angle up the side of the cake and the sides of the cake are completely covered.
Pour on the Drip Icing:
- Scoop half a can (about 1 cup) of frosting into a microwave safe bowl, and microwave the frosting for 15-30 seconds, until smooth.
- Add two drops of purple gel food coloring to the melted frosting and stir until the food coloring is fully blended.
- Carefully pour the purple frosting over the top of the cake and use a 6-inch offset spatula to smooth it over the top of the cake and gently push a few drips of frosting down between the jelly beans.
- Wipe up any smeared frosting from the base of the cake using a paper towel.
Notes
- Make sure your jelly bean colors are separated before you start. It helps to use small bowls with jelly beans close by.
- You may need to make one stripe only one jelly-bean wide if you don’t have enough space. That’s fine, just make sure it’s facing the back when you add your topper.
- White frosting is recommended underneath the jelly beans so their color stands out best. Dark or colored frosting may affect the final look.
- Make sure you add your jelly beans from bottom to top, so the lower jelly beans support the weight of the jelly beans above.
- If the jelly beans tend to slide down your frosting, put the cake in the refrigerator for 15-20 minutes to firm it up.
- Keep a few paper towels and a cup of warm water at hand to wipe off your offset spatulas every now and then.
- Obviously making a cake from scratch will save you a lot of money. If you choose to do that, I recommend having your cake baked and frosted the day before you start decorating.


Nart at Cooking with Nart says
I love jelly beans!!! This is amazing! I’d like this for my birthday!
Leslie says
Jelly beans are so fun, right? We actually made this a year ago, and both my younger kids say they want me to make it again. 😄
Angela says
This cake is so cute! What a fun party cake. Your step by step pictures are wonderful!
Tara says
Oh how fun! Such a wonderful way to celebrate. I love how you decorated the sides with the jelly beans.
kim says
This is so fun! My nieces would adore this cake. We’ll definitely give it a try soon!
Jen says
What an absolutely fun cake idea! So easily customizable with different color jelly beans. Love it!
April says
I love it! And my husband is obsessed with jelly beans, so this will be perfect for his August birthday!
Leslie says
Yes! Jelly beans are good all year round!