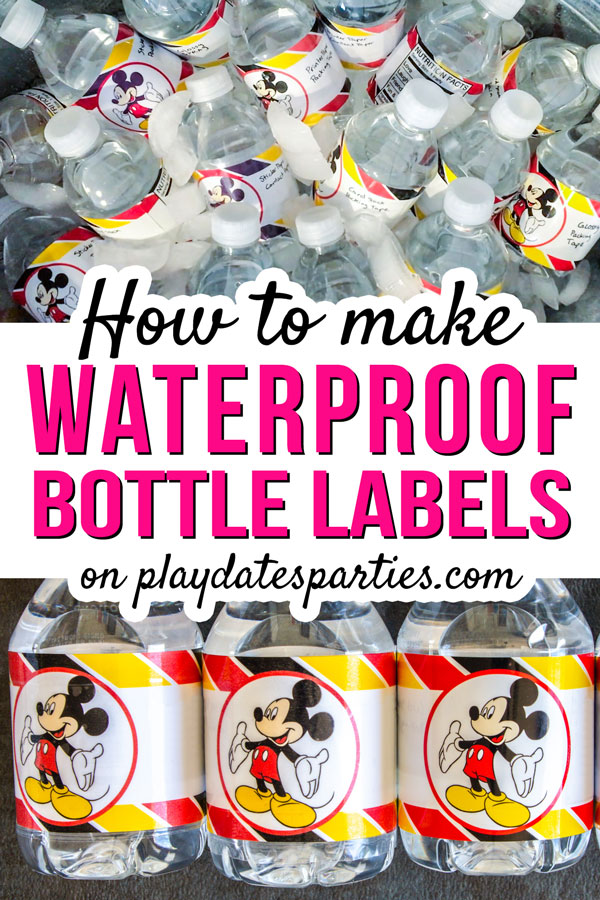
Want the best way to make waterproof water bottle labels? We tested all the papers and DIY techniques to find the right choice for your budget and schedule.
I love it when readers ask questions.
I especially love it when readers ask questions that need a little bit of digging and experimenting. Why? Because it results in something truly useful. For example, this awesome question was posed on Facebook a couple weeks ago:
What is the best paper to use for waterproof water bottle labels?
Such a good question, right?!
No one wants their party printables to smear, smudge, and bleed during a party. And I’ve heard of at least a half a dozen products and methods over the years claiming to make water bottle labels waterproof.
It was finally time to put them all to the test.
How we Tested Making Waterproof Water Bottle Labels
I wanted to be thorough on this one, so I decided to test every combination I could. This way we can see if any one paper or DIY method really stands out.
Types of Paper Tested:
- plain printer paper
- white card stock
- glossy photo paper
- weather proof sticker paper
Note: I originally intended to include my favorite matte photo paper in the testing, but my printer stopped working right when I went to print on the paper. If I get the chance to test the matte photo paper, I’ll definitely update that information right here!
DIY Methods tested:
- covering the labels with clear contact paper
- covering the labels with clear packing tape
- spraying the labels with a clear acrylic sealer
How It Worked:
For each type of paper tested, I included a bottle with one plain label that had no additional sealant, and then one bottle of each paper with one of the DIY methods applied. That’s a total of 16 bottles.
And just because it could get difficult to keep track, I marked every label with the type of paper and the treatment it got before conducting the test.
Finally, all of the bottles were placed in an ice bucket for nearly two hours, just as though they were in a bucket for a party.
Bonus: Free Printable Water Bottle Labels
Of course, this won’t work without some colorful water bottle labels to use! So I designed this cute Mickey Mouse water bottle label just for the experiment. It purposefully has a mix of bold colors, black ink, and plenty of white space, too.
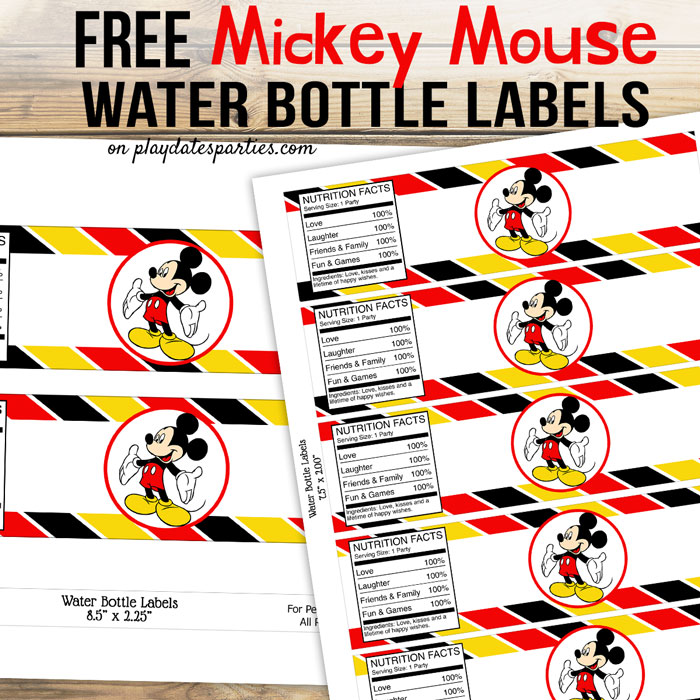
And I’m offering the labels free for you to download, too! They’re available in two sizes. The 8.5 x 2.25 inch version is perfectly sized for Cricut’s print and cut feature, while the 7.5 x 2.00 labels are best for printing lots of labels at the same time.
To grab your copy, simply fill out the form below. Or you can also purchase the labels in my shop for a small price.
Watch the Video
I made a little video showing the water bottles as they got soaked in the ice bucket. It also shows how the papers reacted as each bottle was pulled out of the ice.
Using Paper without Any Treatment
Are you ready to see what happened with my little experiment? First up, we’re going to look at how the papers reacted without any treatment at all.
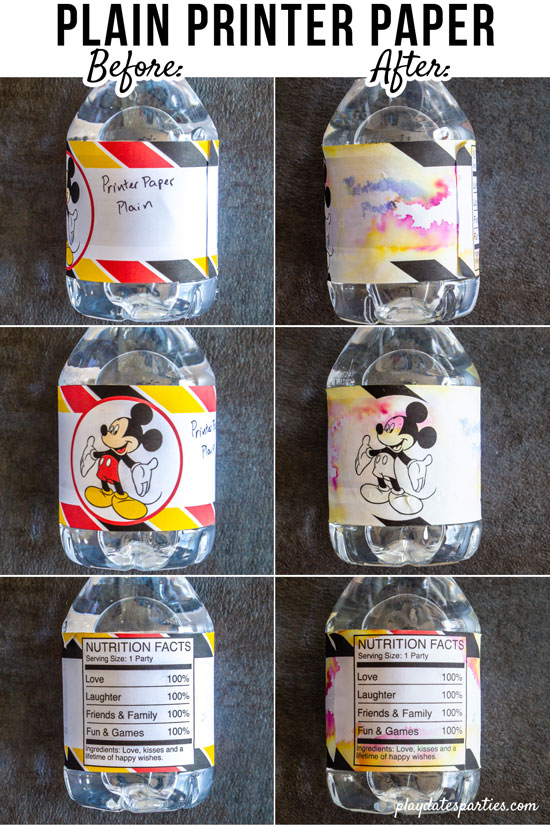
Regular Printer Paper
Pros:
- Cheapest of all paper
- Easy to find
- Easy to cut
Cons:
- Not very durable. You’ll need other paper for the rest of your party printables.
- Print quality isn’t very good.
Plain Printer Paper Results:
As expected, the plain printer paper performed worst out of all of the papers. Not only did the ink bleed and ruin the image, but the ink actually rubbed off on my hands too.
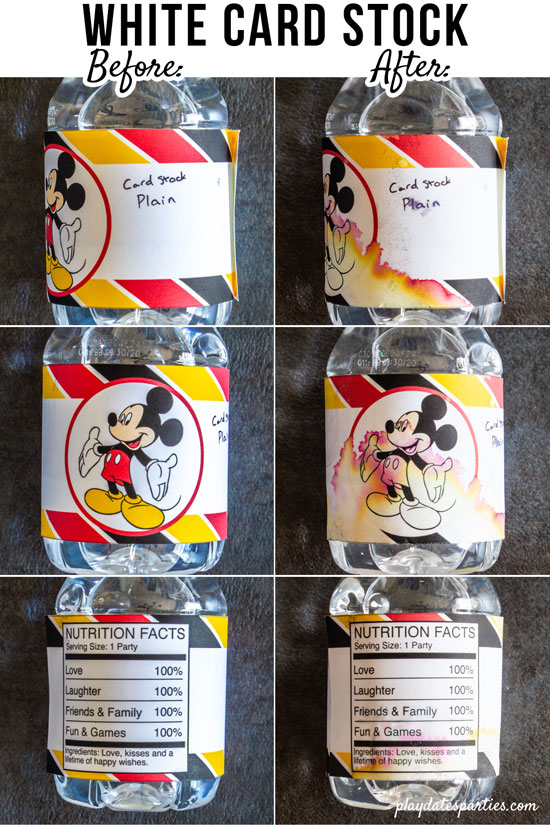
White Card Stock
Pros:
- Easy to find (this is the brand I use)
- Fairly inexpensive
- Easy to cut
- Can be used for all your party printables
Cons:
- Print quality is okay, but not the best
Plain Card Stock Results:
Not good! While the ink didn’t bleed as badly as the plain printer paper, it still ruined the image and looked pretty darn ugly.
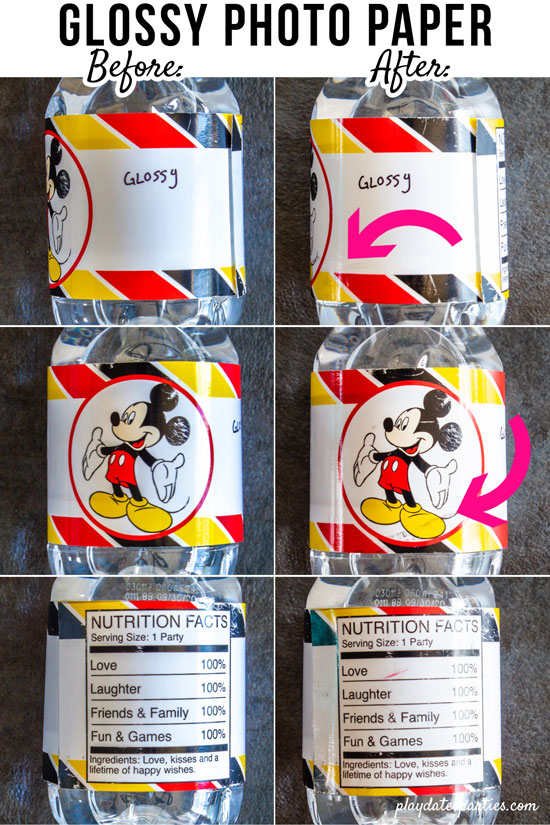
Glossy Photo Paper
Pros:
- Easy to find (this is the glossy paper I tested)
- Easy to cut
- Can be used for all your party printables
Cons:
- The ink can scratch off the designs if you’re not careful
- It can get expensive
Glossy Photo Paper Results:
The glossy photo paper’s durability was only so-so. There was some smearing of the black ink, but not as much as the plain paper or card stock.
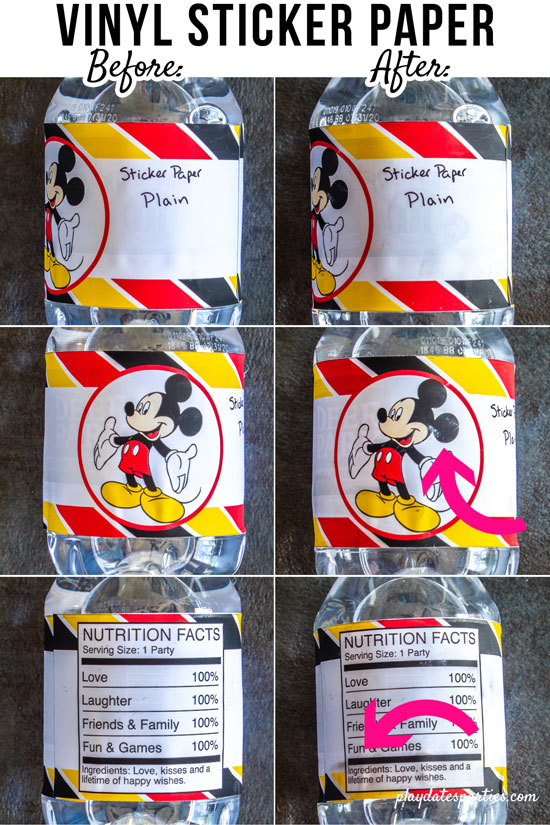
White Vinyl Sticker Paper
Pros:
- No need for a glue gun or any other adhesive
- Should hold up to some humidity
- Looks more professional
Cons:
- Very expensive. (there are many to choose from, but this is the one I tested)
- Need to make sure that your water bottle label matches the size of the label on the bottle you’re using, otherwise it will wrinkle
- Directions suggest using an additional sealer to make them waterproof
Vinyl Sticker Paper Results:
The vinyl sticker paper smudged least out of all the untreated paper. However, the labels wrinkled and became semi-transparent once wet.
DIY Methods to Make Waterproof Water Bottle Labels
I also tested each of the above papers against 3 popular DIY methods used to make water bottle labels waterproof. Let’s take a look at the results:
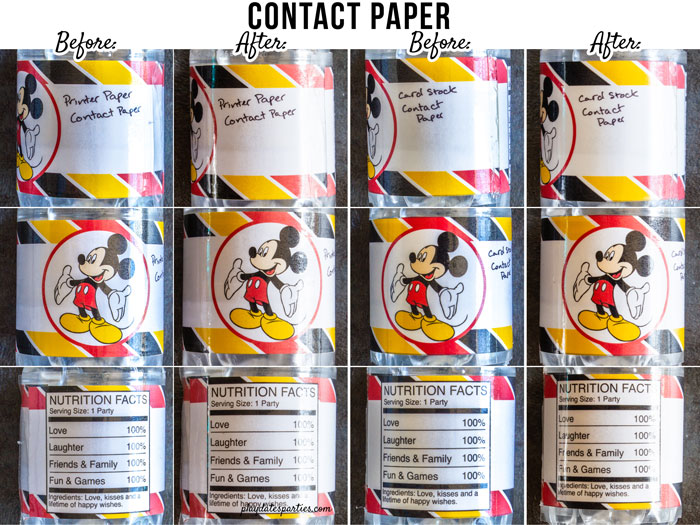
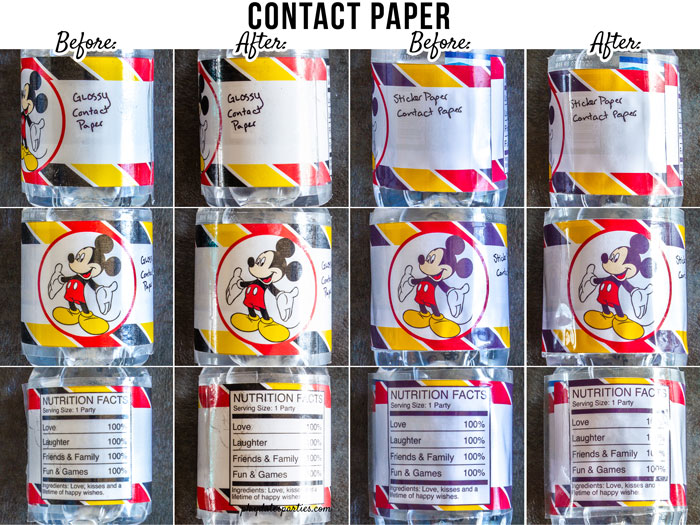
Clear Contact Paper
Some DIY party planners swear by using contact paper for covering their water bottle labels. It makes sense, too. Contact paper is basically like adding a clear sticker right over top of your label.
Pros:
- Fairly easy to find (you can often find it in stores like Target or Walmart, but it’s also easily purchased online)
- Inexpensive (you can often find a roll for less than $10 and it will last for several projects)
- Good for larger bottles.
- It should also act as an adhesive to hold the label on the bottle
Cons:
- You only have one shot with covering your label correctly. If you drop your label, or put it on the contact paper in a crooked direction, it very well may be ruined.
- Very time consuming if you have a lot of water bottle labels to place.
- The extra border created by the contact paper is not very attractive.
- The contact paper adds some bubbles/texture to the final look, which is especially apparent on black ink.
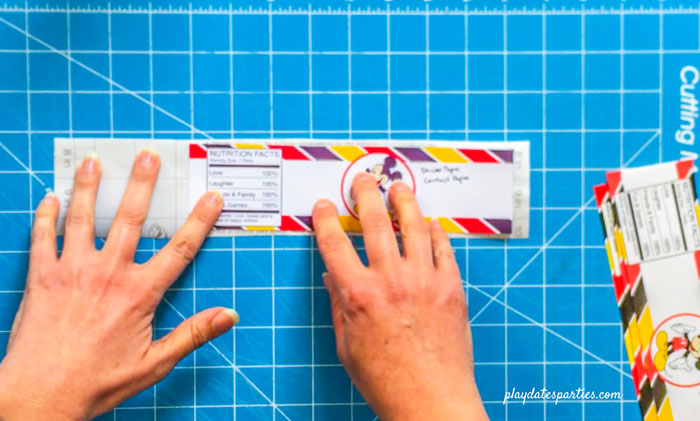
How to Cover a Water Bottle Label with Clear Contact Paper
Materials:
- Water bottle label
- Clear contact paper
- Scissors
- Mat with a grid (optional, but helpful)
- Low temperature glue gun and glue sticks (just in case)
Directions
- Measure your water bottle label
- Cut a piece of clear contact paper slightly larger than the height and width dimensions you recorded. Remove the backing.
- Place the water bottle label in the center of the contact paper.
- Place your label and contact paper cover on your water bottle. If the contact paper does not stick, use a low temperature glue gun to hold it down.
Results:
Even though the contact paper gives a slightly hazy appearance to the design of the bottle labels, it was very successful in keeping the labels from smudging or bleeding while they were in the ice bucket.
That said, it was a very time consuming technique, with too many opportunities to go wrong. In addition, the contact paper simply wouldn’t stick to my water bottles, and I had to glue them in place.
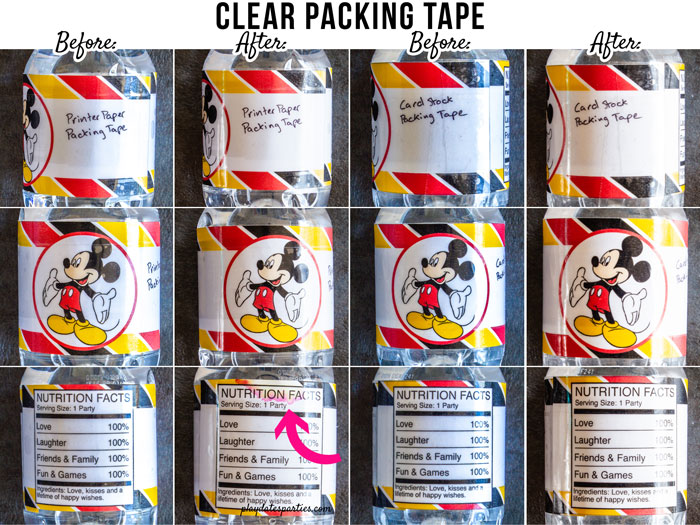
The Packing Tape Method
Pros:
- Packing tape is cheap and readily available.
- Also act as an adhesive to hold the label on the bottle.
Cons:
- You have to be careful with your measurements and make sure you get packing tape that is the same width as your label.
- Can add bubbles to the look of the final project, which isn’t as pretty as a label that’s left untouched.
- It can be time consuming if you have a lot of labels to make for a party.
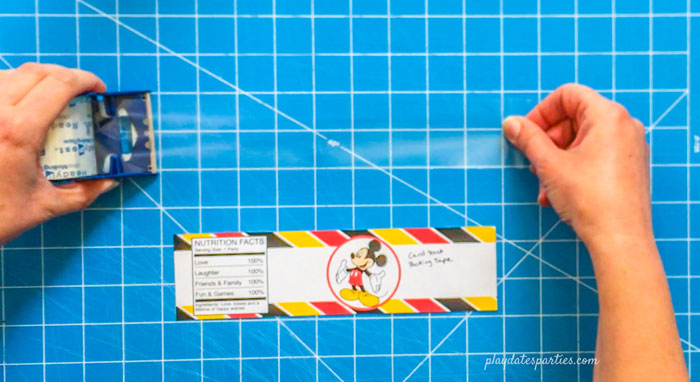
How to Cover a Water Bottle with Packing Tape
Materials:
- Water bottle label
- Packing Tape
- Scissors
- Mat with a grid (optional, but strongly recommended)
Directions
- Measure your water bottle label
- Cut a piece of packing tape slightly longer than the width of your water bottle label.
- Place the packing tape sticky side up on your mat, with the sticky side up.
- Carefully place your label on the sticky side of the packing tape, making sure to align the top edge of the label with the top edge of the tape.
- Add the label to the water bottle.
Results:
The packing tape definitely kept the water bottle labels looking nice. I only had a minor amount of bleeding on the plain printer paper where the tape was not fully to the edge of the paper.

The Spray Sealant Method
Pros:
- Clear sealer is widely available and fairly inexpensive
- It’s fairly quick: you can spray many labels at the same time
- When done properly, it looks very natural
Cons:
- You must have a well ventilated area, so this doesn’t work well if you are in an apartment
- If the weather is too cold or too humid, it could affect your ability to spray paint your labels or get a good result.
- If you spray the labels to heavily, you can get visible drips.
- Difficult to ensure you get even coverage
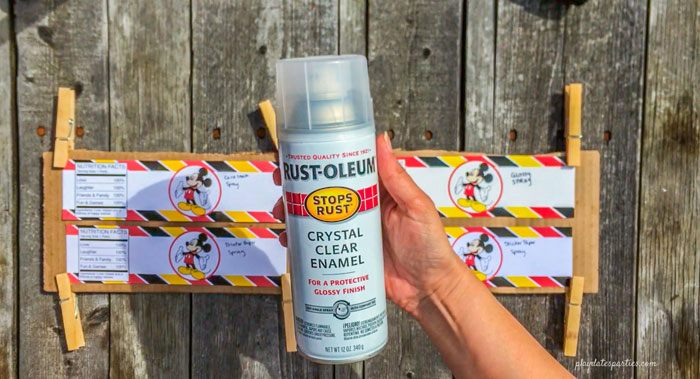
How to Waterproof a Water Bottle with Clear Sealant Spray
Materials:
- Water Bottle Label
- Clear Acrylic Sealer
- Box or surface to place the labels on
- Something to hold the labels down (clothespins, museum putty, etc.)
- Tape or low temperature glue gun and glue
Directions
- Place cut water bottle labels in a box or on a surface that can get ruined. You may need to use clothespins or some other method to keep the water bottle labels down while you spray and as they dry.
- In a well ventilated area (preferably outdoors), lightly spray the labels with a clear acrylic sealer.
- Allow to dry. (Drying time may vary depending on the type of sealer you use. Please refer to instructions on your spray can)
- Repeat steps 2 and 3 for a total of 2-3 coats of sealer. Allow to dry completely.
- When dry, adhere labels to water bottles with tape or low-temperature glue gun
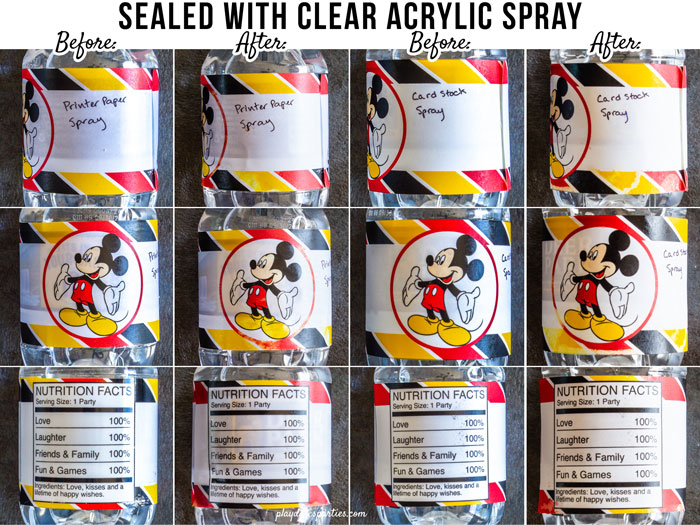
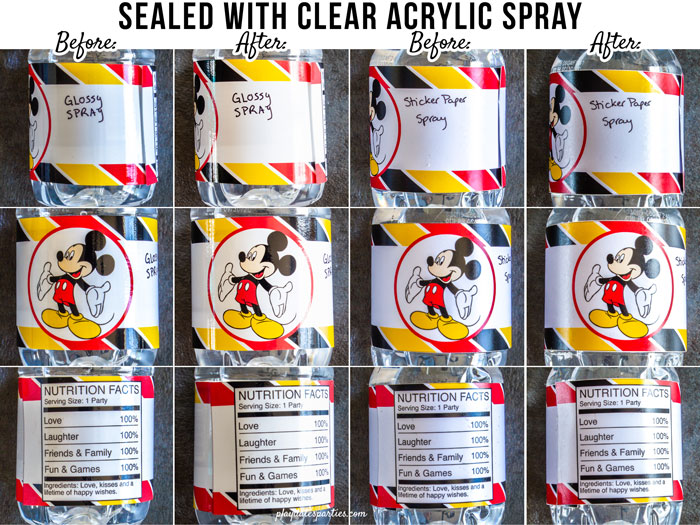
Spray Sealant Method Results:
I’d say that this was generally a winner. While there was some ink bleeding on the printer paper and the card stock, it was significantly better than those papers performed plain. And on the glossy photo paper, it looked almost perfect.
So, What is the Best Way to Make Waterproof Water Bottle Labels?
Like many things in life, the answer is: it depends. Based on the results of this test, no paper worked perfectly straight out of the package, so a DIY method is probably the best bet. But which DIY method to use?
The cheapest option:
Hands down, the cheapest option is plain paper with either packing tape or contact paper. While I think packing tape is easier to use, you may be a contact paper guru. In that case, go for the contact paper.
The fastest option:
The acrylic spray on glossy photo paper definitely wins this one. You can treat many water bottle labels with only 10-15 minutes of effort (not including drying time).
The Best Looking Option:
I’m going to have to give this one to the combination of acrylic spray and glossy paper again. The treatment is practically transparent, and the sealer even helped prevent the image from scratching off the paper.
Now, It’s Your Turn
We’ve gone over lots of information today about waterproof water bottle labels. And now you can make the best choice between all of these options for your schedule and budget. There’s no one single right answer. But I want to know…
Were you surprised by any of these results?
Which waterproof water bottle label do you think is the best value?
Do you have any other tips for waterproofing water bottle labels?


Nana K says
These are so cool! I absolutely love Mickey and the “Nutrition Facts”. Thanks for sharing on Sunday’s Best
Jennifer Wise says
This is SO ADORABLE!! I love seeing the different types of paper, too. That is so helpful. Love the printable. Pinning!
#graceathomeparty
Liz says
Do back sides of paper regardless of what method used need to be covered?
Leslie says
That’s a great question. It definitely shouldn’t be an issue with the tape and contact paper covered labels, as those methods will help prevent water from leaking in.
As far as the spray sealer goes, I just spray painted the front, not the back, and it wasn’t an issue.
Hope that helps!
Jess says
Modge podge is the best. No worry about fumes, and don’t have to buy anything. Easy, effective.
Valerie says
Thank you for this information. Just what I was looking for. I just have a question for the glossy/acrylic option. Will this work the same if I spray the whole sheet of labels, or do they need to be cut out individually first and then sprayed for complete coverage?
I have 250 labels to do so individually would be more time consuming, but I’m not sure if spraying the whole sheet and then cutting affects the sealed edge.
Julie says
Following! I would like to know the answer to this question, but I only have 100 labels to do.
Leslie says
Honestly, I didn’t test that, so I can’t provide a definitive response right now. My best guess is that if your design doesn’t go to the edge then it will probably be fine. But if the design does go to the edge, then I would err on the side of making sure the edges are sealed.
Also, at large quantities, it may be better to outsource. There are many online sources that sell waterproof labels for a fairly low price. The costs for paper, sealer and ink for 100 or more labels isn’t insignificant. Add in the hours of work cutting and prepping, and it might be better to consider an option like this one: https://www.uprinting.com/waterproof-label-printing.html
PolyCreative Mami says
This is great tutorial and super mega insightful. Thanks. I was wonderiing, did you tried it with waterproof Modge Podge? Wondering if that would be a good contender.
Thanks.
jessicamartin says
Label Sticker
Amazing product thanks for sharing with us It is very informative.
custom cardboard says
Informative article!. Thanks for sharing
powerpoint slides says
We add new presentation designs bi-weekly! This month, we added a variety of widescreen
PowerPoint templates focused on 2021, business concepts and abstract animated designs.
powerpoint slides
Stampa Prints says
I just love this blog after reading
LehighHVAC says
Such a good written and well explain article.