Summer birthdays are made for ice cream cakes. Find out how even you can make this amazing Frozen inspired ice cream cake.
A Frozen themed birthday party held during the summer NEEDS an ice cream cake.
It’s just the perfect marriage. Summers in the mid-Atlantic are hot and sweaty. So ice cream is the perfect treat. But add to it a Frozen theme, it’s just too logical a combination to pass up.
But just any old ice cream cake would not do for my 4-year-old’s Frozen Luau birthday party last summer. We needed real cake layers, sandwiched between layers of the perfect shades of blue and purple.
So, when I found this cake from The Gunny Sack last spring, I knew it was the perfect template for our Frozen Inspired Ice Cream Cake.
What I Changed:
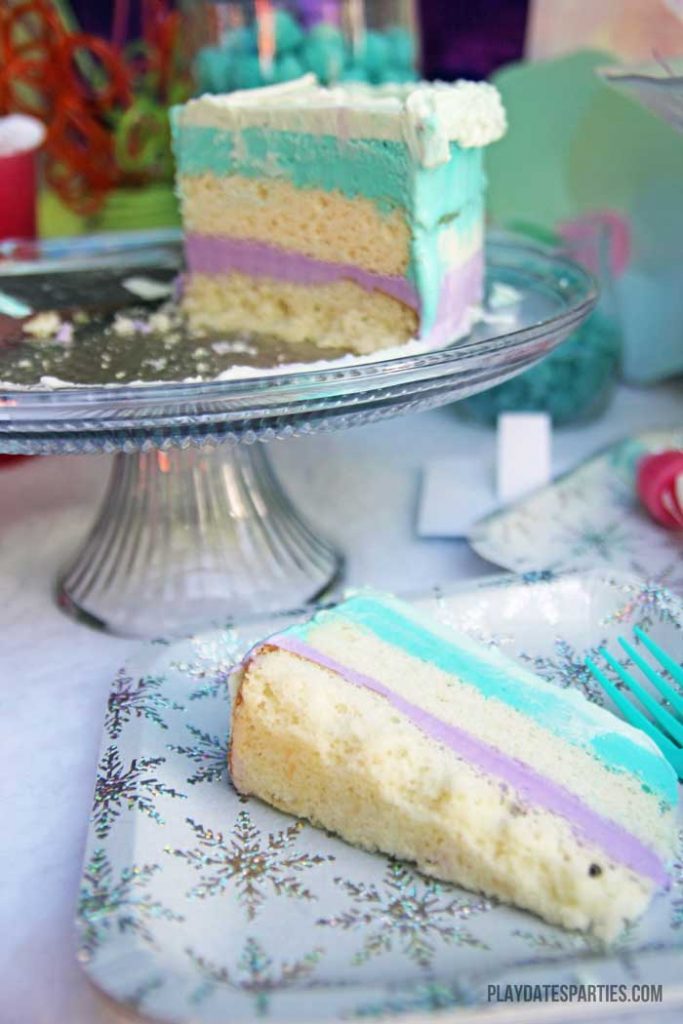
- To stick with the Frozen theme, the ice cream was dyed in shades of blue and purple.
- Instead of chocolate cake, I used white cake to keep the color scheme simple. (Though chocolate cake would have been very pretty with the blue and purple ice cream!)
- To stick with the Frozen theme, the ice cream was dyed in shades of blue and purple.
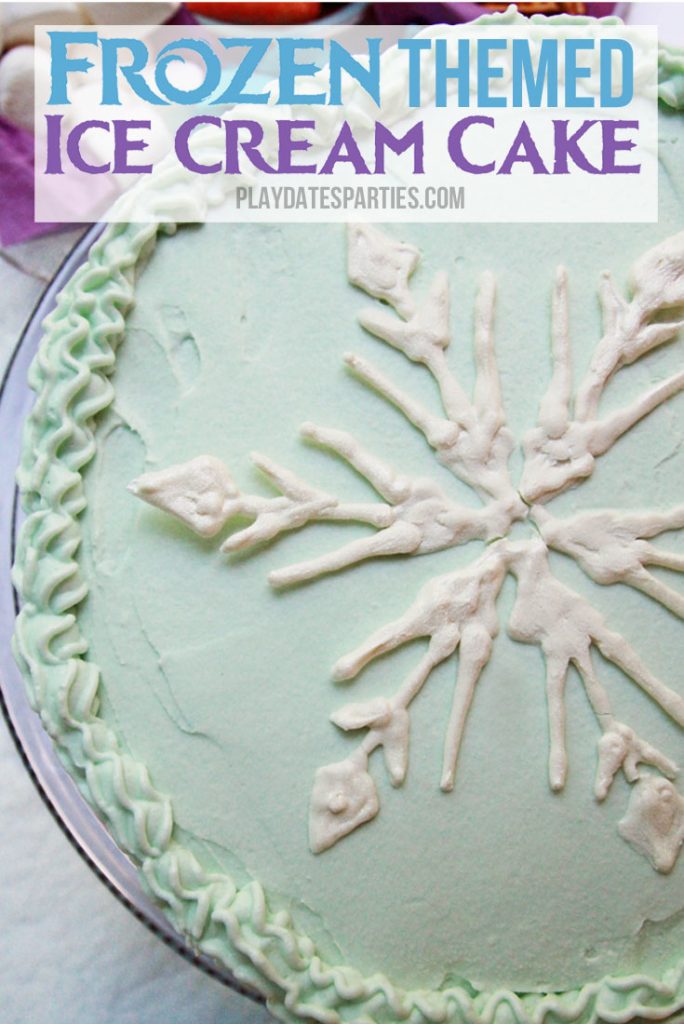
- Instead of the M&Ms, I added a candy snowflake to the top.
[bctt tweet=”Make your own #Frozen themed birthday #cake! #kids #kidsparties #Disney” username=”PlayDatesParty”]
I found myself going through the instructions and images at the original post over and over again, so I thought it would be good to share a short video of how to make the cake. The video combined with the instructions and notes down below should be all you need to make your own amazing Frozen inspired ice cream cake!
How to Make a Frozen Inspired Ice Cream Cake
(Adapted from The Gunny Sack)
Ingredients
- 2 boxes white cake mix, prepared in a 10-inch round springform pan
- 1 quart vanilla ice cream, divided in half for each color
- Gel food coloring in Teal and Purple
- Whipped Cream frosting
- White candy melts
Materials:
- 10-inch springform pan
- parchment paper
- black and white image of a snowflake
- piping bags or gallon-sized ziploc bags
- wax paper
Directions:
- Before assembling the cake, allow the ice cream to soften for a few minutes. (see notes below)
- Using a serrated knife, cut the tops off the cakes to make them as level as possible.
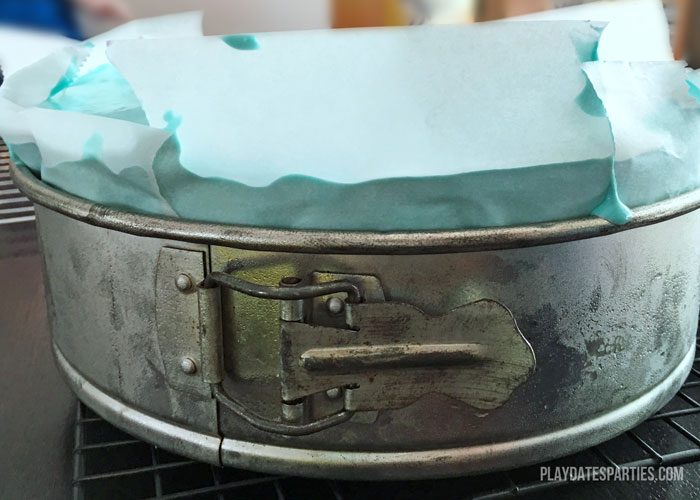
- In the same springform pan used to bake the cakes, create a ‘star’ of wide parchment sheets to cover the base of the pan.
- Add the first cake layer to the base. Fold the parchment sheets up the sides of the cake and add the side of the springform around the parchment.
- Tint one-half of the softened ice cream with purple gel food coloring and quickly spread on top of the cake base.
- Add the second cake layer on top of the purple ice cream. (see notes)
- Tint the other half of the softened ice cream with teal gel food coloring and spread over the second cake layer. Freeze until firm (at least 4 hours or overnight)
- While the cake is in the freezer, prepare your favorite whipped cream frosting (or use the original frosting recipe), tinting it a lighter shade of teal than the ice cream.
- When it is time to frost the cake, remove the outside rim of the springform pan and parchment paper. Complete the next two steps as quickly as possible to avoid letting your ice cream melt too much.
- Starting at the top of the cake, use an offset spatula to spread 3/4 of your whipped cream frosting over the top and sides of the cake.
- Using a pastry cutter, knife, or large offset spatula, scrape the frosting off of the sides of the cake to reveal the layers of cake, ice cream, and frosting. Return cake to freezer for at least 1 hour. Refrigerate remaining frosting until cake is firm.
- While the cake is in the freezer, prepare your chocolate snowflake: Place a piece of wax paper on top of a black-and-white snowflake image that is 6 to 8-inches in diameter. Melt white candy melts in the microwave until smooth. Add candy melts to a piping bag or ziploc bag and cut a small hole in the bottom. Carefully trace the snowflake image on the wax paper. Cool in the refrigerator until it’s time to place the snowflake on the cake.
- When the cake and frosting have firmed up, put the remaining 1/4 of the frosting in a piping bag or gallon-sized ziploc bag fitted with a star tip. Pipe a decorative rim around the top edge of the cake. Very carefully, remove the snowflake from the wax paper and place on top of the cake.
[bctt tweet=”A #Frozen themed birthday party held during the summer NEEDS an ice cream cake! #desserts” username=”PlayDatesParty”]
How long did it take?
Due to multiple steps and freezing time, I started making the cake two days before the party.
- Baking the cakes took 20 minutes active time, plus at least 1 hour to cool
- Assembling the ice cream cake took about 45 minutes active time, plus overnight to firm up
- Making the frosting took about 15 minutes.
- Frosting and decorating the cake: about 1 hour active time (including some mistakes)
Total time: About 2.5 hours active time between two days.
How much did it cost?
- Cake mix: $2.60
- Ice cream: $2.50 (yes, we bought the cheap stuff)
- Whipped Cream Frosting: $5
- Wilton Gel Food Coloring: $6.20
- White candy melts: $7
Total Cost*: $23.30
* Total cost is based on the whole price for items that most of us would not keep on hand. However, there will be plenty of leftovers from the candy melts, food coloring, and some of the whipped cream ingredients to make many other projects
Notes:
- Make sure you are prepared with everything you need before starting to assemble your Frozen inspired ice cream cake. The ice cream once tinted will need to be spread and frozen very quickly to avoid ice crystals. You may also want to put the cake in the freezer while tinting your second batch of ice cream.
- Baking the cakes in the springform pan helps to ensure that your cake layers are the proper size for the overall cake.
- The softening time for your ice cream will depend on many factors. Richer ice cream will need more time to soften, while lower-fat varieties will take less time.
- Per the original recipe, I used about 6 cups (48 oz) of ice cream, but found that it was too much for our springform pan, and the ice cream started to overflow! The recipe above reduces the recommended ice cream quantity to one quart (32 oz) to prevent this. Be wary of this if you decide to use a full container of ice cream.
- When it comes to the candy snowflake, simpler is better. The design can be quite fragile, so thin lines and small details may break off. (I piped about 3 snowflakes before getting one that worked well enough)
- We let the cake warm up in the fridge for about 30 minutes before serving.
- Just in case the candy snowflake didn’t work, I purchased a container of snowflake sprinkles. You could easily skip the candy snowflake and sprinkle a bunch of these in the center of the cake as well.
Would I do it again?
First, I jumped into making this cake without concern for cost. Now that I look at the total price…yikes! No more complaints about the cost of a store-bought ice cream cake. Plus, it was a LOT of work to pull together.
That said, there’s something priceless about making a completely unique cake for your child’s birthday. And the cake got rave reviews from everyone. So, yes, I would definitely make this cake again. But the price and effort involved make it a special-occasion-only cake.
Now It’s Your Turn
Make your own blue and purple Frozen Inspired Birthday cake, or change things up with your favorite colors. Either way, this cake is going is the perfect choice for a summer birthday party.
Have you ever made an ice cream cake before?
What kind of cake would you serve for a Frozen themed party during the summer?
Subscribe via
Bloglovin, Facebook, and Twitter
to get more updates!


Disney Magic Mommy says
I really should try this! though maybe not in frozen colors, I have two boys. It seems pretty easy though, and might be a really great summer desert!!
Mother of 3 says
That looks yummy! Pinned.
Jen Gregor says
I love this! Such a good idea for a frozen party.
Fiona Cambouropoulos says
All my kids would go nuts for this!
Jess says
This is SO cute! 🙂
I would love for you to share this with my Facebook Group for recipes, crafts, tips, and tricks: https://www.facebook.com/groups/pluckyrecipescraftstips/
Thanks for joining the 100th Cooking and Crafting with J & J!
Jay @ JayTriedAndTrue says
Oh how fun! I would love you to share this with Smell Good Sunday https://jaytriedandtrue.blogspot.com/2017/06/smell-good-sunday-23.html
Brittney says
This is such a pretty cake. I have never made an ice cream cake, but that may change very soon. What part of it was the most complicated?
Sandra L Garth says
This was quite an undertaking and you did a great job. It also looks very delicious! Thank you for sharing with us this week at Celebrate Your Story, and I hope your week is going great.
patti @ pandora's box says
Wow!…this is such a pretty cake!
Gentle Joy Homemaker says
A fun and colorful cake! 🙂
Tammy @ Just Being Myself says
What a great and awesome cake! More power to you for making it all from scratch I know I wouldn’t of. My kids are way to old for stuff like this now.
Came over from Paula’s No Rule’s Weekend Blog Party!
Theresa says
Nice Ice cream cake & would be perfect for a kids party. Thanks for sharing at the #InspirationSpotlight party @DearCreatives Pinned & sharing
Menaka Bharathi says
Yes would definitely love to try it.. I m sure her next b’day this ice cream cake would be a hit..Thanks for sharing the recipe..
https://www.simpleindianmom.in/top-10-tips-sound-sleep-pregnancy/
Christina Makri says
Even it is a little bit difficult for me I would give it a try! Thank you for sharing 🙂
Amy says
This is ah-maz-ing. I love it! Maybe when my daughter is a bit older I’ll give this a try. Although she has a February birthday, so I’m not sure how well that would go over… Awesome job!
Danielle says
My daughter turns 2 this next Monday and she’s crazy about Elsa!! I was searching Pinterest specifically for a frozen-themed ice cream cake so thanks Girl ?
HimalayansaltValley says
This looks amazing. Thanks for the idea.