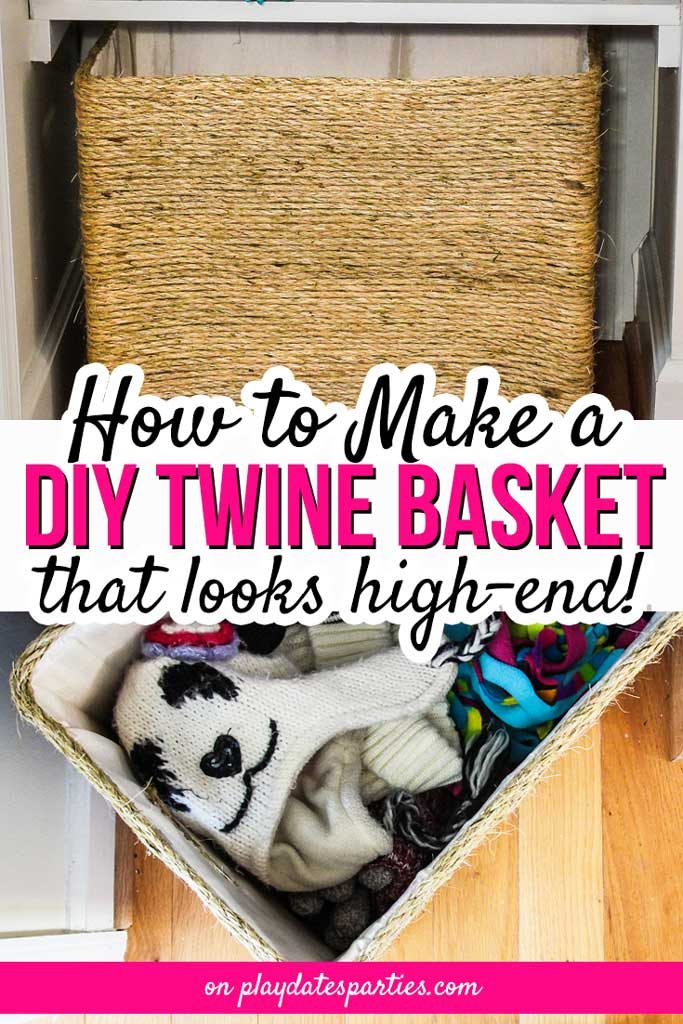
Household storage doesn’t have to be expensive. With this tutorial you will learn how to make a high-end looking DIY rope basket using an old box and twine.
I love our home. I really do! But there is one thing that makes it really annoying.
Let me back up a little bit. You see, we liver in a split foyer house, which means that right when you enter you have to choose between going upstairs or downstairs.
There’s barely room for more than one person at the door at any given moment, and there’s no coat closet on the main level.
And, we have little kids…
…who have a hard enough time remembering to put their coats on the hooks in the hallway.
So winters often turn our main living level into a mess of jackets, hats, gloves, and scarves strewn all over the place.
For many years we tried to keep the clutter at bay with a fabric storage tote, but it just wasn’t working. As items went in and out, the storage bag would lose shape and slump over, looking horribly cluttered.
Looking For A Storage Solution
When reorganizing the linen closet and open shelving last fall, I decided enough was enough and went in search for a solution that was both pretty and functional. Whatever solution we ended up with needed to fit these requirements:
- Storage that fits the open shelving at the end of the main level hallway
- Easy access for the whole family
- A system simple enough for even my 5-year-old to manage it on her own, and
- Keep the clutter almost completely hidden from sight.
The challenge is that the opening I wanted to use itself is a very awkward size at 16”H x 11.5”D x 20.5”W. And the cost of a basket that would only fit half the height of the opening can run close to $50!
Honestly, I nearly gave up on the whole project.
Inspiration Strikes
Then, one day I realized that an economy size box of baby diapers is practically the perfect size for our space.
All I had to do was find a way to turn an ugly baby box into something pretty. And after raiding my fabric stash, lots of glue sticks, some twine, and plenty of time, I had a beautiful DIY rope basket for barely more than $25!
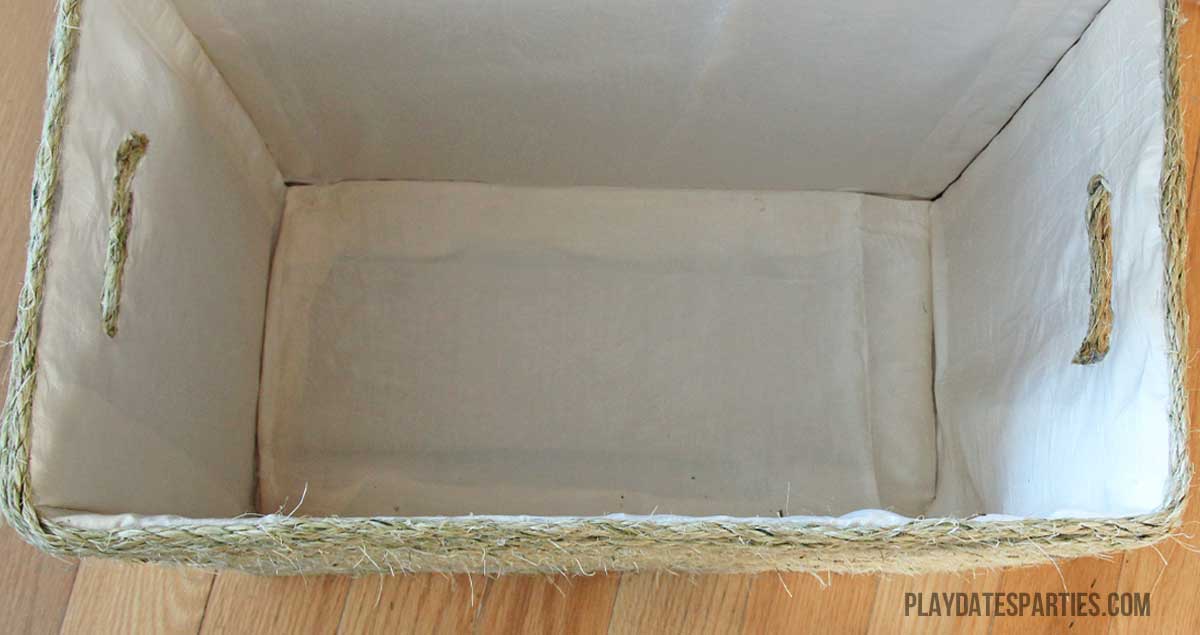
Even though this DIY rope basket is made with a cardboard box, it looks fantastic inside and out, giving the whole project a high end look.
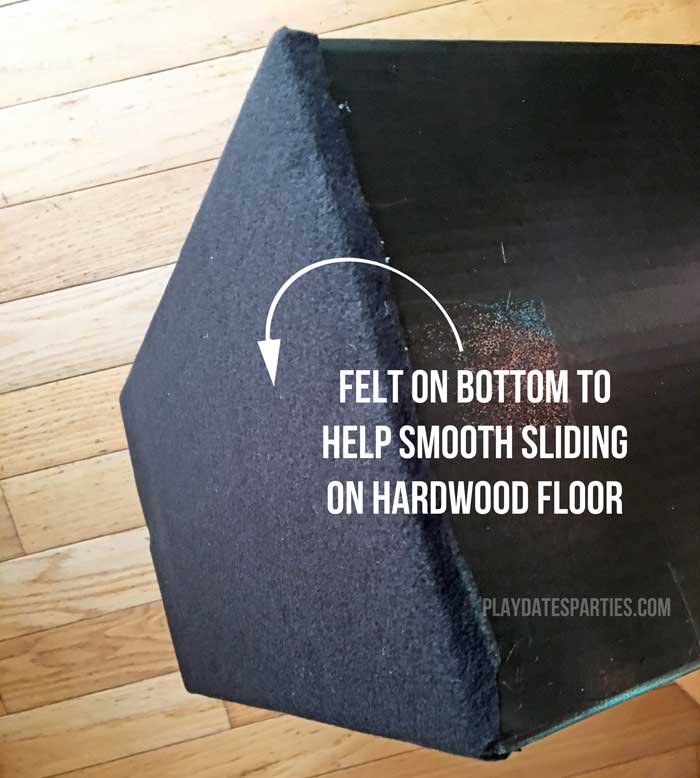
I used extra fabric to glue in a liner to make the inside pretty, and a felt bottom makes the box slide easily in and out of the shelf opening without scratching the hardwood floor.
You would never know that this used to be a diaper box!
Now everyone’s hats, gloves, scarves, and sunglasses are easy to find, and almost completely hidden from sight…well, that is when the kids actually remember to put their things in the DIY Rope Basket!
[bctt tweet=”Never overpay for #storage boxes and baskets again! #DIY #home” username=”PlayDatesParty”]
How to Make a DIY Rope Basket with Twine and an Old Box
Materials & Supplies
- Corrugated cardboard box in your desired size
- Box cutter
- Hot glue gun & hot glue (about 40 sticks of glue for a large box)
- Spray paint (optional)
- Approximately 1/2 yard scrap fabric for lining
- Large piece of scrap felt for bottom of the box
- 1/4-inch Natural twisted sisal rope (about 400 feet for a large diaper box)
Directions:
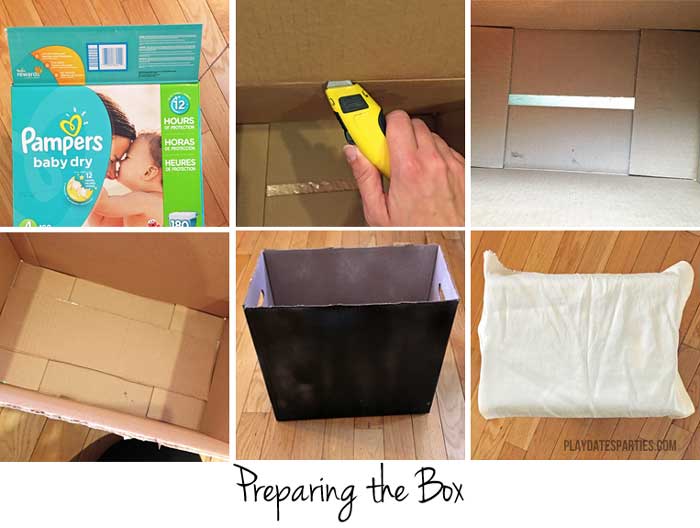
Preparing the box:
- Cut the flaps off of the box
- If the box has an opening at the bottom, glue one of the flaps over the inside of the bottom for stability.
- Spray paint the inside and outside of the box. For the inside of the box, choose a color that closely matches the fabric of the lining. For the outside of the box, choose a color you don’t mind showing between any possible gaps in the twine.
- Drape the lining fabric over the outside of each side and the bottom of the box. Cut pieces of fabric with at least 1/2 to 1 inch extra around each edge. This will give you plenty of room for a “seam”. You should end up with 5 pieces of fabric.
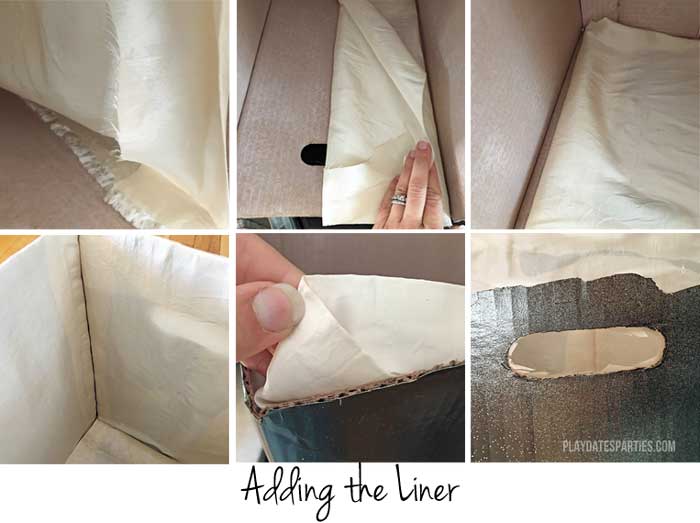
Gluing the Lining to the Box:
- Place one piece of lining fabric along the inside of one of the sides of the box. Fold your lining fabric under by 1/2 to 1 inch along one of the vertical sides and glue the folded portion as close to the corner of the box as possible.
- When the glue is dry, fold the lining fabric at the bottom of the box and carefully pull the lining fabric taught as you hot glue the fabric as close as possible to the bottom corner of the box. Stop gluing the lining when you get about an inch away from the next corner.
- Fold the final inside seam under (opposite the first glued corner), making sure the fabric is as tight as possible. Hot glue as close as possible to the corner of the box
- Repeat steps 1 through three with each of the sides of the box, finishing with the bottom piece of the box. When finished, the glued lining should look similar to sewn seams of a fabric liner.
- Fold the top edges of the fabric over the top of the box. Fold the corners of the fabric under like a present and glue each flap down onto the box.
- If your box has handles, carefully cut out the lining with scissors at the openings.
- If desired, hot glue a piece of felt to the bottom of the box before adding twine.

Wrapping the box with Twine:
- If your box has openings for handles, start by gluing a piece of twine just inside the opening, making sure to cover the edges of the liner with the twine. This should have the effect of gluing down both the lining and the twine at the same time.
- Starting at a top corner of the box, begin hot gluing the twine onto the box in sections of 6 to 8 inches at a time.
- As you wrap the box, the twine will try to unwind. After applying hot glue, quickly twist the twine back into place and hold it tightly against the previous row to hold in place. This will also help to reduce gaps. Finish wrapping at a corner of the box for the cleanest look possible.
- Wrapping twine around the handles: As you approach a handle, cut the twine at an angle and glue down tightly. Re-start the row at the opposite side of the handle and continue to glue around the box, cutting again as you approach each opening until you can wrap the twine underneath the opening in as straight a line as possible.
- Seaming together additional rolls of twine: Large boxes will require multiple rolls of twine. To create a nearly seamless look, make sure the end of the previous section of twine is glued securely. Then, snip off a small portion of the beginning of the section at an angle. Carefully add the second section directly against (almost overlapping) the previous piece of twine.
- As you approach the bottom of the box, you may find that your rows are not completely straight. Seaming in a row or two of twine along the sides of the box will help. (Note: Try to avoid gaps by making sure the twine is always as close as possible to the nearby rows.)
Now It’s Your Turn
I’m so glad I didn’t have to spend a fortune looking for a store-bought solution to our storage problem. And I love that this DIY rope basket can be adapted to fit any space! But I want to know…
Do you have any awkward spaces that would love a DIY rope basket?
What is the most difficult storage solution you’ve had in your home?

[pt_view id=”501df700ea”]

Subscribe via
Bloglovin, Facebook, and Twitter
to get more updates!


Janine Huldie says
I have in the past caved and bought a few of these boxes at our local Marshall’s for a bit cheaper, but still they are quite costly. Never thought to repurpose and old box though and make our own. But now I totally want to do this as it looks easy enough and inexpensive enough, as well. Thanks Leslie for the brilliant money saving idea!! 🙂
Leslie says
I’ll still buy them occasionally at HomeGoods or Marshalls, but sometimes you just can’t find the right size.
ShootingStarsMag says
This is such a clever idea! I love that it used to be a diaper box. You’re right…you would really never know! Thanks for the step-by-step guide.
Leslie says
We have a lot of diaper boxes around here…. The inside and bottom lining make all the difference in hiding the original purpose!
Marina @ Parental Journey says
It looks great – and really simple to make!
Leslie says
It definitely doesn’t take any special skills. The most difficult part was getting the liner to line up right at the corners. But since it’s filled with stuff that doesn’t have to look perfect, right? Thanks so much for stopping by!
Tammy says
You did an amazing job transforming that old diaper box into a beautiful storage unit that perfectly fits your space. No one would ever believe it started as an old box…it looks stunning!! And…at a much better price point. Great job!
Leslie says
Thanks so much, Tammy! I was motivated first by the awkward size, and second by the price. You know what they say…necessity is the mother of invention!
Jen says
OK so you want to know something weird? I had a dream last night that I was a basket weaver, but I kept thinking I have no idea how to do that? Now I do1 The basket you made turned out so cute and I had better get cracking on one of my one, in case my dream is a premonition or something 🙂
Leslie says
Haha! That’s too funny! It took enough patience to make this box, I don’t know if I could handle actually weaving one…
Angie ~ ambient wares says
Now, this is what I’m talking about! It looks just like you bought it at a store! Awesome 😀 pinned!
Leslie says
Thanks so much Angie! I may even have another version or two in our future, so stay tuned!
Jess says
This is so cute! I love the idea!
I would love for you to share this with my Facebook Group for recipes, crafts, tips, and tricks: https://www.facebook.com/groups/pluckyrecipescraftstips/
Thanks for joining Cooking and Crafting with J & J!
Leslie says
Thanks so much Jess!
Carol says
You are so creative! Pinned and shared.
Leslie says
Thank you Carol!
Mother of 3 says
What a great idea! I love how it looks! Thanks for sharing at Together on Tuesdays.
Leslie says
Thanks so much for stopping by!
Mother of 3 says
Thanks for sharing with us at the Hello Fall linky party. Pinned.
Nina says
Love this idea! You are right about how expensive they can be if purchased in a store, but this one looks so professional – will have to give this a try. We just painted the inside of our front entry closet and I’ve been trying to decide the best way to store the mittens, scarves, hats, etc. so this will be perfect! Thanks for sharing this with the Thursday Favorite Things Blog Hop – I’m updating my blog this month, and will be adding lots of creative DIY projects that might be fun for you and your family. Hope you’ll stop by for a visit! Nina @ Vintage Mama’s Cottage
Leslie says
Thanks so much for hosting…and for stopping by!
Lisa Ehrman says
I love the finished box! I love the way this could be done with any-size space. Just finding the right size box, and following your directions will help us all to solve those pesky storage problems. Thanks for linking up at Together on Tuesdays 🙂
Leslie says
It really can be frustrating to find the right size box. Thanks so much for hosting!
Helen at the Pleasures of the NW says
Totally pinning this!! Thanks for sharing on the Pleasures of the NW’s DIY party.
Leslie says
Thanks for pinning and thanks for stopping by!
Adelina Priddis says
Wow! I love this so much. I’m wondering if I have enough twine already. I know I have plenty of boxes, lol. I am curious though, why spray paint the inside and outside if you just cover it up?
Leslie says
Great questions Adelina! I spray painted the inside of the box because the lining fabric I used was fairly thin and a bit sheer. It may have been overkill, but I wanted to make sure that there weren’t any dark spots showing through the fabric. As for the outside of the box, there’s almost no way you can guarantee that something round – like twine – will cover 100% of the box. There are likely to be spots showing through. I wanted to make sure that if that happened, the color showing through wouldn’t be the bright colors that are on the outside of the diaper box.
Smiling Notes says
This is such a neat idea! Loved it. Definitely going to try it out
Crystal Green says
I love this! I like how simple it is to make. I also think even my NON-crafty self can make them.
Christine says
Great way to upcycle an old box that doesn’t match your decor. You did a great job. Thanks for linking up with the DIDI Crew!
Audra @ Renewed Projects says
Love the look of this box! I’ve done fabric wrapped boxes for the same idea and appreciate the tricky work around the inside corners. Never thought to add felt to the bottom, great idea!
Jann Olson says
it really turned out nice! You can do so much with rope and jute. Thanks for sharing with SYC.
hugs,
Jann
Sam - Raggedy Bits says
Oh the possibilities are endless with the sizes you can make!! What a great idea and storage problem saver!!
Thank you so much for sharing your DIY Twine Wrapped Storage Boxes with us over at Waste Not Wednesday!
Dellene Becker says
What a great idea! we recently moved so have a lot of empty boxes just waiting for something like this 🙂
Jodie Fitz says
I never would have thought of that. GREAT idea! And, it makes an adorable gift basket that’s useful afterwards…..
Thanks for sharing at last week’s Reader Tip Tuesday. I always look forward to your ideas and shares. Looking forward to seeing you at this week’s party: https://www.jodiefitz.com/2018/09/25/reader-tip-tuesday-weeks-craft-recipe-party-14-2-2-2-2-2-2-2-2-2-2-2-2-2-2-2-2-2-2-2-2-2-2-2-2-2-2-2-2-2-2-2-2-2-2-2-2-2-2-2-2/
Elise Ho says
I have several boxes such as this. However, they are all purchased. Perhaps I need to get into DIY