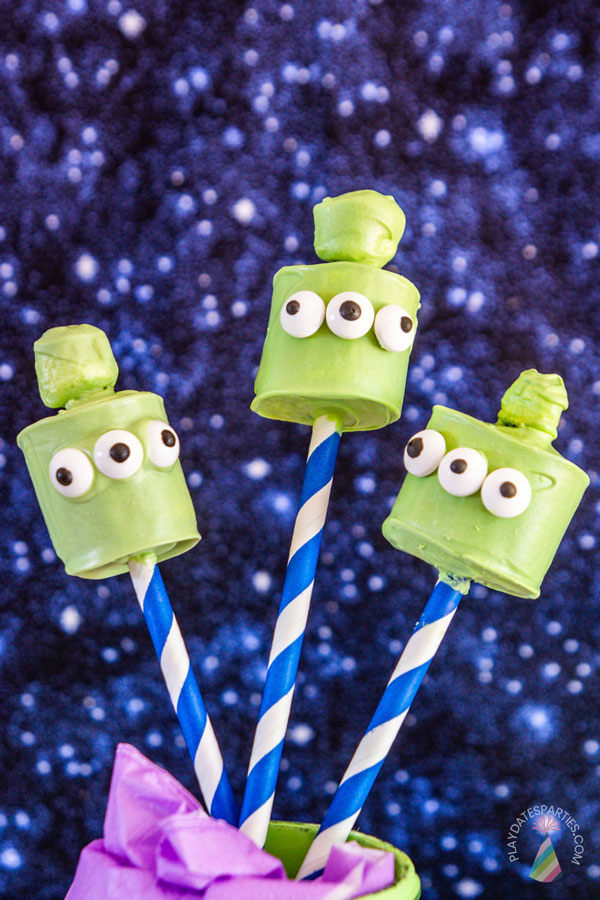
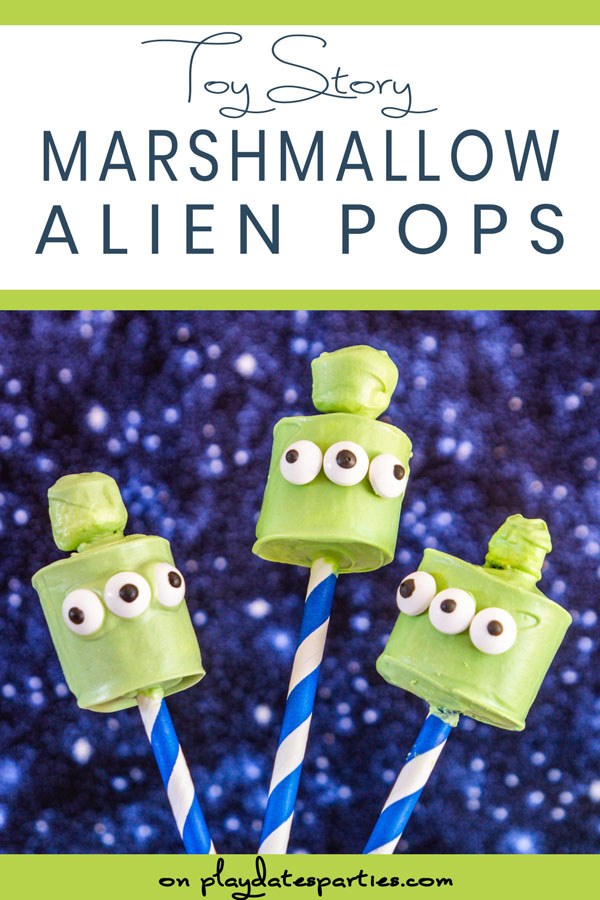
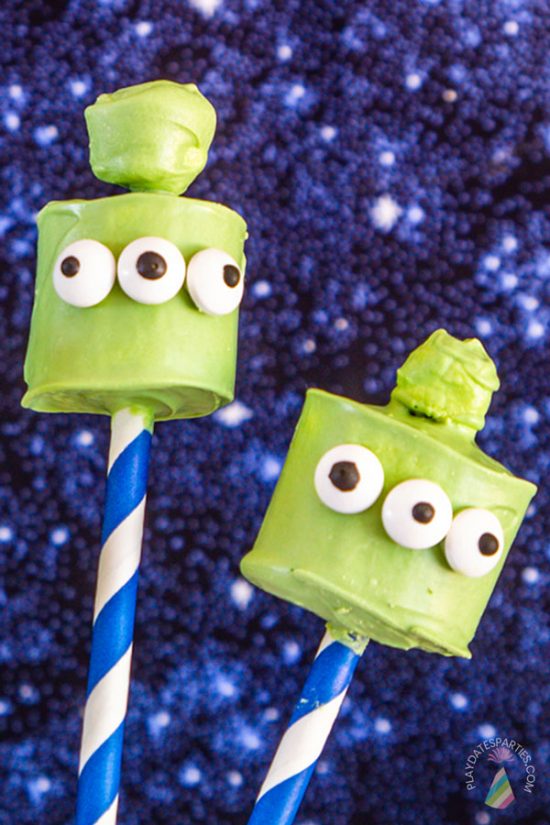
Make a bunch of these fun Toy Story alien marshmallow pops as an out of this world party snack or favor for your next Halloween or birthday party. They’ll look fabulous on your buffet, and the kids will blast off with excitement!
Halloween is just around the corner, which means it’s time to start pulling out all the fun class treats!
And for this Halloween I thought it would be fun to revisit the Toy Story alien marshmallow pops that I made for my nephew’s birthday, now 8 years ago!
Of course, with time has come a lot of wisdom, which means these marshmallow pops look a lot more fun than the original, and are actually easier to make too!
Let’s get on to the fun stuff, shall we?
How to Make Marshmallow Pops:
Once you’ve had a bit of practice, and gotten down the rolling technique discussed below, these Toy Story Alien Marshmallow Pops are actually very easy to make.
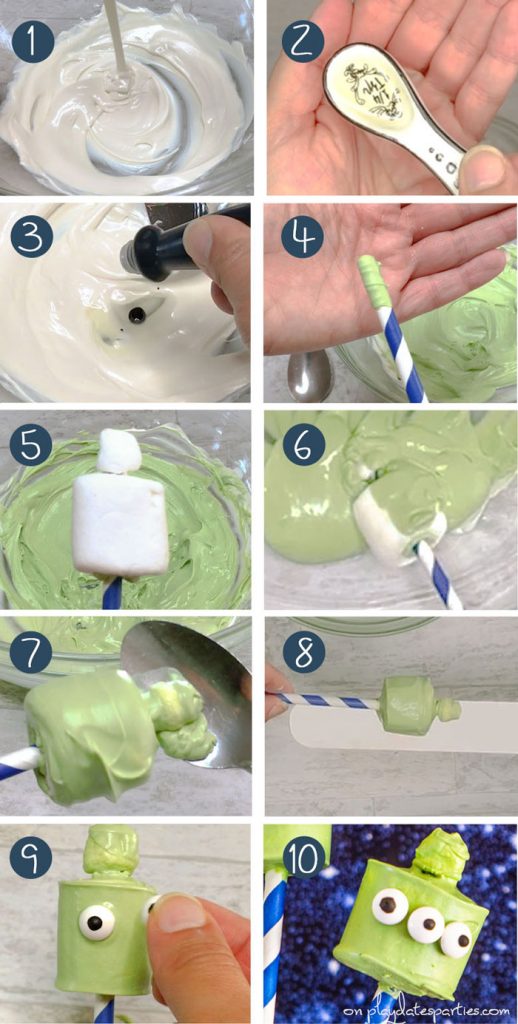
First, Melt Your Candy Melts
I used a microwave for these marshmallow pops, but you can also use a double boiler (like I did for these chocolate truffles.)
Just remember to keep the temperature low, and to slowly melt the chocolate in small bursts, stirring in between heating. If your chocolate gets too hot, it will easily scald and will be ruined.
In most cases, you can pull the candy melts out of the microwave while they’re still lumpy. They’ll magically finish melting as you stir them.
If Your Candy Melts Are Too Thick:
We’re working with white chocolate/candy melts for this project, and those are extra finicky when melting.
There are two main reasons that chocolate doesn’t melt smoothly:
- It’s gotten too hot and is burnt (see above), or
- Water got into the chocolate, causing a chemical reaction that results in seizing.
Water can get into melting chocolate through steam from a double boiler, or in the food coloring you use. That’s right, most food coloring is water-based, which means it is highly likely to make your chocolate clump up…kind of like this:
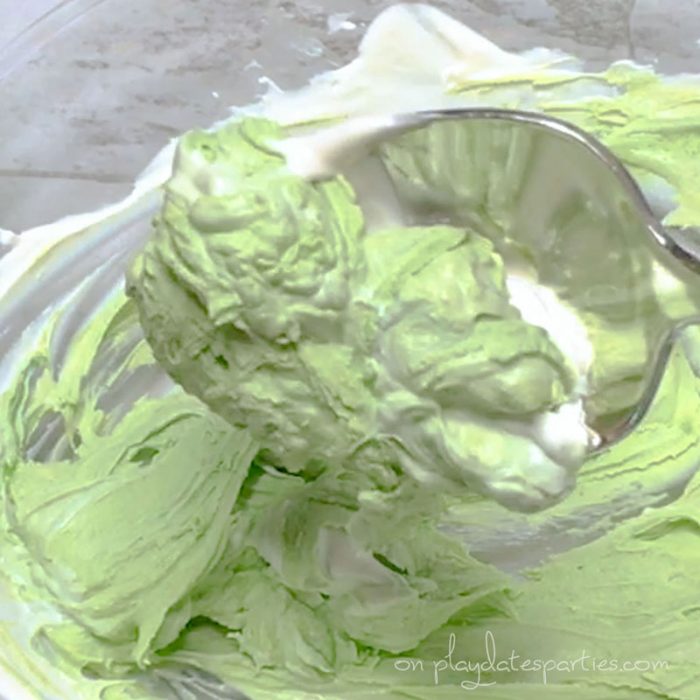
You can avoid this by using pre-colored candy melts or oil-based food coloring. But, if you’re like me, you’ve already got more than enough food coloring sitting around and don’t need any more.
You can still make these with gel food coloring! (I know, because I did!)
Here’s what I did to reduce and/or fix any seizing:
- After the candy melts were smooth, I added a tiny bit of oil to the bowl, and then added the food coloring directly into the oil. This increased the fat to water ratio, which helps to keep white chocolate smooth
- If the candy melts still seized (which they sometimes do), I then stir in a little bit more oil, stirring constantly until things are smooth enough to dip.
- You can also try adding a little bit of shortening to your chocolate to help smooth it out again.
Just know that after adding a water-based food coloring, you’re not likely to get your chocolate back to a pouring consistency.
As I mentioned above, you can always use pre-colored candy melts. That was actually my original plan, but I couldn’t find any when I went to make these, so food coloring it was!
Prepare Your Marshmallows
Dipping the tip of the paper straw into the chocolate before piercing the marshmallow helps to make sure they stay put and don’t roll around on the straw as you coat the marshmallows with chocolate.
For these little aliens, I poked a jumbo marshmallow all the way through and then added a mini marshmallow on top to simulate antennae.
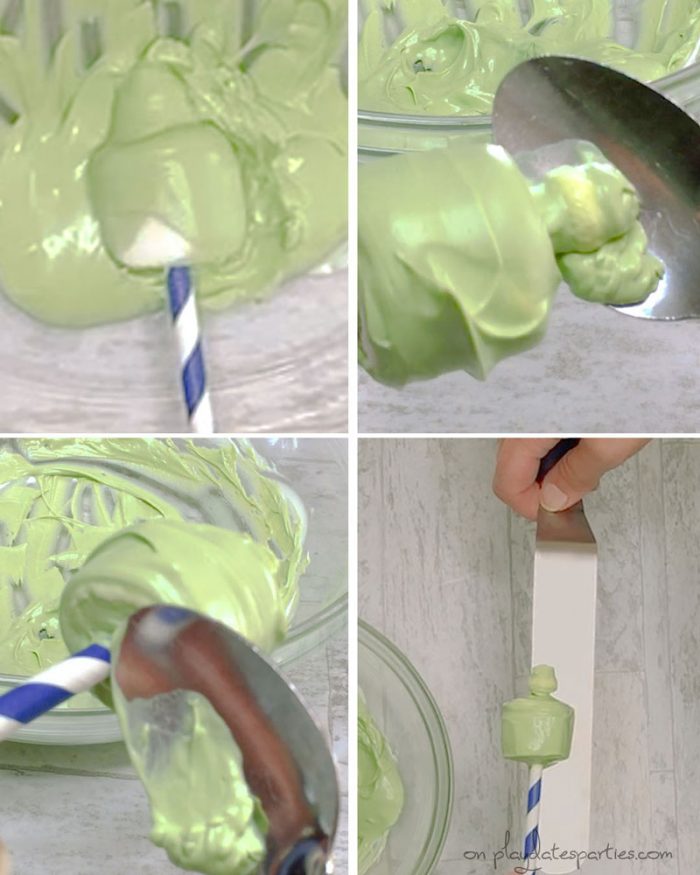
Roll the Marshmallows instead of Dipping
This was hands down the easiest way to get a nice coat of candy on the marshmallows, without ending up with waaaaay too much candy.
First, you’ll roll the marshmallows in the candy melts, getting them completely coated. Then you’ll take a spoon to the mini marshmallow, and the top and bottom of the jumbo marshmallow.
Again, you’ll be rolling the marshmallows in/on the spoon instead of rolling the spoon around the marshmallow.
And then, using a large flat surface, like an offset spatula, roll the marshmallow along the edge to remove excess candy from the wide part of the marshmallow. You may need to clean up the top and bottom a second time, but the end result should be a thin and fairly smooth coat of candy.
Finally, you add the candy eyes and it’s time to let them dry!

Drying the Toy Story Alien Marshmallow Pops
When I first made these Toy Story Alien Marshmallow Pops, I put them in a tall glass to dry. But then I found, especially on hot and humid days that the marshmallows would start slipping down the straw before they were dry.
Later, I figured out that it was easier to just prop the marshmallow pops in a bowl with a saucer on top until they were at least partially dry. This way, gravity wasn’t pulling down the marshmallows.
After about 20-30 minutes, when things started to harden, I transferred the marshmallow pops to a tall glass again.
A Few More Tips for Getting the Best Alien Marshmallow Pops
Be Patient while Dipping
I strongly recommend giving yourself extra marshmallow pops and extra time to practice the technique of smoothing out the candy melts.
Once you get the hang of it, it’s easy to do, but it does take a couple tries to get it right.
Seriously…you should see my first attempt. It wasn’t pretty.
Give Yourself a Break
If you’re making these for a party at home, or for school, then please don’t stress over making everything look perfect.
The reality is that kids are going to think they’re awesome, even if they aren’t perfectly smooth.
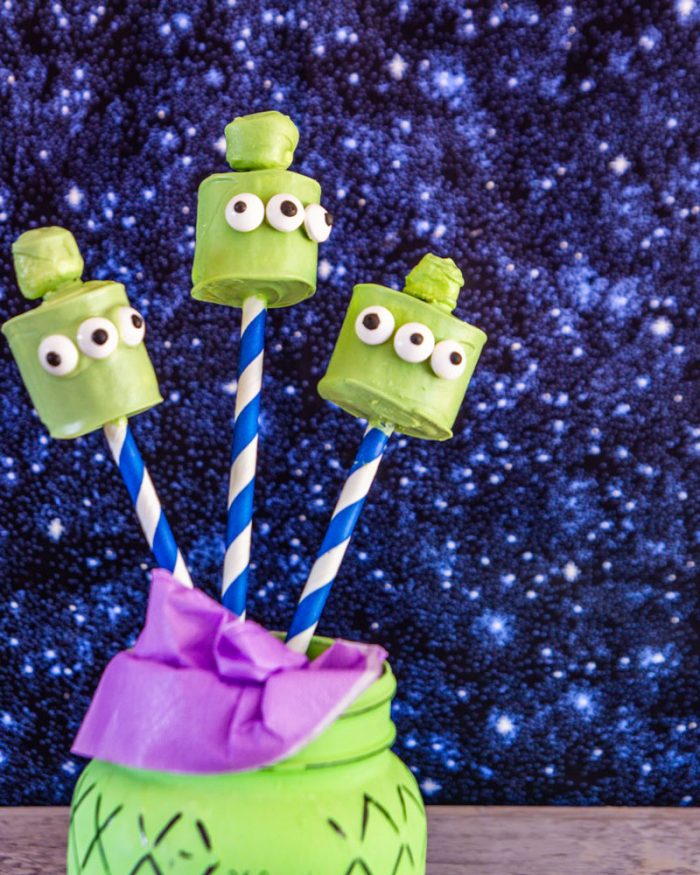
How to Display Marshmallow Pops
My favorite way to display marshmallow pops is in a coordinating glass or painted jar. I actually painted the jar above with chalk paint and added purple tissue paper inside to replicate the Buzz Lightyear colors from Toy Story.
Here are a few other cute ways to display any marshmallow pops:
- Add candy or brightly colored cereal to a clear vase and have the marshmallow pops poke out from there
- Cover a foam block with tissue paper (kind of like wrapping a present) and then poke the marshmallow pops into the foam in rows,
- Lay the marshmallow pops neatly on a plate,
- Place a thin layer of styrofoam in a rectangular serving dish, cover the styrofoam with plastic wrap and then candy, brightly colored cereal, or even Easter grass, and poke the marshmallow pops through into the styrofoam (here’s an example),
- If you really want to get fancy, you can also use a cake pop stand, which is specifically designed to display treats like these!
How Long do Marshmallow Pops Last?
Marshmallow pops will stay fresh at room temperature for several days, so you can make these treats up to a week in advance. Just make sure the room isn’t hot or humid enough that the candy starts to get tacky.
More Recipes & Party Inspiration:
- Free Printable Halloween Sign
- Crescent Roll Mummy Hot Dogs
- Clementine Pumpkins (2 Ways!)
- The cutest Halloween Party Favors
- Halloween Party Songs for All Kids
Toy Story Alien Marshmallow Pops
Toy Story Alien Marshmallow Pops
Make a bunch of these fun Toy Story alien marshmallow pops as an out of this world party snack or favor for your next Halloween or birthday party. They’ll look fabulous on your display, and the kids will blast off with excitement!
Ingredients
- 3 oz candy melts
- 4 drops Green food coloring, I used gel based food coloring but oil based would be easier to work with
- 1-2 Tbsp Vegetable oil
- 8 + Large marshmallows
- 8 + Mini marshmallows
- Candy eyes
Instructions
Prepare the Candy Melts
- Heat the candy melts in a microwave safe bowl for 30 seconds.
- Stir the candy melts and then continue to heat the candy melts in the microwave for 10 seconds at a time, stirring frequently until they are melted smooth.
- Add ¼ tsp vegetable oil
- Drop a few drops of green food coloring directly into the oil, and stir until well combined.
- If the candy melts get thick or start to seize, add a ¼ tsp of oil at a time and mix until smooth again.
Prepare the Marshmallow Pops
- Dip the end of a paper straw into the candy melt mixture and then pierce a large marshmallow all the way through, so the paper straw pokes out of the top.
- Add a mini marshmallow to the top of the paper straw and set aside.
- Repeat with remaining marshmallows and paper straws.
Coat and Decorate the Marshmallows
- If necessary, reheat your candy melts for 10 seconds at a time in the microwave at 50% power. You may also need to add a little bit more oil if they’re still quite thick.
- Once the candy melts are smooth, hold your bowl at an angle so all the candy melts puddle on one side.
- With your other hand, hold a marshmallow pop by the paper straw and carefully roll the marshmallows in the melted candy until they are completely covered.
- Using a spoon, roll the mini marshmallow inside the bowl of a small spoon to remove excess candy melts. Then use the back of the spoon to smooth the top and bottom of the large marshmallow.
- Next, roll the outside of the large marshmallow along the edge of an offset spatula to smooth out and remove excess candy melts. You may need to use the spoon again to smooth out the top and bottom.
- Finally, add three candy eyes to the marshmallow pops while the candy melts are still soft.
- Let air dry until candy melts are firm, about 1-2 hours
Notes
To avoid chocolate that is too thick for dipping, oil-based food coloring or pre-colored candy melts are recommended.
Don't forget to check the tips in the post for how to handle candy melts that are super thick!
Nutrition Information:
Yield:
8Serving Size:
1 gramsAmount Per Serving: Unsaturated Fat: 0g
Now It’s Your Turn
These Toy Story alien marshmallow pops are perfect for class parties, as a Halloween treat, or even as a fun centerpiece for a space or Toy Story themed party. Seriously, your kids are going to go nuts for them!
Do your kids love marshmallow pops, too?
Have any questions? Ask below in the comments!


Beth says
K, these are adorable!! So fun for my Little’s class party!
Anita says
These are simply too cute! I’m an adult and even I want to join the blast-off party! 🙂
Tisha says
How fun are these!!!! So great for a toy story birthday party or even a Halloween treat!
Patty at Spoonabilities says
These are ADORABLE! What a fun treat for a party!
Haley D. Williams says
These are so fun for Halloween and kids parties! The step by step photos are really helpful.